Sanyo FWBP505F Quick Start Guide
Sanyo FWBP505F Manual
 |
View all Sanyo FWBP505F manuals
Add to My Manuals
Save this manual to your list of manuals |
Sanyo FWBP505F manual content summary:
- Sanyo FWBP505F | Quick Start Guide - Page 1
supports the following region codes. - Blu-ray Disc™: "A" - DVD: "ALL" or "1" • Clean the disc. If you do not find a solution above, please visit our website sanyo-av.com for the Online Owner's Manual. Please download it and then refer to "TROUBLESHOOTING" section for more information. Servicing - Sanyo FWBP505F | Quick Start Guide - Page 2
this product. If you are interested in obtaining GPL source code used in this product, please contact FUNAI SERVICE CORPORATION 2425 Spiegel Drive, Groveport , OH 43125 [email protected] See the Online Owner's Manual for details: sanyo-av.com Instrucciones De Seguridad El modelo y el número
-
 1
1 -
 2
2
 |
 |

2
3
1
Please Wait...
AV/SOURCE
Welcome!
Next
Cancel
This unit is ready for initialization. Please
follow the on-screen instructions.
Initialization
Please select your language for on-screen
display.
English
Español
Français
Return
Language
HDMI1
1
Printed in China
ECM00UL
2VMN00298
★★★★★
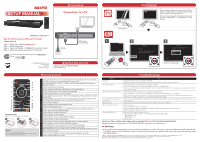
INSERT BATTERIES
Install 2 AAA (1.5V) batteries (not supplied)
1
2
3
See the Online Owner’s Manual for details:
sanyo-av.com
Step 1 Please visit website
sanyo-av.com
Step 2 Select Downloads.
Step 3
Type in the Model # “FWBP505F” and click “Search”
.
Step 4
Select the Manual, and click on “Download”
.
For product recycling information, please visit -
sanyo-av.com
Click on
SETUP MANUAL
FWBP505F / FWBP505F K
• Remote Control (NC088UH/NC088UL)
• SETUP MANUAL
© 2016 Funai Electric Co., Ltd.
C
onnections
S
upplied
A
ccessories
Connection to a TV
AC plug
HDMI cable
(not supplied)
R
emote
C
ontrol
1
Press to Turn On the unit, or to switch the unit into Standby mode. (To completely
Turn Off the unit, you must unplug the AC power cord.)
2
During Playback (Blu-ray Disc™ or DVD), press to select the Menu (Top menu or
Pop menu/menu).
3
Press to select items or settings.
4
Press to display the Number Select Menu or the Search Menu.
5
During playback, press to Fast Reverse the playback.
6
Press to start playback or resume playback.
7
During playback, press once to return to the beginning of the current Title, Chapter,
Track or File.
During playback, press twice to return to the previous Title, Chapter, Track or File.
During the JPEG playback, press to return to the previous File.
8
Press to Stop playback.
9
Press to Display the on-screen display menu.
10
Press to select Repeat mode.
11
Press to activate shortcut keys on some BD-video functions. When a file list is
shown, press to switch between pages.
12
Press to Open or Close the disc tray.
13
Press to display the Home Menu.
14
During playback, press to display the Play Menu.
15
Press to confirm or select menu items.
16
Press to Return to the previously displayed menu or screen function.
17
During playback, press to Fast Forward the playback.
When playback is in pause, press to Slow Forward the playback.
18
During playback, press to Skip to the next Chapter, Track or File.
When playback is in pause mode, press to Forward the playback picture by picture.
19
Press to Pause playback.
20
Press to select the Audio Channel (such as audio languages) on a disc.
21
Press to select Subtitles on a disc.
T
roubleshooting
Problem
T ip
No power.
• Check the AC power cord, if it is properly connected.
•
Unplug the AC power cord, and wait for about 5-10 seconds. Plug it back in and attempt to Power On the unit.
No sound or picture.
• Make sure both the TV and Blu-ray Disc™ player are Turned On.
• Confirm the connections to the TV are made properly as
shown in CONNECTIONS.
• Check to see whether the connected TV or another device supports HDCP.
(This unit will not output a video signal unless the other
device supports HDCP.)
No reaction to the remote control.
• Confirm that the player’s AC power cord is plugged into a power outlet.
• Check the batteries in the remote control, and make sure they are inserted properly by + or - symbols.
• Aim the remote at the unit’s remote receiver.
Then press any arrow key and confirm the Power-On indicator dims and blinks when a
remote button is pushed.
This confirms that unit is receiving the remote IR signal.
No high-definition video signal on
the TV screen.
• Does the disc contain high-definition video and the TV support it? High-definition video is only available when the disc contains it and
the TV supports it.
Distorted picture.
• Sometimes a small amount of picture distortion may appear.
This is not a malfunction.
No sound or distorted sound.
• Adjust the volume.
• Check the HDMI connection as necessary.
• Make sure the HDMI cable is not plugged into an HDMI-DVI adapter which does not handle Digital sound.
• Check the settings in “Audio Out” menu.
Cannot play back a disc.
• Make sure that the product supports the disc.
• Check the region code of the disc.
This unit supports the following region codes.
-
Blu-ray Disc™:
“A”
-
DVD:
“ALL” or “1”
• Clean the disc.
SANYO is a registered trademark of SANYO Electric Co., Ltd. and is used by Funai Electric Co., Ltd. and Funai Corporation, Inc. under license from SANYO Electric Co., Ltd.
Any liability related to SANYO products, including design and quality, is the sole responsibility of Funai Electric Co., Ltd. and Funai Corporation, Inc.
Please contact Funai Corporation, Inc. for any questions or claims related to SANYO products: sanyo-av.com
If you do not find a solution above, please visit our website
sanyo-av.com
for the Online Owner’s Manual.
Please download it and then refer to “TROUBLESHOOTING” section for more information.
Servicing
• If this unit becomes inoperative, do not try to correct the problem by yourself.
There are no user-serviceable parts inside.
Eject the disc
(if possible), disconnect the USB Memory Stick (if connected), place the unit into standby mode, unplug the power plug, and then please
visit:
sanyo-av.com
I
nitial
S
etup
Initial Setup
Please locate the Source / Input / AUX / Video
button on TV’s remote control. The button may
vary on the TV brand and model.
Once you have located the button, press until
you see “Please Wait...” or “Welcome!” on the
Screen.
Power Button
Select your language.
Note(s)
• Do not mix old and new batteries.
• Do not mix alkaline, standard (carbon-zinc) or rechargeable
(ni-cad, ni-mh, Li-ion, etc.) batteries.
1
12
13
14
16
17
2
3
4
11
15
18
19
5
6
7
8
20
21
9
10