SanDisk Clip User Manual
SanDisk Clip - Sansa Clip - Digital Player Manual
 |
UPC - 619659041007
View all SanDisk Clip manuals
Add to My Manuals
Save this manual to your list of manuals |
SanDisk Clip manual content summary:
- SanDisk Clip | User Manual - Page 1
Sansa® Clip User's Manual Technical Support U.S.: 1-866-SANDISK (726-3475) Worldwide: www.sandisk.com/techsupport For more information on this product, please visit www.sandisk.com/sansa. Part Number: Clip-7UM-ENG - SanDisk Clip | User Manual - Page 2
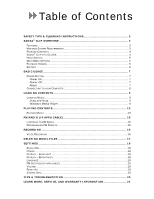
CONTENTS 4 SANSA® CLIP AT A GLANCE 4 HOLD SWITCH 5 MAIN MENU OPTIONS 5 PLAYBACK SCREEN 5 BATTERY 6 BASIC USAGE 7 POWER BUTTON 7 Power On 7 Power Off 7 Reset 7 CONNECTING TO YOUR COMPUTER 8 LOADING CONTENTS 9 LOADING MUSIC 9 Drag and Drop 9 Windows Media Player 9 PLAYING CONTENTS - SanDisk Clip | User Manual - Page 3
Table of Contents GETTING TECHNICAL SUPPORT 21 SANDISK LIMITED WARRANTY 21 END USER LICENSE AGREEMENT 22 - SanDisk Clip | User Manual - Page 4
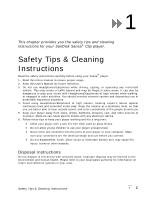
you the safety tips and cleaning instructions for your SanDisk Sansa® Clip player. Safety Tips & Cleaning Instructions Read the safety instructions carefully before using your Sansa® player. 1. Read this entire manual to ensure proper usage. 2. Keep this User's Manual for future reference. 3. Do not - SanDisk Clip | User Manual - Page 5
allows users to store data on the internal memory. • Works with most subscription services using WMDRM10. Minimum System Requirements • Windows XP SP2 • Windows Media Player v10 • Intel Pentium class PC or higher • CD-ROM drive • USB 2.0 port for hi-speed transfers and charging Sansa® Clip Overview - SanDisk Clip | User Manual - Page 6
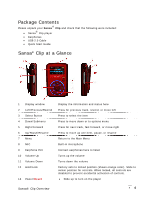
: • Sansa® Clip player • Earphones • USB 2.0 Cable • Quick Start Guide Sansa® Clip at a Glance 1 Display window 2 Left/Previous/Rewind 3 Select Button 4 Down/Submenu 5 Right/Forward 6 Up/Pause/Resume 7 Menu 8 MIC 9 Earphone Port 10 Volume Up 11 Volume Down 12 Hold/Lock 13 Power/Reset Display the - SanDisk Clip | User Manual - Page 7
removable clip accessory Hold Switch The Hold Switch is located on the left side of the player, and is used to prevent any accidental operation. All function keys will be disabled once the Hold Switch is moved to the lock position (Orange Color visible). All the buttons on the Sansa® Clip will not - SanDisk Clip | User Manual - Page 8
(not included) or a car adapter (not included) and you will be able to play your device while charging with one of the adapters. NOTE: Some low-power USB ports may not be able to provide enough charge power. Also note that the rechargeable batteries are not replaceable. Sansa® Clip Overview 6 - SanDisk Clip | User Manual - Page 9
you the basic usage instructions for your Sansa® Clip player. Basic Usage Power Button The power button is used to turn on or off the player, as well as resetting it. Power On Slide the Power Switch up to turn on the player. The Blue Ring will light up and the Main Menu will appear after it has - SanDisk Clip | User Manual - Page 10
player. 3. The Sansa® player will show connected on its display screen. 4. The Sansa® player will appear in My Computer as Portable Media Player. To remove the Sansa® player from your computer, simply disconnect the USB cable from the player after you have finished charging, transferring, firmware - SanDisk Clip | User Manual - Page 11
music from your computer to the Sansa® player using the drag-and-drop method or using music management software like Windows Media Player. Drag and Drop Follow these steps to drag-and-drop music to your Sansa® Clip player: 1. Connect your Sansa® Clip player to your computer. 2. Select Open device - SanDisk Clip | User Manual - Page 12
folders, as well as the files stored in the personal Music that belong to other users on your computer. Creating Playlist To create playlist for Windows Media Player, follow these steps: 1. Launch Windows Media Player. 2. Clear the List pane by clicking the Clear List pane button. 3. Click the arrow - SanDisk Clip | User Manual - Page 13
in the List pane. 7. Click Save Playlist. Transferring Playlist To transfer playlist to your Sansa® player, follow these steps: 1. Connect your Sansa® player to the computer. 2. Select Sync digital media files to this devices using Windows Media Player on initial connection. Loading Contents 11 - SanDisk Clip | User Manual - Page 14
Sync... 4. Select Personal Playlists from the dropdown menu on the left pane. 5. Highlight the playlists you want transfer to your Sansa® player, click Add then Finish. 6. Synchronization will start as soon as you click Finish. To see the Sync progress, click on Sync Results. Loading Contents 12 - SanDisk Clip | User Manual - Page 15
chapter shows you how to play music on your Sansa® Clip player. Playing Contents Playing Music Follow these steps to press-and-hold to fast forward. 5. Press | - SanDisk Clip | User Manual - Page 16
MusicEQ The Sansa® Clip player provides various EQ modes such as: Rock, Pop, Jazz, Classical, Press Menu button and select Music menu. 2. Select Playlists. 3. Select GoList to play songs saved in the Go List. 4. Press |>| button to select the song you want to remove. 5. Press Submenu button. - SanDisk Clip | User Manual - Page 17
instructions on how to listen to FM broadcast radio and to program the preset stations on Sansa® Clip player. 6 FM Radio (if applicable) The Sansa® player the Radio Mode is selected for the very first time, the Sansa® player will run an auto station searching and store the searched stations as the - SanDisk Clip | User Manual - Page 18
to use your Sansa® Clip player's built-in microphone. 7 Recording Voice Recording The Sansa® Clip has a built press Select. A pop-up window will appear on the screen. Select Yes to save recording. The recording will be saved in the RECORD/ of your media player, in compliance with all copyright - SanDisk Clip | User Manual - Page 19
This chapter shows you how to delete contents on Sansa® Clip player. Deleting Music Files There are 2 ways to delete music files. You can delete them from the player directly or using the computer. To delete music files directly from the Sansa® player, follow these steps: 1. In playback mode, press - SanDisk Clip | User Manual - Page 20
how to customize your Sansa® Clip player's settings Settings You can personalize your Sansa® Clip player's settings by scrolling down button to return to Main Menu. Power You can set the timer under Auto Power Off and Sleep settings to turn off the Sansa® player automatically when it is playing for - SanDisk Clip | User Manual - Page 21
. Reset All This will reset the player to its original factory settings. 1. Press Menu to return to the Main Menu. 2. Move to Reset All and select it. 3. Select Save to reset to factory settings or Cancel to stop. System Info This displays information regarding your Sansa® Clip (such as firmware rev - SanDisk Clip | User Manual - Page 22
Troubleshooting How do I drag music files to my Sansa® Clip player? As long as the files are WMA or MP3, they can be dragged into the Media folder. Which bit rate will the Sansa® Clip player support? The Sansa® Clip player will support 64-320Kbps for MP3 and 32-192Kbps for WMA. Why should I update - SanDisk Clip | User Manual - Page 23
11 This chapter provides information to help you get service and support for your Sansa® Clip player. Learn More, Service, and Warranty Information Getting Technical Support Before you contact Technical Support, we encourage you to read the Tips & Troubleshooting section to see if your question is - SanDisk Clip | User Manual - Page 24
" TO STOP THE DOWNLOAD PROCESS. The firmware, computer programs, device drivers, data or information ("Software") is provided to each person who downloads, uses or installs the Software ("you" or "your") under the terms of this Agreement between you and SanDisk Corporation ("SanDisk," "we," or "us - SanDisk Clip | User Manual - Page 25
is "in use" when it is either downloaded, copied, loaded into RAM or installed into the hard disk or other permanent memory of a computer or other hardware device. 2. Restrictions. SanDisk and its Licensors retain all rights in the Software not expressly granted to you. You may not modify - SanDisk Clip | User Manual - Page 26
with the instructions, may cause harmful interference to radio communications. However, there is no guarantee that interference will not occur in a particular installation. If this equipment does cause interference to radio or television reception, which can be determined by turning the equipment
-
 1
1 -
 2
2 -
 3
3 -
 4
4 -
 5
5 -
 6
6 -
 7
7 -
8
-
9
-
10
-
11
-
12
-
13
-
14
-
15
-
16
-
17
-
18
-
19
-
20
-
21
-
22
-
23
-
24
-
25
-
26
 |
 |
Sansa
®
Clip
User’s Manual
Technical Support
U.S.: 1-866-SANDISK (726-3475)
Worldwide:
www.sandisk.com/techsupport
For more information on this product, please visit
www.sandisk.com/sansa
.
Part Number: Clip-7UM-ENG