Ryobi PSD101B Operation Manual
Ryobi PSD101B Manual
 |
View all Ryobi PSD101B manuals
Add to My Manuals
Save this manual to your list of manuals |
Ryobi PSD101B manual content summary:
- Ryobi PSD101B | Operation Manual - Page 1
6-9 Maintenance 9 Illustrations 10-11 Parts Ordering and Service Back page TABLE DES MATIÈRES Avertissements de sécurité générales risk of injury, the user must read and understand the operator's manual before using this product. AVERTISSEMENT : Pour réduire les risques de - Ryobi PSD101B | Operation Manual - Page 2
warnings and instructions may result in electric shock, fire and/or serious injury. Save all warnings and instructions for future can be drawn into air vents. Do not use on a ladder or unstable support. Stable footing on a solid surface enables better control of the power tool in unexpected - Ryobi PSD101B | Operation Manual - Page 3
or tool outside the temperature range specified in the instructions. Charging improperly or at temperatures outside the specified range may damage the battery and increase the risk of fire. SERVICE Have your power tool serviced by a qualified repair person using only identical replacement parts - Ryobi PSD101B | Operation Manual - Page 4
operator an electric shock. Know your power tool. Read operator's manual carefully. Learn its applications and limitations, as well as the specific risk of serious personal injury. Save these instructions. Refer to them frequently and use them to instruct others who may use this tool. If you - Ryobi PSD101B | Operation Manual - Page 5
Conditions Alert Recycle Symbol Volts Minutes Direct Current No Load Speed Per Minute To reduce the risk of injury, user must read and understand operator's manual before using this product. Always wear eye protection with side shields marked to comply with ANSI Z87.1. Do not expose to rain or use - Ryobi PSD101B | Operation Manual - Page 6
battery pack is secured in the product before beginning operation. To remove: Depress the latches on each side of the battery pack. For complete charging instructions, see the operator's manuals for your battery pack and charger. 6 - English - Ryobi PSD101B | Operation Manual - Page 7
OPERATION TURNING THE SANDER ON/OFF See Figure 2, page 10. To turn the sander ON: Insert the battery pack. Depress the switch trigger. To turn the sander OFF: n Release the switch trigger. LOCK-ON BUTTON See Figure 2, page 10. The lock-on feature allows you to lock the switch trigger in the ON - Ryobi PSD101B | Operation Manual - Page 8
work surface. Lower the sander to the work surface with a slight forward motion. Move the sander slowly over the work surface, using the handle to guide and control the sander. NOTE: Allowing the sander to remain in one place will result in an uneven surface. WARNING: Keep a firm grip on the - Ryobi PSD101B | Operation Manual - Page 9
is not designed for contour sanding. Sanding on the front roller could cause irregularity in the sanding belt tracking. MAINTENANCE WARNING: When servicing, use only identical replacement parts. Use of any other parts could create a hazard or cause product damage. GENERAL MAINTENANCE Avoid using - Ryobi PSD101B | Operation Manual - Page 10
peut entraîner une électrocution, un incendie ou des blessures graves. Conserver les avertissements et les instructions à des fins de référence ultérieure. Le terme « outil électrique », utilisé dans tous les avertissements ci-dessous désigne tout outil fonctionnant sur secteur (câblé) ou - Ryobi PSD101B | Operation Manual - Page 11
utiliser l'outil sur une échelle ou un support instable. Une bonne tenue et un bon °F) représente un risque d'explosion. Suivre toutes les instructions afférentes à la recharge et ne pas recharger le bloc-piles ou l' et les fournisseurs de service autorisés doivent effectuer la réparation ou l'entretien - Ryobi PSD101B | Operation Manual - Page 12
ce et retirer les clous éventuels avant d'utiliser cet outil. Le respect de cette consigne réduira les risques de blessures graves. Conserver ces instructions. Les consulter fréquemment et les utiliser pour instruire les autres utilisateurs éventuels. Si cet outil est prêté, il doit être accompagn - Ryobi PSD101B | Operation Manual - Page 13
SYMBOLES Les termes de mise en garde suivants et leur signification ont pour but d'expliquer le degré de risques associé à l'utilisation de ce produit. SYMBOLE SIGNAL SIGNIFICATION DANGER : Indique une situation dangereuse qui, si elle n'est pas évitée, aura pour conséquences des blessures - Ryobi PSD101B | Operation Manual - Page 14
CARACTÉRISTIQUES FICHE TECHNIQUE Taille de la bande...12,7 x 457 mm (1∕2 po x 18 po) Surface de ponçage...32,3 cm2 (5 po2). Vitesse à vide...629,4 m/min (2 065 pi/min) ASSEMBLAGE AVERTISSEMENT : Ne pas utiliser le produit s'il n'est pas complètement assemblé ou si des pièces semblent manquantes - Ryobi PSD101B | Operation Manual - Page 15
UTILISATION MISE EN MARCHE / ARRÊT DE LA PONCEUSE Voir la figure 2, page 10. Pour mettre la ponceuse en MARCHE : Installer le bloc-pile. Appuyer sur la gâchette. Pour mettre la ponceuse en ARRÊT : n Relâcher la gâchette. BOUTON DE VERROUILLAGE Voir la figure 2, page 10. La fonction de - Ryobi PSD101B | Operation Manual - Page 16
UTILISATION AVERTISSEMENT : Avant de brancher la ponceuse sur une prise secteur, toujours vérifier que la gâchette n'est pas verrouillée. Ne pas prendre cette précaution peut causer un démarrage accidentel, entraînant des blessures graves. Pour régler l'alignement de la bande abrasive, procéder - Ryobi PSD101B | Operation Manual - Page 17
UTILISATION AVERTISSEMENT : Garder les mains et les doigts à l'écart de la bande abrasive en mouvement, du rouleau tendeur avant, et du rouleau d'entraînement. Ne pas prendre cette précaution peut entraîner des blessures graves. AVERTISSEMENT : Ne pas laisser les doigts reposer sur le bord - Ryobi PSD101B | Operation Manual - Page 18
ADVERTENCIAS DE SEGURIDAD PARA HERRAMIENTAS ELÉCTRICA ADVERTENCIA Consulte todas las advertencias de seguridad, ilustraciones y especificaciones suministradas con esta herramienta eléctrica. El incumplimiento de las advertencias e instrucciones puede ocasionar descarga eléctrica, fuego o lesiones - Ryobi PSD101B | Operation Manual - Page 19
ADVERTENCIAS DE SEGURIDAD PARA HERRAMIENTAS ELÉCTRICA Una acción descuidada puede causar lesiones graves en una fracción de segundo. No vista ropas holgadas ni joyas. Recójase el cabello si está largo. Las ropas holgadas y las joyas, así como el cabello largo, pueden resultar atraídas hacia el - Ryobi PSD101B | Operation Manual - Page 20
metálicas expuestas de la herramienta y da una descarga eléctrica al operador. Familiarícese con su herramienta eléctrica. Lea cuidadosamente el manual del operador. Aprenda sus usos y limitaciones, así como los posibles peligros específicos de esta herramienta eléctrica. Con el cumplimiento de - Ryobi PSD101B | Operation Manual - Page 21
permitirá utilizar mejor y de manera más segura el producto. SÍMBOLO NOMBRE DENOMINACIÓN/EXPLICACIÓN Alerta de seguridad Indica un peligro posible de lesiones personales. Lea manual del operador Protección para los ojos Para reducir el riesgo de lesiones, el usuario debe leer y comprender el - Ryobi PSD101B | Operation Manual - Page 22
de empezar a utilizarlo. Para quitar: Oprima los pestillos de cada lado del paquete de baterías. Para obtener instrucciones específicas de carga, lea el manual del operador que se incluye con el cargador y la batería. 6 - Español - Ryobi PSD101B | Operation Manual - Page 23
FUNCIONAMIENTO APAGADO Y ENCENDIDO DE LA LIJADORA Vea la figura 2, página 10. Para ENCENDER la lijadora: Coloque el paquete de baterías. Oprima el gatillo del interruptor. Para APAGAR la lijadora: n Suelte el gatillo del interruptor. BOTÓN DE SEGURO DE ENCENDIDO Vea la figura 2, página 10. El - Ryobi PSD101B | Operation Manual - Page 24
FUNCIONAMIENTO Al instalar una nueva banda de lija, es posible que sea necesario ajustar varias veces la alineación de la misma hasta acondicionarla. UTILIZACIÓN DE LA LIJADORA Asegure la pieza de trabajo para evitar que se mueva bajo la lijadora. ADVERTENCIA: Antes de conectar la lijadora al - Ryobi PSD101B | Operation Manual - Page 25
FUNCIONAMIENTO ADVERTENCIA: En todo momento mantenga las manos y los dedos alejados de la banda de lija en movimiento, del rodillo delantero y del ensamble del rodillo de impulsión. La inobservancia de esta advertencia causa lesiones corporales serias. ADVERTENCIA: No permita que los dedos - Ryobi PSD101B | Operation Manual - Page 26
PSD101 A B G E C F D A - Sanding belt (bande abrasive, banda de lija) B - Handle (poignée, mango) C - Tension release lever (levier de soulagement de la tension, palanca de afloje de tensión) Fig. 1 Fig. 2 D - Switch trigger (gâchette, gatillo del interruptor) E - Tracking knob (bouton de - Ryobi PSD101B | Operation Manual - Page 27
Fig. 4 A Fig. 5 A Fig. 6 A B B A - Tension release lever (levier de soulagement de la tension, palanca de afloje de tensión) B - Direction of rotation (sens de rotation, sentido de rotación) B A - Install unidirectional belts in the direction of the rotation (installer les bandes - Ryobi PSD101B | Operation Manual - Page 28
UTILISATION / PONCEUSE À BANDE 18 V 1/2 po x 18 po MANUAL DEL OPERADOR/LIJADORA DE BANDA DE 18 V 1/2 pulg. x 18 pulg. PSD101 To request service, purchase replacement parts, locate an Authorized Service Center or obtain Customer or Technical Support: Visit www.ryobitools.com or call 1-800-525-2579 If
-
 1
1 -
 2
2 -
 3
3 -
 4
4 -
 5
5 -
 6
6 -
 7
7 -
8
-
9
-
10
-
11
-
12
-
13
-
14
-
15
-
16
-
17
-
18
-
19
-
20
-
21
-
22
-
23
-
24
-
25
-
26
-
27
-
28
 |
 |

WARNING:
To reduce the
risk of injury, the user must read and
understand the operator’s manual before
using this product.
ADVERTENCIA:
Para
reducir el riesgo de lesiones, el usuario
debe leer y comprender el manual del
operador antes de usar este producto.
SAVE THIS MANUAL FOR
FUTURE REFERENCE
AVERTISSEMENT :
Pour
réduire les risques de blessures,
l’utilisateur doit lire et veiller à bien
comprendre le manuel d’utilisation avant
d’employer ce produit.
GUARDE ESTE MANUAL
PARA FUTURAS CONSULTAS
CONSERVER CE MANUEL
POUR FUTURE RÉFÉRENCE
TABLE OF CONTENTS
****************
General Power Tool
Safety Warnings
..............................
2-3
Sander Safety Warnings
.....................
4
Symbols
..............................................
5
Features
..............................................
6
Assembly
............................................
6
Operation
.........................................
6-9
Maintenance
.......................................
9
Illustrations
..................................
10-11
Parts Ordering
and Service
.........................
Back page
TABLE DES MATIÈRES
****************
Avertissements de sécurité générales
relatives aux outils électriques
........
2-3
Avertissements de sécurité
relatifs ponceuse
................................
4
Symboles
............................................
5
Caractéristiques
.................................
6
Assemblage
........................................
6
Utilisation
........................................
6-9
Entretien
.............................................
9
Illustrations
..................................
10-11
Commande de pièces
et dépannage
....................
Page arrière
ÍNDICE DE CONTENIDO
****************
Advertencias de seguridad para
herramientas eléctrica
...................
2-3
Advertencias de seguridad
del lijadora
.........................................
4
Símbolos
............................................
5
Características
...................................
6
Armado
..............................................
6
Funcionamiento
.............................
6-9
Mantenimiento
...................................
9
Illustraciones
..............................
10-11
Pedidos de
piezas y servicio
...........
Pág. posterior
OPERATOR’S MANUAL
MANUEL D’UTILISATION
MANUAL DEL OPERADOR
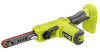
18 V 1/2 in. x 18 in. BELT SANDER
PONCEUSE À BANDE 18 V 1/2 po x 18 po
LIJADORA DE BANDA DE 18 V 1/2 pulg. x 18 pulg.
PSD101