Polk Audio TC80i DIY In-Ceiling and In-Wall Installation Guide
Polk Audio TC80i Manual
 |
View all Polk Audio TC80i manuals
Add to My Manuals
Save this manual to your list of manuals |
Polk Audio TC80i manual content summary:
- Polk Audio TC80i | DIY In-Ceiling and In-Wall Installation Guide - Page 1
Installing Your In-Wall or In-Ceiling Speakers - Polk Audio TC80i | DIY In-Ceiling and In-Wall Installation Guide - Page 2
Ceiling Polk Audio Speakers Installing your new Polk Audio in-ceiling or in-wall speakers is relatively easy to accomplish for even the most hesitant do-it-yourselfer. This Guide will take you through the process step by step. Installing your new Polk speakers confident about troubleshooting any - Polk Audio TC80i | DIY In-Ceiling and In-Wall Installation Guide - Page 3
Photos and description of the Tools Sheet rock saw Stiff Putty blade Fish tape to help install wire into existing walls Tape measure, utility knife and wire stripper Battery powered hand held drill and driver (shown with magnetic driver extension) DIY CI Tutorial 3 - Polk Audio TC80i | DIY In-Ceiling and In-Wall Installation Guide - Page 4
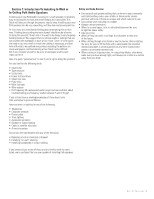
Section 2: Polk Audio In-Wall and In-Ceiling Speaker Installation Guide Materials and Preparation Before cutting into your walls to install your new Polk Audio speakers, gather up all the tools and materials needed to complete the project. Speaker cable: the audio signals are going to run on the - Polk Audio TC80i | DIY In-Ceiling and In-Wall Installation Guide - Page 5
as it is much easier to run cables through them than walls. Section 3:Checking For Obstacles Before Installation Speaker placement research: Once you have a good idea about where you want to install your new Polk speakers, we suggest you check out the space just to make sure there is enough room for - Polk Audio TC80i | DIY In-Ceiling and In-Wall Installation Guide - Page 6
location that may affect where you want to place the others. Once you have determined the locations for your Polk speakers tape the supplied templates to the wall or ceiling. The use a pencil and trace the edge of the template: Drill a small exploratory hole Bend a stiff wire at a right - Polk Audio TC80i | DIY In-Ceiling and In-Wall Installation Guide - Page 7
pull the cable and install the speakers. Polk Audio can recommend a professional installation company, call (800) 377-7655 during installations this will not be an issue because of the small holes - you only have to pull a cable or two. Here are the guidelines: When working with studs: studs support - Polk Audio TC80i | DIY In-Ceiling and In-Wall Installation Guide - Page 8
use of common holes for both. Also for performance reasons try to separate your speaker cabling from the AC lines with as much distance as practical: National Electric Code does not allow low voltage cable to be installed in the same holes or boxes as AC. In load bearing walls be sure - Polk Audio TC80i | DIY In-Ceiling and In-Wall Installation Guide - Page 9
When running speaker cables separate them from AC wiring and when When bending the speaker cables use a gentle or gradual arch: crossing the AC wires cross them at 90 degrees: Wrong speaker cables AC wiring RIGHT speaker cables AC wiring Correct DIY CI Tutorial 9 - Polk Audio TC80i | DIY In-Ceiling and In-Wall Installation Guide - Page 10
Tips to running cable in existing walls Vertical runs: In a 2 story home where you want to run cabling between floors to some ceiling speakers: Wrong ceiling joist And when using tie wraps or staples be careful to not "over tighten" or "over fasten" the cables: These cables so mashed and attached - Polk Audio TC80i | DIY In-Ceiling and In-Wall Installation Guide - Page 11
channel: Thread the pull tape from the top notch through the wall to the opening, attach the speaker wire and pull (gently) up through the wall. ceiling joist top plate wall stud wall stud When attaching speaker cabling to the pull or fish tap-overlap the cable through the "paper-clip" on the - Polk Audio TC80i | DIY In-Ceiling and In-Wall Installation Guide - Page 12
Horizontal runs Running speaker cabling across a room may seem difficult-one good idea is to utilize the base board molding. First use : When you find a fire-block in between the studs it is possible to drill through using the speaker hole to get your drill into the wall: D I Y C I T u t o r i a l 12 - Polk Audio TC80i | DIY In-Ceiling and In-Wall Installation Guide - Page 13
for our horizontal cable runs, if needed notch the studs: Now you can install the cable: Replace the molding, and touch up with paint, now you are ready to install your new Polk speakers! rotating cam clamps Our speakers utilize a unique "rotating cam" that presses the front baffle casing to the - Polk Audio TC80i | DIY In-Ceiling and In-Wall Installation Guide - Page 14
some insulation into the wall cavity (be sure to place the same amount behind each speaker). Now install the speaker into the wall and tighten up the dog-clamps with your screwdriver. Be careful not to over tighten the speaker-the dry wall or sheet rock could dimple, or break. This is most likely - Polk Audio TC80i | DIY In-Ceiling and In-Wall Installation Guide - Page 15
the grill: Terminate the speaker cable to the binding post inserts and install like this: For a professional look holes in the wall. Your friends will think a professional did the install! The simple install goes like this: Install a single gang retrofit box: These are available at all home centers - Polk Audio TC80i | DIY In-Ceiling and In-Wall Installation Guide - Page 16
drywall joint tape and joint compound. Now just connect to the amplifier. Congratulations, you're done! Here are the steps: 1. Clean the wall and ceiling area, remove any loose debris. 2. Remove the backing of the patch and apply to cover holes, press the self-adhering mesh against the surface. Be
-
 1
1 -
 2
2 -
 3
3 -
 4
4 -
 5
5 -
 6
6 -
 7
7 -
8
-
9
-
10
-
11
-
12
-
13
-
14
-
15
-
16
 |
 |

Installing Your In-Wall
or In-Ceiling Speakers