Pfaff powerquilter 16.0 Manual
Pfaff powerquilter 16.0 Manual
 |
View all Pfaff powerquilter 16.0 manuals
Add to My Manuals
Save this manual to your list of manuals |
Pfaff powerquilter 16.0 manual content summary:
- Pfaff powerquilter 16.0 | Manual - Page 1
Owner's manual - Pfaff powerquilter 16.0 | Manual - Page 2
on your purchase of the powerquilter™ 16.0 Quilting Machine by PFAFF® Welcome to the PFAFF® family! PFAFF® is committed to your quilting success through excellence in customer service and education. With that in mind, we invite you to visit our website at www.pfaff.com to learn more about - Pfaff powerquilter 16.0 | Manual - Page 3
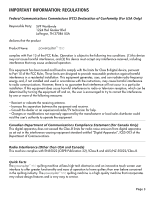
uses, and can radiate radio frequency energy and, if not installed and used in accordance with the instructions local sales distributor could quilting industry. The powerquilter™ 16.0 quilting machine is a high quality machine that incorporates very robust design features and is very easy to service - Pfaff powerquilter 16.0 | Manual - Page 4
not play with this machine. SAVE THESE INSTRUCTIONS This machine is intended for household and commercial use. Disclaimer SVP Worldwide and its Representatives are in no way legally responsible or liable for damage to the powerquilter™ 16.0 quilting machine when used improperly or not in accordance - Pfaff powerquilter 16.0 | Manual - Page 5
therefore should never be used. 3. Do not drop or bump the machine. 4. Always consult the manual to replace or fix the presser foot, needle or any other part of the machine. To repair or adjust the machine If the machine breaks down or needs adjustment, first check the troubleshooting chart in the - Pfaff powerquilter 16.0 | Manual - Page 6
For Users in the UK, Eire, Malta and Cyprus Only If this machine is fitted with a three-pin non-rewireable BS plug then if engaged in a live socket outlet. In the event of replacing the plug fuse, use a fuse approved by ASTA to BS 1362, i.e. carrying the mark, rating as marked on plug. Always replace - Pfaff powerquilter 16.0 | Manual - Page 7
to connect this plug to a 2-pole receptacle as shown in sketch B if a properly grounded outlet is not available. The temporary adapter should be used only until a properly grounded outlet can be installed by a qualified electrician. The green colored rigid ear, lug, and the like, extending from the - Pfaff powerquilter 16.0 | Manual - Page 8
the Machine 18 Bobbin Case and Bobbin Thread Tension Adjustments 19 Top Thread Tension Adjustment 20 Maintenance 21 Using the Touch-Screen Displays 28 Geting Started Quilting 29 Correcting Common Issues 32 Optional Accessories 33 Register your powerquilter™ 16.0 Quilting Machine Page - Pfaff powerquilter 16.0 | Manual - Page 9
plug, not the cord. Never operate the powerquilter™ 16.0 quilting machine if the cord is damaged or not working correctly. If a mechanical or electrical problem is encountered, return the powerquilter™ 16.0 quilting machine to the nearest authorized service center or the manufacturer for examination - Pfaff powerquilter 16.0 | Manual - Page 10
powerquilter™ 16.0 Quilting Machine Components Front Side View 1. 2. 7. 10. 3. 6. 4. 5. 8. 9. Figure 1 1. 2. 3. 4. 5. 6. 7. 8. 9. 10. Thread Stand Thread Guide A Three-Hole Thread Guide B Thread Guide C Top Thread Tension Assembly Stirrup Thread Guide E Take-Up Lever Thread Guide F - Pfaff powerquilter 16.0 | Manual - Page 11
Bar 12. Needle Bar Thread Guide 13. Needle 14. Hopping Foot 15. Needle Plate 16. Needle Clamp Screw 17. Front Display 18. Back Casing/Frame 19. Color Touch-Screen Display Connector 20. Threaded Horizontal Spool Pin Mounting Hole 19. 20. 17. 11. 12. 16. 13. 15. 14. DETAIL H SCDAetLaEil - Pfaff powerquilter 16.0 | Manual - Page 12
On/Off Switch 22. Power Cord Connector 23. Foot Pedal Connector 24. Spool Pins 25. Thread Stand 26. Bobbin Assembly 27. LED Light Ring Included Accessories 4 M-Class Bobbins Inspira® Needles Size 16 Bobbin Case Screwdriver Lint Brush Pen Oiler Power Cord 24. H 25. 23. Page 12 27. 21. 22. Rear - Pfaff powerquilter 16.0 | Manual - Page 13
Table (and Taking it Down for Storage) The powerquilter™ 16.0 quilting machine table has been designed to accommodate the powerquilter™ 16.0 machine. It has folding legs that are height-adjustable and is heavy enough to provide stabilization for quilting at high speeds. Installing the Power Cord - Pfaff powerquilter 16.0 | Manual - Page 14
the machine, with the touch screen facing the needle end of the machine. 2. Use a machine (page 11, Figure 2, #19). Note: The eyelets of the thread stand MUST be centered over the spool pins. This ensures that the cone of thread will not pull, turn or tilt, which will cause thread tension problems - Pfaff powerquilter 16.0 | Manual - Page 15
quilting or more often if working with a lot of fusibles or heavy materials. SIGHT HOLE Needle/Thread Selection Guide Figure 7 The needle that is in the machine when it arrives at your home has been used of the machine, and the long groove down the front of the needle facing the bobbin case side - Pfaff powerquilter 16.0 | Manual - Page 16
the Machine DC DC A Figure 8 1. Place a cone or spool of thread on the spool pin. If using a spool, make sure that the slits on the spool are agaiDnsEt tTheAbILasDe of the spool pin holder. Pass the thread SthrCouAgLhEthe1 t:hr2ead-stand eyelet from back to front, continuing to thread guide - Pfaff powerquilter 16.0 | Manual - Page 17
and thread through the hole (thread guide F). 7. Make sure the thread is following the groove down the front of the needle and threads from front to back. Be careful that the thread does not twist around the needle. IMPORTANT NOTE: The powerquilter™ 16.0 quilting machine does not have a presser foot - Pfaff powerquilter 16.0 | Manual - Page 18
the case inward further until it clicks (see Figure 14). Allow the thread end to hang freely. NOTE: Pulling out the latch lever pushes the bobbin forward in the bobbin case, aiding in removal of the bobbin. The lever should be used only for removing the bobbin case from the machine. Page 18 - Pfaff powerquilter 16.0 | Manual - Page 19
the Bobbin Thread to the Top of the Quilt 1. After threading the machine, plug it in and turn on the power. Place quilt sandwich (See Figure 16 on next page.) Tension may need to be adjusted, depending on the fabric, thread or batting used in each project. Unlike the bobbin case adjustment, - Pfaff powerquilter 16.0 | Manual - Page 20
performing maintenance on the machine. Cleaning and Lubricating the Machine Only use light sewing machine oil in the powerquilter™ 16.0 quilting machine. Internal oiling is not necessary on the powerquilter™ 16.0 quilting machine except when the machine is taken to a service technician for routine - Pfaff powerquilter 16.0 | Manual - Page 21
19 25 % 25 % 87 % STOP STOP 54 % 87 % Figure 20 25 % OP 54 %More The powerquilter™ 16.0 quilting machine has a color touch-screen display on the front of the machine. Settings are changed using this display. Main Screen Button Functions (Figure 18) Pedal Status The status of the foot pedal - Pfaff powerquilter 16.0 | Manual - Page 22
between different speeds preferred for different types of quilting. For example you may wish to use a slower speed for detail work and a faster does not move the needle, but simply determines the final needle position after the machine has been stopped. (Figure 24) More When in "Needle Down" mode, - Pfaff powerquilter 16.0 | Manual - Page 23
The More screen allows access to other functions available on the powerquilter™ 16.0 quilting machine. (Figure 25) Presets Press the "Presets" button to where machine diagnostic functions can be performed. Diagnostic functions are generally only used when working with our Technical Support to - Pfaff powerquilter 16.0 | Manual - Page 24
" menu screen. Diagnostics Tests (Figure 28) Motor Sensor Test The "Motor" Sensor test can help you determine whether they may be a problem with the powerquilter™ 16.0 quilting machine motor. Slowly rotating the hand wheel should result in an audible "beep." If you get a constant solid "beep" or no - Pfaff powerquilter 16.0 | Manual - Page 25
this indicates a failed test and the machine should be inspected by a qualified PFAFF® repair technician. Press the "Main" problem with the powerquilter™ 16.0 quilting machine speed sensor. Before performing this test, remove the bobbin case and the top thread. Press the foot pedal so that the machine - Pfaff powerquilter 16.0 | Manual - Page 26
as well as the firmware revision numbers of the powerquilter™ 16.0 quilting machine and its handlebars. The Lifetime and Trip (or project be reset and should be used as an indicator to determine when general machine maintenance should be performed by an authorized PFAFF® Representative. (Figure 32) - Pfaff powerquilter 16.0 | Manual - Page 27
will increase the preset speed and pressing the "-" button will decrease the speed. These presets are saved so that they are preserved even if the machine is turned off. Press the "Main" button to return to the "Main" menu screen or the "Back" button to return to the "More" menu screen - Pfaff powerquilter 16.0 | Manual - Page 28
and the foot pedal, and moves the fabric to get an even, consistent stitch. In order to become comfortable using the powerquilter™ 16.0 quilting machine, quilters can begin with a few simple techniques using a sample quilt sandwich (two pieces of fabric with a layer of batting between them). Set the - Pfaff powerquilter 16.0 | Manual - Page 29
dull, • Replace the needle often, normally once or twice per day for continuous bent, or installed improperly quilting or at least once per quilt. Use powerquilter™ 16.0 quilting machine recommended needles. • Always change the needle if the needle has struck any hard object such as a straight - Pfaff powerquilter 16.0 | Manual - Page 30
the machine and remove the power plug from the electrical outlet. Remove the bobbin case from the machine. Lubricate the hook, then manually rotate to the threading diagram and threading instructions on page 16-17. Corrective Measure • Turn the machine on only by using the switch on the back of the - Pfaff powerquilter 16.0 | Manual - Page 31
and thread breakage. Use ONLY Inspira® bobbins • Needle is burred, bent or • Change the needle at least once per quilt. Make sure the needle Wrong type of needle • Use needles recommended by PFAFF®. Using the wrong needle with a smaller shank diameter causes many problems. For example a system - Pfaff powerquilter 16.0 | Manual - Page 32
fed from a vertical spool. TruStitch™ Stitch Regulator for PFAFF® Figure 37 Expand your original powerquilter™ 16.0 quilting machine table with Table Extensions. Each extension measures 18" x 30". Purchase one or two to provide extra support for large projects. Adding two extensions will expand the - Pfaff powerquilter 16.0 | Manual - Page 33
Register your powerquilter™ 16.0 Quilting Machine For product and warranty registration, go to the PFAFF® web site at www.pfaff.com. Correct Disposal of this product This marking indicates that this product should not be disposed with other household wastes throughout the European Union. To - Pfaff powerquilter 16.0 | Manual - Page 34
www.pfaff.com ©2013 KSIN Luxembourg II, S.ar.l. All rights reserved.
-
 1
1 -
 2
2 -
 3
3 -
 4
4 -
 5
5 -
 6
6 -
 7
7 -
8
-
9
-
10
-
11
-
12
-
13
-
14
-
15
-
16
-
17
-
18
-
19
-
20
-
21
-
22
-
23
-
24
-
25
-
26
-
27
-
28
-
29
-
30
-
31
-
32
-
33
-
34
 |
 |

Owner’s manual