Pentax Auto 110 Auto 110 Manual
Pentax Auto 110 Manual
 |
View all Pentax Auto 110 manuals
Add to My Manuals
Save this manual to your list of manuals |
Pentax Auto 110 manual content summary:
- Pentax Auto 110 | Auto 110 Manual - Page 1
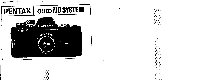
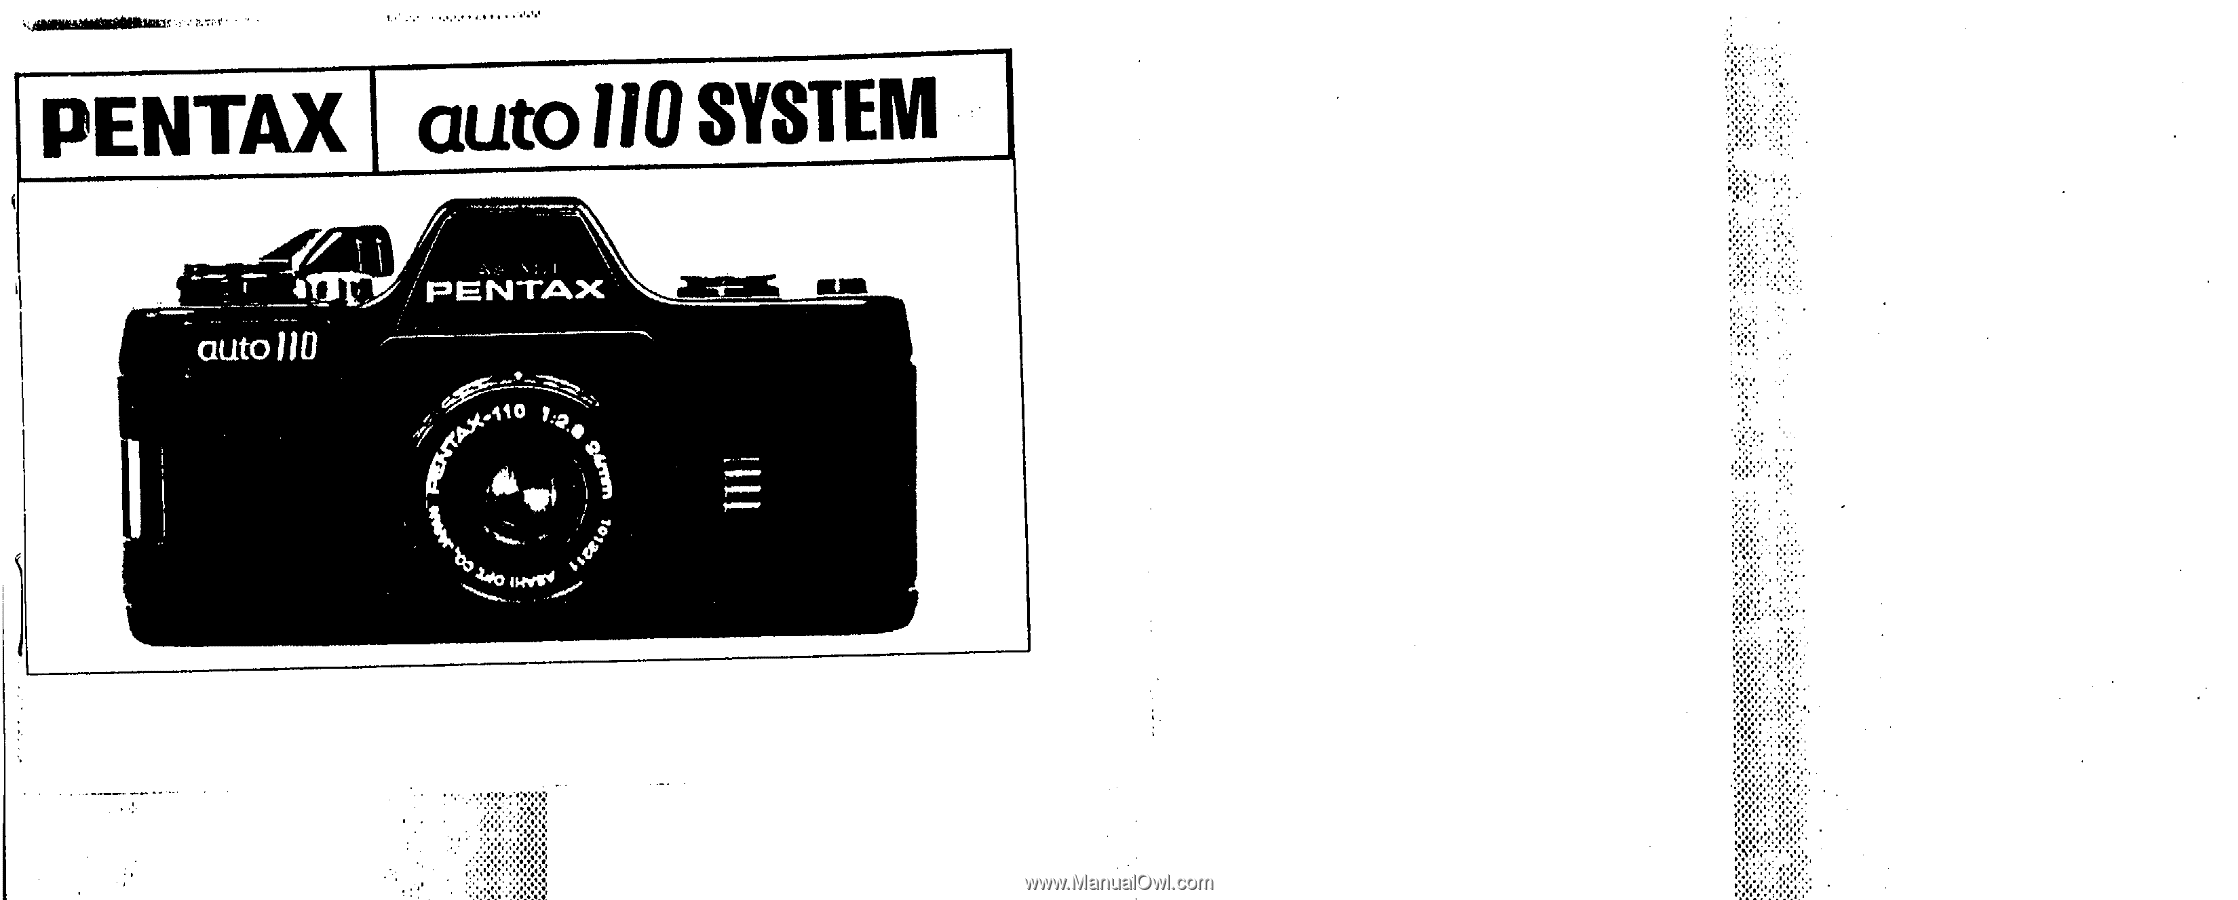
PENTAXI auto110 SYSTEM auto 110 ,,.//Per.rrAx 9 A10 • '44 400iwv$4 - Pentax Auto 110 | Auto 110 Manual - Page 2
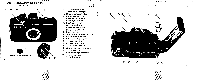
an SLR system. The Pentax Auto 110 accepts interchangeable lenses, auto flash units, a winder, close-up attachments, filters, and lens hoods. CONTENTS Specifications Names of parts Basic operating instructions Battery loading Battery life Battery precautions Film loading Advancing the film Holding - Pentax Auto 110 | Auto 110 Manual - Page 3
AUTO:ll° SPECIFs.ICA,t TIONS Type Film Type Negative Format Lens Lens Mount Viewfinder Focusing Viewfinder Information Battery Check Exposure Metering 2 TTL metering 110 SLR camera with bayonet mount for interchangeable lenses. Cartridge-loading 110 film. 13mm x 17mm. Pentax 110 24mm 1/2.8; 47 - - Pentax Auto 110 | Auto 110 Manual - Page 4
AUTO 110 NAMES OF PARTS ••0.0 9!,.., . 0 E) (:), q al O. 1. 110-Bayonet Mount 2. Aperture diaphragm \ 3. Shutter release button 12 4. Film advance lever • \ V moon loo!d isoa PENTIaX 5. Lens release button 6. Flash synch shoe 7. Flash contact pin 8. Wrist strap hook 9. lens distance - Pentax Auto 110 | Auto 110 Manual - Page 5
even if the shutter is released. Reread the instructions carefully and correct the problem. AAA 6 3. Insert batteries and return case to original position. 5. Turn film advance lever approx. 7 strokes until it stops. 4. Insert film (110 cartridge). v, • 'MO 6. The number "1" will appear in - Pentax Auto 110 | Auto 110 Manual - Page 6
. •4 11 8. Focus. 8 9. Steps 7 & 8 do not apply when using the PF lens. rocuo lefil - - 10. If a green light appears in the viewfinder when you depress the an "X" appears In the back cover window. OR x+ 12. Turn film advance lever 2 strokes for next exposure. ullyj 14. Turn the - Pentax Auto 110 | Auto 110 Manual - Page 7
the back cover and remove the battery holder tray from inside the battery chamber. 2. Insert the (-) side of one of the batteries into the opened side of the tray. Then, turn the tray over and do the same with the other battery. the (-) side of both batteries will correspond with the (-) indication - Pentax Auto 110 | Auto 110 Manual - Page 8
not take apart or charge a dead battery, or throw it into a fire, as it may explode. If the batteries go dead while there•is.film in the camera, point the lens downward and open the back cover in a shaded location, then remove the battery case and replace the batteries, taking care not to move the - Pentax Auto 110 | Auto 110 Manual - Page 9
cartridge as shown. 2. Close the back cover. The 110 cartridge film automatically adjusts the camera to the correct ASA speed (ASA 64/100 or ASA 400) upon loading. No manual film speed setting is required. ASA 400 film is appropriate for photographing dark subjects or when you desire a fast shutter - Pentax Auto 110 | Auto 110 Manual - Page 10
the camera properly in order to take blur-free photos. Practice holding and operating the camera before inserting your first film cartridge. , etc., as support. Always push the shutter release button gently. CAUTION: Do not touch the flash hot shoe with your finger when holding the camera. If you do - Pentax Auto 110 | Auto 110 Manual - Page 11
FFOCUSING Look through the eyepiece and turn the focusing ring of the lens. Reasonably sharp focus can be obtained by focusing on any part of the screen. To be assured of pinpoint focusing, however, check your focus against - Pentax Auto 110 | Auto 110 Manual - Page 12
CHECK. It is possible to shoot with the camera held in your hands when the green diode of the Auto Flashes (AF100P or AF130P) to prevent blurring. USING A TRIPOD A tripod can be screwed into the tripod socket. When using the 50mm or 70mm telephoto lens or the 2040mm zoom lens, the lens will hit - Pentax Auto 110 | Auto 110 Manual - Page 13
APERTURE AND SHUTTER SPEED RELATIONSHIP The Auto 110's automatic exposure system is based on a program that has apertures and shutter speeds paired off in preset combinations. Neither aperture or shutter speed is displayed on the camera. However, when the green LED lights up in the viewfinder the - Pentax Auto 110 | Auto 110 Manual - Page 14
end of the film roll (12 or 24 exposures), be sure to check the film window. An "X" will appear when you advance the film after using the red distance scale index of the lens 0 with the red dot on the camera body O and insert the lens into the body. 2. Turn the lens to the right until it locks - Pentax Auto 110 | Auto 110 Manual - Page 15
-A • - •44\z-e 25.5 13 30.5 27 37.5 57 49 160 30.5 29 49 174 Note: • PF is a fixed-focus lens. • There are no aperture settings on Pentax-110 lenses. The aperture is set automatically by the diaphragm mechanism of the camera's programmed shutter system. The aperture range is f/2.8 - f/13.5. 27 - Pentax Auto 110 | Auto 110 Manual - Page 16
in the viewfinder, take precautions against camera movement. 28 Using the Close-up lens accepts filters and a lens hood with a 30.5mm diameter. Using an auto flash unit When using an Auto Flash with the PF lens, refer to the chart below for effective flash range. Film ASA 100 ASA 400 Auto Flash - Pentax Auto 110 | Auto 110 Manual - Page 17
use with 24mm lens) 30.5mm (for 18mm lens) 37.5mm (for 50mm lens) I lomln There is a specially -designed hood for each 110 lens. N.R.: As the filter thread of the 70mm and 20-40mm zoom lenses is 49mm in diameter, 49mtn filters, close-up attachments, and lens hoods made for 35mm format cameras can be - Pentax Auto 110 | Auto 110 Manual - Page 18
available in the following diopters: -5, -4, -3, -2, -1, +1, +2 and +3. When purchasing a corrective eyepiece, make certain it is the right one by testing it on a camera. 32 USING THE HANDSTRAP AND SUI- I CASt •:;:rs 1. Attach the handstrap by pushing the clip towards you from its front. 2. To - Pentax Auto 110 | Auto 110 Manual - Page 19
the camera or film. Do not wipe the camera or lens with solvents such as paint thinner or alcohol to clean. Use a blower to blow away dust from the lens and other glass surfaces, and then clean with a lens brush. 34 Precaution on Auto 110 Lens Removal When changing lenses or removing the lens on - Pentax Auto 110 | Auto 110 Manual - Page 20
accredited repair shops, unless you are sending it directly to the manufacturer. Always obtain a quotation of the service charge, and only after you accept the quoted service charge, instruct the service station to proceed with the servicing. This warranty policy does not apply to Pentax products - Pentax Auto 110 | Auto 110 Manual - Page 21
Corporation 35 Inverness Drive East, Englewood, Colorado 80112, U.S.A. Pentax Canada Inc. 1 760 West 3itl Avenue, Vancouver, B.C. V6J 1K5, CANADA Pentax U.K. Limited Pentax House, South lion Avenue, South Harrow, Middlesex HA2 OLT, U.K. Asahi Optical Brasilaira Ind. a Corn. Ltda. I1ua Estados Unidos
-
 1
1 -
 2
2 -
 3
3 -
 4
4 -
 5
5 -
 6
6 -
 7
7 -
8
-
9
-
10
-
11
-
12
-
13
-
14
-
15
-
16
-
17
-
18
-
19
-
20
-
21
 |
 |
PENTAXI
auto
110
SYSTEM
,
,.//Per.rrAx
auto
110
9
A10
•
‘44
40
0iwv$
4