MSI Aegis 3 Plus 8th User Manual
MSI Aegis 3 Plus 8th Manual
 |
View all MSI Aegis 3 Plus 8th manuals
Add to My Manuals
Save this manual to your list of manuals |
MSI Aegis 3 Plus 8th manual content summary:
- MSI Aegis 3 Plus 8th | User Manual - Page 1
Aegis Series Personal Computer Aegis B907/ B918 - MSI Aegis 3 Plus 8th | User Manual - Page 2
iii Upgrade and Warranty iv Acquisition of Replaceable Parts iv Technical Support iv Green Product Features iv Environmental Policy v Chemical Substances Information v Battery Information v Safety Instructions vi CE Conformity viii FCC-B Radio Frequency Interference Statement viii WEEE - MSI Aegis 3 Plus 8th | User Manual - Page 3
Preface Copyright Notice The material in this document is the intellectual property of MICRO-STAR INTERNATIONAL. We take every care in the preparation of this document, but no guarantee is given as to the correctness of its contents. Our products are under continual improvement and we reserve the - MSI Aegis 3 Plus 8th | User Manual - Page 4
recommended that you contact the authorized dealer or service center for any upgrade or replace service. Acquisition of Replaceable Parts Please be noticed that parts. Technical Support If a problem arises with your system and no solution can be obtained from the user's manual, please contact - MSI Aegis 3 Plus 8th | User Manual - Page 5
Preface Environmental Policy ◙◙ The product has been designed to enable proper reuse of parts and recycling and should not be thrown away at its end of life. ◙◙ Users should contact the local authorized point of collection for recycling and disposing of their end-of-life products. ◙◙ Visit the MSI - MSI Aegis 3 Plus 8th | User Manual - Page 6
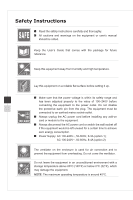
◙◙ Read the safety instructions carefully and thoroughly. ◙◙ All cautions and warnings on the equipment or user's manual should be noted. Keep the User's Guide that comes with the package for future reference. Keep this equipment away from humidity and high temperature. Lay this equipment - MSI Aegis 3 Plus 8th | User Manual - Page 7
vii If any of the following situations arises, get the equipment checked by service personnel: ◙◙ The power cord or plug is damaged. ◙◙ Liquid has does not work well or you can not get it work according to user's manual. ◙◙ The equipment has dropped and damaged. ◙◙ The equipment has obvious sign of - MSI Aegis 3 Plus 8th | User Manual - Page 8
. This equipment generates, uses and can radiate radio frequency energy and, if not installed and used in accordance with the instruction manual, may cause harmful interference to radio communications. However, there is no guarantee that interference will not occur in a particular installation - MSI Aegis 3 Plus 8th | User Manual - Page 9
Preface RoHS Statement Japan JIS C 0950 Material Declaration A Japanese regulatory requirement, defined by specification JIS C 0950, mandates that manufacturers provide material declarations for certain categories of electronic products offered for sale after July 1, 2006. http://www.msi.com/html/ - MSI Aegis 3 Plus 8th | User Manual - Page 10
- MSI Aegis 3 Plus 8th | User Manual - Page 11
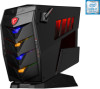
1 Overview Sturdy, stable and solid, the MSI Aegis is loaded with the perfect ammunition for PC gamers that do not want to compromise on gaming performance. Housing a highly appraised MSI GAMING motherboard and equipped with unrelenting tools of efficiency, power, cooling and low-noise, the MSI - MSI Aegis 3 Plus 8th | User Manual - Page 12
Packing Contents Aegis AC Power Cord User Manual & Quick Guide (Optional) Keyboard (Optional) 1-2 Mouse (Optional) Thumber Screw (Optional) M3 Screws (Optional) 6#32 Screws (Optional) * Please contact us immediately if any of the items is damaged - MSI Aegis 3 Plus 8th | User Manual - Page 13
the optical disk drive. 3 Eject Hole Insert a thin, straight object (such as a paper clip) into the eject hole to open the optical disk drive manually if the eject button does not work. 4 USB 3.1 Gen 1 Port (Type C) (optional) USB Type C port is allowing for reversible plug orientation. USB 3.1 Gen - MSI Aegis 3 Plus 8th | User Manual - Page 14
5 USB 3.1 Gen 1 or USB 2.0 Port (with Super Charger Technology) (optional) With MSI Super Charger Technology, not only does it function as normal USB port, but it also enables users to charge USB devices even when the system is turned off. Users will no longer need to power on the system just to - MSI Aegis 3 Plus 8th | User Manual - Page 15
. 3 USB 2.0 Port The USB (Universal Serial Bus) port is for attaching USB devices such as keyboard, mouse, or other USB-compatible devices. It supports up to 480Mbit/s (Hi-Speed) data transfer rate. 4 HDMI-Out Port (Optional) The High-Definition Multimedia Interface is an all-digital audio/video - MSI Aegis 3 Plus 8th | User Manual - Page 16
5 USB 3.1 Gen 1/ Gen 2 Port (optional) USB 3.1 Gen 1/ Gen 2, the SuperSpeed USB/ SuperSpeed USB 10Gbps, delivers the higher interface speeds for connecting various devices, hard drives, or video cameras, and offers more advantages over high-speed data transferring. 6 RJ-45 LAN Jack The standard RJ- - MSI Aegis 3 Plus 8th | User Manual - Page 17
hh Sides View 1 1 Overview 1 Headset Holder Pull out the hanger, then a headset can be hung on the holder. 1-7 - MSI Aegis 3 Plus 8th | User Manual - Page 18
, please contact the local dealer. Do not attempt to upgrade or replace any component of the product if you are not an authorized dealer or service center, since it may cause the warranty void. It is strongly recommended that you contact the authorized dealer or - MSI Aegis 3 Plus 8th | User Manual - Page 19
2 Getting Started This chapter provides you with the information on hardware setup procedures. While connecting peripheral devices, be careful in holding the devices and use a grounded wrist strap to avoid static electricity. - MSI Aegis 3 Plus 8th | User Manual - Page 20
the floor, so that your knees and elbows have the proper position (about 90-degree) when operating. 5. Put your hands on the desk naturally to support your wrists. 6. Avoid using your PC in a place where discomfort may occur. 7. The PC is an electrical device. Please treat it with great care to - MSI Aegis 3 Plus 8th | User Manual - Page 21
Getting Started Hardware Setup Important • The illustrations are for reference only. Your system may vary in appearance. • Please make sure the system has been grounded to earth through the AC power cord and the electrical outlet before powering on the system. hh Connecting Peripherials Connect the - MSI Aegis 3 Plus 8th | User Manual - Page 22
hh Connecting the AC Power and Power On 1. Connect the power cord to the system and electrical outlet. 2 1 2-4 2. Press the power button to power on the system. - MSI Aegis 3 Plus 8th | User Manual - Page 23
3 System Operations This chapter provides you with essential information on system operations. Important All information is subject to change without prior notice. - MSI Aegis 3 Plus 8th | User Manual - Page 24
a low-power or "Sleep" mode after a period of user inactivity. When used with an external ENERGY STAR qualified monitor, this feature also supports similar power management features of the monitor. To take advantage of these potential energy savings, the power management feature has been preset to - MSI Aegis 3 Plus 8th | User Manual - Page 25
System Operations hh Waking the System Up The computer shall be able to wake up from power saving mode in response to a command from any of the following: ■■ the power button, ■■ the network (Wake On LAN), ■■ the mouse, ■■ the keyboard. Energy Saving Tips: ■■ Turn off the monitor by pressing the - MSI Aegis 3 Plus 8th | User Manual - Page 26
Network Connection (Windows 10) hh Wired Network 1. Right-click [Start] and select [Control Panel] from the list. 2. Select [View network status and tasks] under [Network and Internet]. 3-4 3. Select [Set up a new connection or network]. - MSI Aegis 3 Plus 8th | User Manual - Page 27
System Operations 4. Choose [Connect to the Internet] and click [Next]. 5. Select [Broadband (PPPoE)] to connect using DSL or cable that requires a user name and password. 6. Type the information from your Internet Service Provider (ISP) and click [Connect] to establish your LAN connection. 3-5 - MSI Aegis 3 Plus 8th | User Manual - Page 28
the list. 3. To establish a new connection, select [Network and Sharing Center]. 3-6 4. Select [Set up a new connection or network]. 5. Followingly, choose [Manually connect to a wireless network] and click [Next] to continue. 6. Enter information for the wireless network you intend to add and - MSI Aegis 3 Plus 8th | User Manual - Page 29
saved on your system drive to other storage devices. If the following solution fails to recover your system, please contact the authorized local distributor or service center for further assistance. 3-7 - MSI Aegis 3 Plus 8th | User Manual - Page 30
Reset this PC 1. Go to [Start] , click [Settings] and select [Update and security]. 2. Select [Recovery] and click [Get started] under [Reset this PC] to start the system recovery. 3-8 3. The [Choose an option] screen pops up. Choose between [Keep my files] and [Remove everything]. Keep my - MSI Aegis 3 Plus 8th | User Manual - Page 31
hh Keep my files 1. Select [Keep my files]. System Operations 2. The [Your apps will be removed] screen shows a list of apps that will need to be reinstalled from the web or installation discs. Click [Next] to continue. 3-9 3. The next screen will show the changes to be made during the process. - MSI Aegis 3 Plus 8th | User Manual - Page 32
hh Remove everything 1. Select [Remove everything]. 2. If you have multiple hard drives, a screen will pop up, asking you to choose between [Only the drive where Windows is installed] and [All drives]. 3. Then select between [Just remove my files] and [Remove files and clean the drive]. 3-10 4. The - MSI Aegis 3 Plus 8th | User Manual - Page 33
and system encountered non-recoverable problems, please use the F3 Hotkey instructions below to continue: 1. Restart the PC. 2. Press the F3 hotkey on the keyboard promptly when the MSI greeting appears on the display. 3. On the "Choose an Option" screen, tap "Troubleshoot". 4. On the "Troubleshoot - MSI Aegis 3 Plus 8th | User Manual - Page 34
-
 1
1 -
 2
2 -
 3
3 -
 4
4 -
 5
5 -
 6
6 -
 7
7 -
8
-
9
-
10
-
11
-
12
-
13
-
14
-
15
-
16
-
17
-
18
-
19
-
20
-
21
-
22
-
23
-
24
-
25
-
26
-
27
-
28
-
29
-
30
-
31
-
32
-
33
-
34
 |
 |

Aegis Series
Personal Computer
Aegis B907/ B918