LevelOne WAB-6120 Quick Install Guide
LevelOne WAB-6120 Manual
 |
View all LevelOne WAB-6120 manuals
Add to My Manuals
Save this manual to your list of manuals |
LevelOne WAB-6120 manual content summary:
- LevelOne WAB-6120 | Quick Install Guide - Page 1
LevelOne WAB-6120 150Mbps Wireless Outdoor PoE Access Point Quick Installation Guide English Deutsch Français Español Nederlands Dansk Italiano Português Svenska Slovenščina Polish - 1 - - LevelOne WAB-6120 | Quick Install Guide - Page 2
Table of Content English 3 Deutsch 8 Français 13 Español 18 Nederlands 23 Dansk 28 Italiano 33 38 Português 43 Svenska 48 Slovenščina 53 58 63 68 Polish 73 - - 2 - - LevelOne WAB-6120 | Quick Install Guide - Page 3
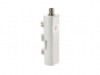
English Hardware Installation 1. Grab the cover and pull it back harder to take it out 2. Plug Cat.5/5e/6 cable into the RJ-45 port. 3. Slide the cover back 4. plug the power cord into the DC port of the PoE injector - 3 - - LevelOne WAB-6120 | Quick Install Guide - Page 4
injector in the Step.4. When you finish the Step.5, the complete set will be like the following picture. For more details, please check your user manual in page 4~13 . - 4 - - LevelOne WAB-6120 | Quick Install Guide - Page 5
Configuration Check Your Network Settings to login web UI Please make sure your PC can get IP address automatically, so the router can communicate with your PC during configuration. Select "Control Panel" > "Network Connections". Right click the "Local Area Connection" and choose "Properties". Select - LevelOne WAB-6120 | Quick Install Guide - Page 6
AP Mode 1. Choose Wireless > Basic Settings for the wireless basic settings Click save. Choose Security to change the security settings. Click Save. - 6 - - LevelOne WAB-6120 | Quick Install Guide - Page 7
Now, you can see SSID "LevelOne" in the list. Congratulations! The AP mode is now successfully configured. - 7 - - LevelOne WAB-6120 | Quick Install Guide - Page 8
Deutsch Hardware Installation Ergreifen Sie die Abdeckung und ziehen diese ab. Verbinden Sie das Cat.5/5e/6 Kabel mit dem RJ-45 Port. Schieben Sie dann die Abdeckung wieder ein. Verbinden Sie das Netzkabel mit dem DC-Port des PoE-Injektors. - 8 - - LevelOne WAB-6120 | Quick Install Guide - Page 9
Verbinden das das andere Ende des Cat.5/5e/6 Kabel mit dem PoE-Port des PoE-Injektors. Wenn Sie diesen Schritt 5 beendet haben, sollte Ihre Installation dem folgenden Bild entsprechen. Weitere Informationen finden Sie auf den Seiten 4 ~ 13 des Benutzerhandbuchs. - 9 - - LevelOne WAB-6120 | Quick Install Guide - Page 10
Konfiguration Überprüfen Sie Ihre Netzwerkeinstellungen für das Login web UI Bitte stellen Sie sicher, dass Ihr PC die IP-Adresse automatisch empfangen kann, so dass der Router mit Ihrem PC während der Konfiguration kommunizieren kann. Wählen Sie "Systemsteuerung" > "Netzwerkverbindungen". Klicken - LevelOne WAB-6120 | Quick Install Guide - Page 11
AP Modus Wählen Sie Wireless > Basic Settings um die Wireless Basis-Einstellungen vorzunehmen. Drücken Sie Save. 2. Wählen Sie Security um die Sicherheits-Einstellungen zu ändern. Drücken Sie Save. - 11 - - LevelOne WAB-6120 | Quick Install Guide - Page 12
Nun können Sie SSID "LevelOne" in der Liste sehen. Glückwunsch! Der AP Modus wurde erfolgreich konfiguriert. - 12 - - LevelOne WAB-6120 | Quick Install Guide - Page 13
Français Installation du matériel 1. Attrapez le capot et tirez-le vers l'arrière avec force pour le dégager 2. Branchez un câble Cat.5/5e/6 sur le port RJ-45. 3. Refaites glisser le capot en place. 4. Branchez le cordon d'alimentation sur le port DC de l'injecteur PoE. - 13 - - LevelOne WAB-6120 | Quick Install Guide - Page 14
5. Assemblez les éléments préparés aux étapes 3 et 4 en branchant l'autre extrémité du câble Cat.5/5e/6 de l'étape 3 sur le port PoE de l'injecteur PoE de l'étape 4. Une fois l'étape 5 terminée, l'ensemble complet a l'apparence ci-dessous. Pour plus de détails, veuillez consulter les pages 4 à 13 de - LevelOne WAB-6120 | Quick Install Guide - Page 15
Configuration Vérifiez vos paramètres réseau pour accéder à l'interface utilisateur web Veuillez vérifier que votre PC est bien en mesure d'obtenir automatiquement une adresse IP afin que le routeur puisse communiquer avec votre PC pendant la configuration. Sélectionnez "Panneau de configuration" > " - LevelOne WAB-6120 | Quick Install Guide - Page 16
Mode AP 1. Choisissez Wireless (Sans fil) > Basic Settings (Paramètres de base) pour les paramètres de base sans fil Cliquez sur Save (Enregistrer). Choisissez Security (Sécurité) pour modifier les paramètres de sécurité. Cliquez sur Save (Enregistrer). - 16 - - LevelOne WAB-6120 | Quick Install Guide - Page 17
Maintenant, vous pouvez voir SSID « LevelOne » (Me rejoindre) dans la liste. Félicitations ! Le mode AP a été configuré avec succès. - 17 - - LevelOne WAB-6120 | Quick Install Guide - Page 18
Español Instalación del Hardware 1. Hale la cubierta para removerla 2. Conecte el cable Cat.5/5e/6 en el puerto RJ-45. 3. Ponga la cubierta en su lugar nuevamente, deslizándola 4. Conecte el cable de corriente en el puerto DC del inyector PoE - 18 - - LevelOne WAB-6120 | Quick Install Guide - Page 19
5. Conecte el cable Cat.5/5e/6 al inyector PoE. La instalación complete deberá lucir como en la siguiente imagen. Para más detalles, por favor verifique el manual de usuario en las páginas 4 a 13. - 19 - - LevelOne WAB-6120 | Quick Install Guide - Page 20
Configuración Verifique su configuración de conexión Asegúrese de que su PC puede obtener una dirección IP automáticamente, de manera que el Router se pueda comunicar con su PC durante la configuración. Seleccione "Panel de Control" > "Conexiones de Red" Clic derecho en "Conexión de Área Local" y - LevelOne WAB-6120 | Quick Install Guide - Page 21
Modo AP 1. Seleccione Inalámbrico > Configuraciones Básicas, para la configuración inalámbrica básica Haga clic en Guardar. Seleccione Inalámbrico > Configuraciones de Seguridad, para cambiar las configuraciones de seguridad. Haga clic en Guardar. - 21 - - LevelOne WAB-6120 | Quick Install Guide - Page 22
Ahora puede ver SSID "LevelOne" en la lista. Felicitaciones! El modo AP está ahora configurado correctamente. - 22 - - LevelOne WAB-6120 | Quick Install Guide - Page 23
Nederlands Hardware-installatie 1. Pak de afdekkap en trek er stevig aan om hem te verwijderen 2. Steek een Cat.5/5e/6-kabel in de RJ-45-aansluiting. 3. Doe de afdekkap weer dicht 4. Steek het voedingssnoer in de DC-aansluiting van de PoE-injector - 23 - - LevelOne WAB-6120 | Quick Install Guide - Page 24
5. Breng de delen uit stap 3 en stap 4 bij elkaar door het andere uiteinde van de Cat.5/5e/6 kabel in stap 3 te steken in de PoE-aansluitig van de PoE-injector uit stap 4. Is stap 5 voltooid, dan ziet het geheel er als volgt uit. Voor meer details leest u pagina 4~13 in de gebruikershandleiding. - - LevelOne WAB-6120 | Quick Install Guide - Page 25
Configuratie Controleer de netwerkinstellingen om aan te melden bij de gebruikersinterface Zorg ervoor dat de computer zelf een IP-adres kan verkrijgen, zodat de router tijdens de configuratie met de computer kan communiceren. Selecteer "Configuratiescherm" > "Netwerkverbindingen". Klik met de - LevelOne WAB-6120 | Quick Install Guide - Page 26
AP-stand 1. Kies Wireless (Draadloos) > Basic Settings (Basisinstellingen) voor de draadloze basisinstellingen Klik op Save (Opslaan). Kies Security (Beveiliging) om de beveiligingsinstellingen te veranderen. Klik op Save (Opslaan). - 26 - - LevelOne WAB-6120 | Quick Install Guide - Page 27
U ziet nu SSID "LevelOne" in de lijst. Gefeliciteerd! De AP-stand is nu met succes geconfigureerd. - 27 - - LevelOne WAB-6120 | Quick Install Guide - Page 28
Dansk Hardware Installation 1. Grib fat I overdel og træk den bagud for at tage den ud 2. Indsæt Cat.5/5e/6 kabel ind I RJ-45 porten. 3. Skyd overdel tilbage 4. Indsæt strømkabel ind I DC porten på PoE injectoren - 28 - - LevelOne WAB-6120 | Quick Install Guide - Page 29
5. Sæt den anden ende af netværkskablet ind I PoE injektoreren . Når du er færdig med step 5, ser det komplette sæt således ud: For flere detaljer, tjek venligst din burger manual side 4~13 . - 29 - - LevelOne WAB-6120 | Quick Install Guide - Page 30
Konfiguration Tjek din netværks opsætninger til login web UI Venligst sikker dig at din PC kan modtage en IP adresse automatisk, så routeren kan kommunikere med din PC under konfigurationen. Vælg "Kontrol Panel" > "Netværks forbindelser". Højre klik "Local Area Connection" og vælg "egenskaber". Vælg - LevelOne WAB-6120 | Quick Install Guide - Page 31
AP Mode 1. Vælg Wireless > Basic Settings for den trådløse basis opsætning Klik gem/ save. Vælg sikkerhed/security for at ændre sikkerheds opsætninger. Klik gem/save. - 31 - - LevelOne WAB-6120 | Quick Install Guide - Page 32
Nu, kan du se SSID "LevelOne" eller dit eget valgte SSID i listen. Tillykke! AP mode er successfuldt konfigureret. - 32 - - LevelOne WAB-6120 | Quick Install Guide - Page 33
Italiano Installazione dell'hardware 1. Afferrare il coperchio e tirarlo indietro con forza per estrarlo 2. Collegare il cavo Cat. 5/5e/6 alla porta RJ-45. 3. Rimettere il coperchio 4. Collegare il cavo d'alimentazione alla porta DC dell'iniettore PoE - 33 - - LevelOne WAB-6120 | Quick Install Guide - Page 34
punto 4. Dopo avere completato le istruzioni del punto 5, il set completo sarà come quello dell'immagine che segue. Per altri dettagli, controllare pagina 4-13 del Manuale d'uso. - 34 - - LevelOne WAB-6120 | Quick Install Guide - Page 35
Configurazione Controllare le impostazioni di rete per accedere all'interfaccia web Assicurarsi che il PC possa ottenere automaticamente l'indirizzo IP così che il router possa comunicare col PC durante la configurazione. Selezionare "Pannello di controllo" > "Connessioni di rete". Fare clic col - LevelOne WAB-6120 | Quick Install Guide - Page 36
Modalità punto d'accesso 1. Scegliere Wireless > Basic Settings (Impostazioni di base) per le impostazioni wireless di base Fare clic su Save (Salva). Scegliere Security (Protezione) per modificare le impostazioni di protezione. Fare clic su Save (Salva). - 36 - - LevelOne WAB-6120 | Quick Install Guide - Page 37
Adesso, nell'elenco si vede SSID "LevelOne". Congratulazioni! La modalità AP (Punto d'accesso) è stata configurata correttamente. - 37 - - LevelOne WAB-6120 | Quick Install Guide - Page 38
1 2 Cat.5/5e/6 RJ45. 3 4 DC PoE injector - 38 - - LevelOne WAB-6120 | Quick Install Guide - Page 39
5 Cat.5/5e/6) του AP POE PoE Injector LAN PoE Injector switch, hub 4~13 . - 39 - - LevelOne WAB-6120 | Quick Install Guide - Page 40
Router TCP/IP Internet Explorer http://192.168.1.1 User name: admin Password: admin - 40 - - LevelOne WAB-6120 | Quick Install Guide - Page 41
1 Wireless > Basic Settings save. Security Save. - 41 - - LevelOne WAB-6120 | Quick Install Guide - Page 42
SSID "LevelOne - 42 - - LevelOne WAB-6120 | Quick Install Guide - Page 43
Português Instalação do hardware 1. Segure a tampa e puxe com força para trás para a remover 2. Ligue o cabo Cat.5/5e/6 à porta RJ-45. 3. Coloque novamente a tampa 4. Ligue o cabo de alimentação à entrada DC do injector PoE - 43 - - LevelOne WAB-6120 | Quick Install Guide - Page 44
injector PoE mencionado no passo 4. Depois de concluir o passo 5, o conjunto complete deverá ser semelhante à imagem seguinte. Para mais detalhes consulte as páginas 4 a 13 do seu manual do utilizador. - 44 - - LevelOne WAB-6120 | Quick Install Guide - Page 45
Configuração Verifique as suas definições de rede para iniciar sessão na interface Web Certifique-se de que o seu PC consegue obter automaticamente o endereço IP para que o router consiga comunicar com o PC durante a configuração. Seleccione "Painel de controlo" > "Ligações de rede". Clique com o - LevelOne WAB-6120 | Quick Install Guide - Page 46
Modo PA 1. Seleccione Wireless (Sem fios) > Basic Settings (Configurações básicas) para entrar nas configurações básicas do modo sem fios Clique em save (Guardar). Seleccione Security (Segurança) para alterar as definições de segurança. Clique em Save (Guardar). - 46 - - LevelOne WAB-6120 | Quick Install Guide - Page 47
Agora já conseguirá ver a rede SSID "LevelOne" na lista. Parabéns! O modo PA foi configurado com êxito. - 47 - - LevelOne WAB-6120 | Quick Install Guide - Page 48
Svenska Hårdvaruinstallation 1. Håll i locket och dra det bakåt med ett kraftigt ryck för att ta av det 2. Sätt i Cat.5/5e/6-sladden i RJ-45-porten. 3. Sätt tillbaka locket 4. Sätt i nätsladden i DC-porten på PoE-injektorn - 48 - - LevelOne WAB-6120 | Quick Install Guide - Page 49
5. Upprepa steg 3 och 4 genom att sätta i den andra änden av Cat.5/5e/6-sladden i steg 3 i PoE-porten på PoE-injektorn i steg 4. När du är klar med steg 5 skall uppkopplingen se ut som i följande bild. För ytterligare detaljer, se sid 4-13 i användarhandboken. - 49 - - LevelOne WAB-6120 | Quick Install Guide - Page 50
Konfiguration Kontrollera nätverksinställningarna för inloggning till webbgränssnittet Se till att din dator kan ges en IP-adress automatiskt så att routern kan kommunicera med datorn under konfigurationen. Välj "Kontrollpanel" > "Nätverksanslutningar". Högerklicka på "Lokal nätverksanslutning" och - LevelOne WAB-6120 | Quick Install Guide - Page 51
AP-läge 1. Välj Wireless (Trådlöst) > Basic Settings (Grundläggande inställningar) för grundläggande trådlösinställningar Klicka på save (spara). Tryck på Security (Säkerhet) för att ändra på säkerhetsinställningarna. Klicka på Save (spara). - 51 - - LevelOne WAB-6120 | Quick Install Guide - Page 52
Du kan nu se SSID "LevelOne" i listan. Gratulerar! Konfigurationen av AP-läget är nu klar. - 52 - - LevelOne WAB-6120 | Quick Install Guide - Page 53
Slovenščina Postavitev naprav 1. Držite pokrov in ga močneje potegnite, da se odpre. 2. Priključite Cat.5/5e/6 mrežni kabel v RJ-45 port. 3. Zaprite pokrov. 4. Vključite napajalni kabel v DC port na PoE injectorju - 53 - - LevelOne WAB-6120 | Quick Install Guide - Page 54
5. Z mrežnim kablom sedaj povežite PoE port na Injectorju in ko končate, mora shema povezanih naprav izgledati kot na spodnji sliki. Za podrobnejša navodila, si prosimo oglejte User manual, na straneh 4~13. - 54 - - LevelOne WAB-6120 | Quick Install Guide - Page 55
Konfiguracija Pred pričetkom preverite vaše mrežne nastavitve Prosimo poskrbite, da bo vaš računalnik samodejno pridobil IP naslov in da bo lahko komuniciral z usmerjevalnikom med postopkom konfiguracije. Izberite "Nadzorna Plošča" > "Omrežne povezave". Desni klik na "Povezava lokalnega omrežja" in - LevelOne WAB-6120 | Quick Install Guide - Page 56
AP Mode 1. Za osnovne nastavitve izberite Wireless > Basic Settings Na koncu kliknite "Save". Za varnostne nastavitve izberite Security. Na koncu kliknite "Save". - 56 - - LevelOne WAB-6120 | Quick Install Guide - Page 57
Sedaj lahko na seznamu brezžičnih omrežij vidite SSID "LevelOne" . Čestitamo! Dostopna točka je bila uspešno konfigurirana. - 57 - - LevelOne WAB-6120 | Quick Install Guide - Page 58
1 2. 請插入 Cat.5/5e/6 RJ-45 孔. 3 4 PoE DC 孔內 - 58 - - LevelOne WAB-6120 | Quick Install Guide - Page 59
5 PoE PoE 4 ~ 13 頁. - 59 - - LevelOne WAB-6120 | Quick Install Guide - Page 60
網路設定 IP Control Panel" > "Network Connections". 請在 "Local Area Connection Properties TCP/IP protocol. 點選 Properties Obtain IP address automatically" 以及 "Obtain DNS server address automatically" Internet Explorer http://192.168.1.1 admin 密碼: admin - 60 - - LevelOne WAB-6120 | Quick Install Guide - Page 61
AP 模式 1. 請選擇 Wireless > Basic Settings 請點選 " Apply" 請選擇 Security Settings Apply" - 61 - - LevelOne WAB-6120 | Quick Install Guide - Page 62
SSID "LevelOne 恭喜你! AP - 62 - - LevelOne WAB-6120 | Quick Install Guide - Page 63
1 2. RJ-45 Cat.5/5e/6 3 4. 전원 DC 코드를 PoE 의 DC - 63 - - LevelOne WAB-6120 | Quick Install Guide - Page 64
5 3/4 5 4~14 - 64 - - LevelOne WAB-6120 | Quick Install Guide - Page 65
웹 UI Check 사용 PC IP PC l TCP/IP IP DNS IP http://192.168.1.1 User name: admin Password: admin - 65 - - LevelOne WAB-6120 | Quick Install Guide - Page 66
AP Mode 1. Wireless > Basic Settings for the wireless basic settings Save Security Save - 66 - - LevelOne WAB-6120 | Quick Install Guide - Page 67
AP SSID "LevelOne" 연결 Congratulations! AP mode - 67 - - LevelOne WAB-6120 | Quick Install Guide - Page 68
1 2 5/5e/6 RJ-45. 3 4 PoE - 68 - - LevelOne WAB-6120 | Quick Install Guide - Page 69
5 5/5e/6 3 PoE 4 5 4-13. - 69 - - LevelOne WAB-6120 | Quick Install Guide - Page 70
IP Local Area Connection TCP/IP IP Internet Explorer http://192.168.1.1 admin admin - 70 - - LevelOne WAB-6120 | Quick Install Guide - Page 71
1 Wireless Basic Settings Save Security Save - 71 - - LevelOne WAB-6120 | Quick Install Guide - Page 72
SSID «LevelOne». - 72 - - LevelOne WAB-6120 | Quick Install Guide - Page 73
Polish Instalacja urządzenia 1. Chwyć za pokrywę i pociągnij ją mocno do tyłu w celu odłączenia 2. Podłącz kabel kat.5/5e/6 do portu RJ-45. 3. Wsuń z powrotem pokrywę 4. Podłącz przewód zasilający do portu prądu stałego injectora PoE - 73 - - LevelOne WAB-6120 | Quick Install Guide - Page 74
5. Ustaw razem elementy wymienione w czynności 3 i czynności 4, podłączając by złącze z drugiej strony kabla kat.5/5e/6 do portu PoE injectora PoE wskazanego w czynności 4. Po zakończeniu czynności 5, kompletny zestaw będzie wyglądał jak na następującej ilustracji. Dalsze szczegółowe informacje - LevelOne WAB-6120 | Quick Install Guide - Page 75
Konfiguracja Sprawdź ustawienia sieciowe logowania do interfejsu użytkownika sieci web Sprawdź, czy używany komputer PC może automatycznie uzyskać adres IP, aby router mógł komunikować się z komputerem PC podczas konfiguracji. Wybierz "Panel sterowania" > "Połączenia sieciowe". Kliknij prawym - LevelOne WAB-6120 | Quick Install Guide - Page 76
Tryb AP 1. Wybierz Wireless (Połączenie bezprzewodowe) > Basic Settings (Ustawienia podstawowe) dla wykonania podstawowych ustawień połączenia bezprzewodowego Kliknij save (zapisz). Wybierz Security (Zabezpieczenie), aby zmienić ustawienia zabezpieczenia. Kliknij Save (Zapisz). - 76 - - LevelOne WAB-6120 | Quick Install Guide - Page 77
Na liście wyświetla się teraz SSID "LevelOne". Gratulujemy! Tryb AP został pomyślnie skonfigurowany. - 77 -
-
 1
1 -
 2
2 -
 3
3 -
 4
4 -
 5
5 -
 6
6 -
 7
7 -
8
-
9
-
10
-
11
-
12
-
13
-
14
-
15
-
16
-
17
-
18
-
19
-
20
-
21
-
22
-
23
-
24
-
25
-
26
-
27
-
28
-
29
-
30
-
31
-
32
-
33
-
34
-
35
-
36
-
37
-
38
-
39
-
40
-
41
-
42
-
43
-
44
-
45
-
46
-
47
-
48
-
49
-
50
-
51
-
52
-
53
-
54
-
55
-
56
-
57
-
58
-
59
-
60
-
61
-
62
-
63
-
64
-
65
-
66
-
67
-
68
-
69
-
70
-
71
-
72
-
73
-
74
-
75
-
76
-
77
 |
 |

- 1 -
LevelOne
WAB-6120
150Mbps Wireless Outdoor PoE Access Point
Quick Installation Guide
English
Português
Deutsch
Svenska
Français
Sloven
šč
ina
Español
繁體中文
Nederlands
한국어
Dansk
Русский
Italiano
Polish
Ελληνικά