Kyocera ECOSYS M3655idn M3655idn/M3660idn Operation Guide
Kyocera ECOSYS M3655idn Manual
 |
View all Kyocera ECOSYS M3655idn manuals
Add to My Manuals
Save this manual to your list of manuals |
Kyocera ECOSYS M3655idn manual content summary:
- Kyocera ECOSYS M3655idn | M3655idn/M3660idn Operation Guide - Page 1
PRINT COPY SCAN FAX ECOSYS M3655idn ECOSYS M3660idn OPERATION GUIDE - Kyocera ECOSYS M3655idn | M3655idn/M3660idn Operation Guide - Page 2
routine maintenance, and take simple troubleshooting measures as needed so that the machine can always be used in the optimum condition. Please read this Operation Guide before using the machine. To maintain quality, we recommend using genuine Kyocera toner containers, which must pass numerous - Kyocera ECOSYS M3655idn | M3655idn/M3660idn Operation Guide - Page 3
Guide 1-2 Environment ...1-3 Precautions for Use 1-4 Laser Safety (Europe 1-5 SAFETY OF LASER BEAM (USA 1-6 Safety Instructions Regarding the Disconnection of Power 1-7 Compliance and Conformity 1-7 Other precautions (for users On/Off ...2-10 Power On ...2-10 Power Off ...2-10 Using the - Kyocera ECOSYS M3655idn | M3655idn/M3660idn Operation Guide - Page 4
No. Search key 2-20 Help Screen ...2-21 Login/Logout ...2-22 Login ...2-22 Logout ...2-23 Default Settings of the Machine 2-24 Setting Date and Time note of the user name and domain name 3-19 Creating a Shared Folder, Making a Note of a Shared Folder 3-20 Configuring Windows Firewall 3-24 - Kyocera ECOSYS M3655idn | M3655idn/M3660idn Operation Guide - Page 5
Printing on Non-standard Sized Paper 4-4 Banner printing ...4-5 Printer Driver Print Settings Screen 4-9 Printer Driver Help 4-10 Changing the Default Printer Driver Settings (Windows 8.1 4-10 Canceling Printing from a Computer 4-10 Printing by AirPrint ...4-11 Printing by Google Cloud Print - Kyocera ECOSYS M3655idn | M3655idn/M3660idn Operation Guide - Page 6
Documents in Custom Box to E-mail Address of Logged in user 5-48 Scanning Document Stored in a Custom Box 5-49 5-53 Removing USB Memory 5-54 Using the Manual Stapler 5-55 6 Using Various Functions 6-1 Functions 6-8 Functions ...6-10 ID Card Copy ...6-10 Original Size ...6-10 Paper Selection - Kyocera ECOSYS M3655idn | M3655idn/M3660idn Operation Guide - Page 7
PDF Password 6-35 10 Pause and Resumption of Jobs 7-10 Canceling of Jobs ...7-10 Device/Communication 7-11 Checking the Remaining Amount of Toner 10 Home ...8-20 Copy ...8-20 Send ...8-21 Document Box ...8-22 FAX ...8-22 Application ...8-22 Internet ...8-23 Address Book/One Touch 8-23 User Login - Kyocera ECOSYS M3655idn | M3655idn/M3660idn Operation Guide - Page 8
47 Login/Logout ...9-47 Unknown User Settings 9-48 Unknown ID Job ...9-48 Registering Information for a User whose ID is Unknown 9-49 10 Troubleshooting 10-1 Regular Maintenance ...10-2 Cleaning ...10-2 Toner Container Replacement 10-6 Waste Toner Box Replacement 10-10 Replacing Staples 10 - Kyocera ECOSYS M3655idn | M3655idn/M3660idn Operation Guide - Page 9
Printer Functions 11-24 Scanner Functions 11-25 Document Processor 11-25 Paper Feeder (500-sheet) (Option 11-26 Manual Stapler ...11-26 Glossary ...11-27 Index ...Index-1 viii - Kyocera ECOSYS M3655idn | M3655idn/M3660idn Operation Guide - Page 10
the status and change the settings of the machine from a Web browser on your computer. Command Center RX (page 2-53) Command Center RX User Guide Output Data USB memory Fax data Security You can use the machine security levels according to your needs. Strengthen security (page xii) Document Box - Kyocera ECOSYS M3655idn | M3655idn/M3660idn Operation Guide - Page 11
one job (Continuous Scan) Send one time with multiple sending options (Multi Sending) Save frequently used documents in the machine (Custom Box) 1 11 21 1 1~10 11~20 21~30 1~30 It is useful when preparing many-page handouts. When a large number of originals cannot be placed in the document - Kyocera ECOSYS M3655idn | M3655idn/M3660idn Operation Guide - Page 12
Save energy and cost Save energy as needed (Energy Saver function) Use less toner for printing (EcoPrint) Off You can save the paper used for sending a of paper and perform sending jobs efficiently. FAX Operation Guide The machine is equipped with Energy Saver function that automatically - Kyocera ECOSYS M3655idn | M3655idn/M3660idn Operation Guide - Page 13
on the Printer (page 4-12) You can log in simply by touching an ID card. You don't need to enter your user name and password. Card Authentication Kit(B) "Card Authentication Kit" (page 11-3) Various functions are available for administrators to strengthen security. Strengthening the Security (page - Kyocera ECOSYS M3655idn | M3655idn/M3660idn Operation Guide - Page 14
without concerning the network cables. In addition, Wi-Fi Direct, etc. are supported. Configuring the Wireless Network (page 2-27) Setting Wi-Fi Direct (page 2- the machine remotely to print, send or download data. Administrators can configure the machine behavior or management settings. Command Center RX - Kyocera ECOSYS M3655idn | M3655idn/M3660idn Operation Guide - Page 15
> Color and Image Quality Functions Color and Image Quality Functions The machine is equipped with various color and image quality functions. You can adjust the scanned image as desired. Basic Color Modes The basic color modes are as follows. Color mode Description Auto Color Automatically - Kyocera ECOSYS M3655idn | M3655idn/M3660idn Operation Guide - Page 16
> Color and Image Quality Functions Adjusting Image Quality and Color To adjust the image quality or color of an image, use the following functions. I want to... Adjust the color precisely. Adjust the density. Sample image Before After Function Density Page page 6-13 Adjust the image quality - Kyocera ECOSYS M3655idn | M3655idn/M3660idn Operation Guide - Page 17
routine maintenance, and what to do when problems occur. Safety Guide Provides safety and cautionary information for installation environment and use of the machine. Be sure to read this guide before using the machine. Safety Guide (ECOSYS M3655idn/ECOSYS M3660idn) Indicates the space required for - Kyocera ECOSYS M3655idn | M3655idn/M3660idn Operation Guide - Page 18
to check and change settings. Print data from a computer Printer Driver User Guide Explains how to install the printer driver and use the printer function. Directly print a PDF file KYOCERA Net Direct Print Operation Guide Explains how to print PDF files without launching Adobe Acrobat or - Kyocera ECOSYS M3655idn | M3655idn/M3660idn Operation Guide - Page 19
operation of the machine. Menu) 9 User Authentication and Accounting (User Login, Job Accounting) Explains user login and job accounting. 10 Troubleshooting Explains what to do when toner runs out, an error is displayed, or a paper jam or other problem occurs. 11 Appendix Describes convenient - Kyocera ECOSYS M3655idn | M3655idn/M3660idn Operation Guide - Page 20
how it is used. If the Table of Contents or tools do not appear, refer to Adobe Reader Help. Certain items are indicated in this guide by the conventions described below. Convention [Bold] "Regular" Indicates keys and buttons. Indicates a message or setting. Description xix - Kyocera ECOSYS M3655idn | M3655idn/M3660idn Operation Guide - Page 21
) Conventions used in procedures for operating the machine In this Operation Guide, continuous operation of the keys on the touch panel is as follows: Actual procedure Select the [System Menu/Counter] key. Select [ ]. Select [Common Settings]. Select [ - Kyocera ECOSYS M3655idn | M3655idn/M3660idn Operation Guide - Page 22
(page 6-13) Duplex (page 6-22) Combine (page 6-20) Quiet Mode (page 6-25) Functions Collate (page 6-13) ID Card Copy (page 6-10) Original Size (page 6-10) Original Orientation (page 6-12) Mixed Size Originals (page 6-13) Original Image (page 6-14) EcoPrint (page 6-15) Sharpness (page 6-16) Contrast - Kyocera ECOSYS M3655idn | M3655idn/M3660idn Operation Guide - Page 23
to Command Center RX User Guide.) E-mail (page 5-22) Folder (page 5-23) FAX Server (page 5-34) FAX (Refer to FAX Operation Guide.) WSD Scan (page 5-31) Functions Color Selection (page 6-15) Quiet Mode (page 6-25) File Format (page 6-29) Original Size (page 6-10) - Kyocera ECOSYS M3655idn | M3655idn/M3660idn Operation Guide - Page 24
Refer to FAX Operation Guide.) Custom Box Custom Box Menu Store File Print Duplex (page 6-27) Scan Resolution (page 6-33) Density (page 6-13) File Name Entry (page 6-25) Color Selection (page 6-15) Quiet Mode (page 6-25) Functions Original Size (page 6-10) Original Orientation (page 6-12 - Kyocera ECOSYS M3655idn | M3655idn/M3660idn Operation Guide - Page 25
5-22) Address Book (page 5-20) Ext Address Book (Refer to Command Center RX User Guide.) E-mail (page 5-22) Folder (page 5-23) FAX Server (Refer to FAX Operation Guide.) FAX (Refer to FAX Operation Guide.) Functions File Format (page 6-29) File Separation (page 6-33) Resolution (page 6-33 - Kyocera ECOSYS M3655idn | M3655idn/M3660idn Operation Guide - Page 26
24) File Name Entry (page 6-25) Priority Override (page 6-25) Encrypted PDF Password (page 6-35) JPEG/TIFF Print (page 6-36) XPS Fit to Page (page page 6-15) Functions Quiet Mode (page 6-25) Original Size (page 6-10) Original Orientation (page 6-12) Mixed Size Originals (page 6-13) Storing - Kyocera ECOSYS M3655idn | M3655idn/M3660idn Operation Guide - Page 27
> Menu Map Sub Address Box (Refer to FAX Operation Guide.) Polling Box Polling Box (Refer to FAX Operation Guide.) FAX Memory RX Box (Refer to FAX Operation Guide.) xxvi - Kyocera ECOSYS M3655idn | M3655idn/M3660idn Operation Guide - Page 28
Job Log (page 7-8) Store Job Log (page 7-8) FAX Job Log (Refer to FAX Operation Guide.) Scanner (page 7-11) Printer (page 7-11) FAX Memory RX Box (refer to FAX Operation Guide.) FAX (refer to FAX Operation Guide.) Toner Status (page 7-13) Paper Status (page 7-13) Removable Memory (page 7-11) USB - Kyocera ECOSYS M3655idn | M3655idn/M3660idn Operation Guide - Page 29
Service Status (page 8-6) Accounting Report (page 8-6) Sub Address Box List (Refer to FAX Operation Guide.) FAX List (Index) (Refer to FAX Operation Guide.) FAX List (No.) (Refer to FAX Operation Guide Counter Printed Pages (page 2-50) Scanned Pages (page 2-50) User Property (page 9-9) xxviii - Kyocera ECOSYS M3655idn | M3655idn/M3660idn Operation Guide - Page 30
Cassette 4 (page 8-8) Cassette 5 (page 8-8) Multi Purpose Tray (page 8-9) Default Screen (page 8-10) Sound Buzzer (page 8-10) FAX Speaker Volume (Refer to FAX Operation Guide.) FAX Monitor Volume (Refer to FAX Operation Guide.) Original Settings Custom Original Size (page 8-11) Auto Detect - Kyocera ECOSYS M3655idn | M3655idn/M3660idn Operation Guide - Page 31
Defaults FAX TX Resolution (Refer to FAX Operation Guide.) Zoom (page 8-16) Continuous Scan (Copy) (page 8-16) Continuous Scan (FAX) (Refer to FAX Operation Guide Multi Originals Fed (page 8-18) Measurement (page 8-18) Low Toner Alert (page 8-18) Keyboard Layout (page 8-18) USB Keyboard - Kyocera ECOSYS M3655idn | M3655idn/M3660idn Operation Guide - Page 32
3-28) One Touch Key (page 3-33) Address Book Defaults Sort (page 8-23) Address Book (page 8-23) Edit Restriction (page 8-24) Print List (Refer to FAX Operation Guide.) User Login/Job Accounting User Login Settings User Login (page 9-3) Local User List (page 9-6) ID Card Settings Keyboard - Kyocera ECOSYS M3655idn | M3655idn/M3660idn Operation Guide - Page 33
Map User Login/Job Accounting Printer User Login Settings Authentication Security User Account Lockout Settings (page 9-4) Password Default Setting Apply Limit (page 9-44) Copy/Printer Count (page 9-44) Default Counter Limit (page 9-44) Unknown User Settings Unknown ID Job (page 9-48) User - Kyocera ECOSYS M3655idn | M3655idn/M3660idn Operation Guide - Page 34
SSL (page 8-37) IPP Security (page 8-37) HTTP Security (page 8-37) SMTP Security (page 8-37) POP3 Security (User 1) (page 8-37) POP3 Security (User 2) (page 8-37) POP3 Security (User 3) (page 8-37) Ping (page 8-37) Restart Network (page 8-38) Proxy (page 8-38) Optional Network Setup (page - Kyocera ECOSYS M3655idn | M3655idn/M3660idn Operation Guide - Page 35
Time Zone (page 8-46) Auto Panel Reset (page 8-46) Panel Reset Timer (page 8-46) Low Power Timer ( 8-48) Unusable Time (Refer to FAX Operation Guide.) Ping Timeout (page 8-48) Quiet Mode Settings Adj. Send/Box (Auto) (page 8-49) Toner Save Level (EcoPrint) Copy (page 8-49) Printer (page - Kyocera ECOSYS M3655idn | M3655idn/M3660idn Operation Guide - Page 36
> Menu Map Adjustment/ Maintenance Correcting Black Line (page 8-50) Display Brightness (page 8-50) Drum Refresh (page 8-50) Auto Drum Refresh (page 8-50) Service Setting (page 8-50) xxxv - Kyocera ECOSYS M3655idn | M3655idn/M3660idn Operation Guide - Page 37
Guide ...1-2 Environment ...1-3 Precautions for Use ...1-4 Laser Safety (Europe) ...1-5 SAFETY OF LASER BEAM (USA) ...1-6 Safety Instructions Regarding the Disconnection of Power 1-7 Compliance and Conformity ...1-7 Other precautions (for users Product (If equipped 1-10 Legal Information ...1-11 - Kyocera ECOSYS M3655idn | M3655idn/M3660idn Operation Guide - Page 38
in This Guide The sections of this guide and parts of the machine marked with symbols are safety warnings meant to protect the user, other Please contact your service representative to order a replacement if the safety warnings in this Operation Guide are illegible or if the guide itself is missing - Kyocera ECOSYS M3655idn | M3655idn/M3660idn Operation Guide - Page 39
and Safety Information > Notice Environment The service environmental conditions are as follows: Temperature Humidity 50 to 90.5 °F (10 to 32.5 °C) 15 to 80% Avoid the following locations when selecting a site for the machine. • Avoid locations near a window or with exposure to direct sunlight - Kyocera ECOSYS M3655idn | M3655idn/M3660idn Operation Guide - Page 40
. Do not attempt to force open or destroy parts which contain toner. Other precautions Return the exhausted toner container and waste toner box to your dealer or service representative. The collected toner container and waste toner box will be recycled or disposed in accordance with the relevant - Kyocera ECOSYS M3655idn | M3655idn/M3660idn Operation Guide - Page 41
laser radiation emitted inside this machine is hermetically sealed within the protective housing and external cover. In the normal operation of the product by user, no radiation can leak from the machine. This machine is classified as Class 1 laser product under IEC/EN 60825-1:2014. Regarding CLASS - Kyocera ECOSYS M3655idn | M3655idn/M3660idn Operation Guide - Page 42
marketed in the United States. On this machine, the label is on the rear. ECOSYS M3655idn / ECOSYS M3660idn 3. Maintenance For safety of the service personnel, follow the maintenance instructions in the other section of this manual. 4. Safety switch The power to the laser unit is cut off when the - Kyocera ECOSYS M3655idn | M3655idn/M3660idn Operation Guide - Page 43
KYOCERA Document Solutions Inc. declares that the radio equipment type ECOSYS M3655idn/ ECOSYS M3660idn are in compliance with Directive 2014/53/EU. The full text of the EU declaration of conformity is available at the following internet address: https://www.kyoceradocumentsolutions.eu/index/service - Kyocera ECOSYS M3655idn | M3655idn/M3660idn Operation Guide - Page 44
> Notice Warranty (the United States and Canada) ECOSYS M3655idn / M3660idn MULTIFUNCTIONAL PRODUCT LIMITED WARRANTY KYOCERA Document Solutions America, Inc. and KYOCERA Document Solutions Canada, Ltd. (both referred to as "KYOCERA") warrant the Customer's new Multifunctional Product (referred to - Kyocera ECOSYS M3655idn | M3655idn/M3660idn Operation Guide - Page 45
area in which radio waves can be transmitted. On the other hand, the following problems may occur if security settings are not configured, because radio waves can pass through contents. • Personal information including ID, passwords, and credit card numbers • Contents of email messages 1-9 - Kyocera ECOSYS M3655idn | M3655idn/M3660idn Operation Guide - Page 46
settings and that they ensure that they fully understand the problems that can occur when the product is used without configuring instructions and precautions provided on the automatic control equipment. • If this product is used in devices that are directly related to service Inalámbricas. 1-10 - Kyocera ECOSYS M3655idn | M3655idn/M3660idn Operation Guide - Page 47
of this guide without the prior written consent of KYOCERA Document Solutions Inc. is prohibited. Regarding Trade Names • PRESCRIBE and ECOSYS are registered trademark of Kyocera Corporation. • KPDL is a trademark of Kyocera Corporation. • Microsoft, Windows, Windows Vista, Windows Server, Internet - Kyocera ECOSYS M3655idn | M3655idn/M3660idn Operation Guide - Page 48
LIABLE FOR ANY DIRECT, INDIRECT, INCIDENTAL, SPECIAL, EXEMPLARY, OR CONSEQUENTIAL DAMAGES (INCLUDING, BUT NOT LIMITED TO, PROCUREMENT OF SUBSTITUTE GOODS OR SERVICES; LOSS OF USE, DATA, OR PROFITS; OR BUSINESS INTERRUPTION) HOWEVER CAUSED AND ON ANY THEORY OF LIABILITY, WHETHER IN CONTRACT, STRICT - Kyocera ECOSYS M3655idn | M3655idn/M3660idn Operation Guide - Page 49
being used are not cryptographic related :-). 4. If you include any Windows specific code (or a derivative thereof) from the apps directory ( DAMAGES (INCLUDING, BUT NOT LIMITED TO, PROCUREMENT OF SUBSTITUTE GOODS OR SERVICES; LOSS OF USE, DATA, OR PROFITS; OR BUSINESS INTERRUPTION) HOWEVER - Kyocera ECOSYS M3655idn | M3655idn/M3660idn Operation Guide - Page 50
Legal and Safety Information > Notice 10 You shall not sublicense, sell, lease, or otherwise transfer EXEMPLARY, OR CONSEQUENTIAL DAMAGES (INCLUDING, BUT NOT LIMITED TO, PROCUREMENT OF SUBSTITUTE GOODS OR SERVICES; LOSS OF USE, DATA, OR PROFITS; OR BUSINESS INTERRUPTION) HOWEVER CAUSED AND ON ANY - Kyocera ECOSYS M3655idn | M3655idn/M3660idn Operation Guide - Page 51
Legal and Safety Information > Notice "Object" form shall mean any form resulting from mechanical transformation or translation of a Source form, including but not limited to compiled object code, generated documentation, and conversions to other media types. "Work" shall mean the work of authorship - Kyocera ECOSYS M3655idn | M3655idn/M3660idn Operation Guide - Page 52
This License does not grant permission to use the trade names, trademarks, service marks, or product names of the Licensor, except as required for may choose to offer, and charge a fee for, acceptance of support, warranty, indemnity, or other liability obligations and/or rights consistent with - Kyocera ECOSYS M3655idn | M3655idn/M3660idn Operation Guide - Page 53
duplex printing be set to use duplex mode by default. Resource Saving - Paper For the preservation and sustainable quality standard, be used. This machine also supports printing on 64 g/m2 paper. Using such copy paper for dry toner imaging processes" Your sales or service representative can provide - Kyocera ECOSYS M3655idn | M3655idn/M3660idn Operation Guide - Page 54
Legal and Safety Information > Notice Energy Star (ENERGY STAR®) Program We have determined as a participating company in the International Energy Star Program that this product is compliant with the standards laid out in the International Energy Star Program. ENERGY STAR® is a voluntary energy - Kyocera ECOSYS M3655idn | M3655idn/M3660idn Operation Guide - Page 55
2-10 Power On 2-10 Power Off 2-10 Using Screen 2-21 Login/Logout 2-22 Login 2-22 Logout 2-23 Default Settings of Windows 2-37 Installing Software in Windows ......... 2-38 Uninstalling the Software 2-44 Installing Software in Mac Computer 2-45 Setting TWAIN Driver 2-47 Setting WIA Driver - Kyocera ECOSYS M3655idn | M3655idn/M3660idn Operation Guide - Page 56
Names Machine Exterior 12 34 13 14 5 6 7 8 9 1 Document Processor 2 Original Width Guides 3 Original Table 4 Original Eject Table 5 Inner Tray 6 Paper Stopper 7 Front Cover 8 Cassette 1 9 Power Switch 10 15 16 11 12 17 10 Original Stopper 11 USB Memory Slot 12 Front Cover Open Button 13 - Kyocera ECOSYS M3655idn | M3655idn/M3660idn Operation Guide - Page 57
Installing and Setting up the Machine > Part Names 19 18 18 Anti-theft Lock Slot 19 Rear Cover 2-3 - Kyocera ECOSYS M3655idn | M3655idn/M3660idn Operation Guide - Page 58
6 4 5 1 USB Interface Connector 2 Network Interface Connector 3 Option Interface Slot 4 TEL Connector 5 LINE Connector 6 Fuser Cover 7 8 9 10 11 11 12 13 7 Paper Width Guides 8 Tray Extension 9 Multi Purpose Tray 10 Paper Length Guide 11 Paper Width Guides 12 Size Dial 13 Duplex Cover 2-4 - Kyocera ECOSYS M3655idn | M3655idn/M3660idn Operation Guide - Page 59
Installing and Setting up the Machine > Part Names 15 16 14 14 Toner Container 15 Toner Container Lock Lever 16 Registration Roller 17 Left Cover 18 Waste Toner Box 17 18 2-5 - Kyocera ECOSYS M3655idn | M3655idn/M3660idn Operation Guide - Page 60
Installing and Setting up the Machine > Part Names With Optional Equipments Attached 1 2 3 4 5 1 Card Reader 2 Cassette 2 3 Cassette 3 4 Cassette 4 6 7 8 5 Cassette 5 6 Manual Stapler 7 Rear Tray 8 Paper Stopper Optional Equipment (page 11-2) 2-6 - Kyocera ECOSYS M3655idn | M3655idn/M3660idn Operation Guide - Page 61
Installing and Setting up the Machine > Connecting the Machine and Other Devices Connecting the Machine and Other Devices Prepare the cables necessary to suit the environment and purpose of the machine use. When Connecting the Machine to the PC via USB USB When Connecting the Machine to the PC or - Kyocera ECOSYS M3655idn | M3655idn/M3660idn Operation Guide - Page 62
Setting up the Machine > Connecting Cables Connecting Cables Connecting LAN Cable IMPORTANT If the power is on, turn the power switch off. Power Off (page 2-10) 1 Connect the cable to the machine. 1 Connect the LAN cable to the network interface connector. 2 Connect the other end of the cable to the - Kyocera ECOSYS M3655idn | M3655idn/M3660idn Operation Guide - Page 63
Installing and Setting up the Machine > Connecting Cables Connecting USB Cable IMPORTANT If the power is on, turn the power switch off. Power Off (page 2-10) 1 Connect the cable to the machine. 1 Connect the USB cable to the USB interface connector located on the left side of the body. 2 Connect the - Kyocera ECOSYS M3655idn | M3655idn/M3660idn Operation Guide - Page 64
power switch disables fax transmission and reception. • Remove paper from the cassettes and seal it in the paper storage bag to protect it from humidity. 2-10 - Kyocera ECOSYS M3655idn | M3655idn/M3660idn Operation Guide - Page 65
Key Assignment (page 8-19) Select the function. Home Admin 10:10 Logout Copy Send FAX Job Box Removable Memory Sub Address Box in Sleep Mode. Returns settings to their default states. Specifies registered information such as address numbers and user IDs by number. Finalizes numeric key - Kyocera ECOSYS M3655idn | M3655idn/M3660idn Operation Guide - Page 66
Installing and Setting up the Machine > Using the Operation Panel Adjusting the Operation Panel Angle The angle of the operation panel can be adjusted. 2-12 - Kyocera ECOSYS M3655idn | M3655idn/M3660idn Operation Guide - Page 67
swiping). Select the function. Home Admin 10:10 Logout FAX Job Box Copy Send Polling Box user. This is displayed when user login administration is enabled. 6 Login User Name Displays the logged-in user name. This is displayed when user login administration is enabled. Selecting "Login User - Kyocera ECOSYS M3655idn | M3655idn/M3660idn Operation Guide - Page 68
can only change the settings by logging in with administrator privileges. The factory default login user name and login password are set as shown below. Login User Name: Login Password: ECOSYS M3655idn ECOSYS M3660idn 5500 6000 5500 6000 2 Configure the settings. The available settings are - Kyocera ECOSYS M3655idn | M3655idn/M3660idn Operation Guide - Page 69
the FAX screen. Displays the Custom Box screen. Refer to the FAX Operation Guide. page 5-39 Displays the Job Box screen. page 4-12 Displays the Removable the time of shipment from factory. *2 Displayed when the optional SSD is installed. *3 Displayed when user login administration is enabled. *4 - Kyocera ECOSYS M3655idn | M3655idn/M3660idn Operation Guide - Page 70
screen. page 5-6 Outgoing FAX Log Incoming FAX Log Displays the Outgoing FAX Log screen. Displays the Incoming FAX Log screen. Refer to the FAX Operation Guide. Refer to the FAX Operation - Kyocera ECOSYS M3655idn | M3655idn/M3660idn Operation Guide - Page 71
Installing and Setting up the Machine > Touch Panel Display for Device Information Shows device information. Allows you to check system and network information, as well as options that are used. 1 Select [Device Information] in the home screen. 2 Check the device information. Device information - Kyocera ECOSYS M3655idn | M3655idn/M3660idn Operation Guide - Page 72
Functions key This screen appears when the Functions icon is selected. Ready to copy. Copy 1 Paper Selection Zoom A4 100% 10:10 Copies Density Normal 0 Duplex Combine Quiet Mode 1-sided>>1-sided Off 2 Functions ID Card Copy Off Favorites 1 Display functions. 2 Select [Functions - Kyocera ECOSYS M3655idn | M3655idn/M3660idn Operation Guide - Page 73
Box FAX Memory RX Box Polling Box FAX Memory RX Box Paper Settings System Menu Favorites 10:10 1/1 < Back Cannot be used because an option is not installed. Example: When a out, the settings of the previous user may still be in effect. In this case, select the [Reset] key and try again. 2-19 - Kyocera ECOSYS M3655idn | M3655idn/M3660idn Operation Guide - Page 74
[Enter] key has the same function as the key with the Enter mark ( ), such as the [OK ] key and the [Close ]. Ready to copy. EcoPrint 10:10 Off On Cancel OK Using the [Quick No. Search] key ( ) The [Quick No. Search] key is used when using the numeric keys to directly enter - Kyocera ECOSYS M3655idn | M3655idn/M3660idn Operation Guide - Page 75
Selection (page 6-11) 2 Ready to copy. Paper Selection Auto A4 A4 A4 10:10 Plain Plain Plain Cancel 1/2 OK Ready to copy. Paper Selection 10:10 1/2 1 Ready to copy. Paper Selection 2 3 10:10 4 1/2 1 Help titles 2 Displays information about functions and machine operation. 3 Closes the Help - Kyocera ECOSYS M3655idn | M3655idn/M3660idn Operation Guide - Page 76
your login user name and login password. NOTE The factory default login user name and login password are set as shown below. ECOSYS M3655idn ECOSYS M3660idn Login User Name: 5500 6000 Login Password: 5500 6000 You will be unable to login if you forget your login user name or login password - Kyocera ECOSYS M3655idn | M3655idn/M3660idn Operation Guide - Page 77
and Setting up the Machine > Login/Logout Simple Login Logout Select the user to login. 01 A 02 B 03 C 10:10 04 None 05 None 06 None 1/3 07 None 08 None 09 None Menu If this screen is displayed during operations, select a user and log in. NOTE If a user password is required, an input - Kyocera ECOSYS M3655idn | M3655idn/M3660idn Operation Guide - Page 78
. Also, configure the following settings if necessary. NOTE The default settings of the machine can be changed in System Menu. periodically set by obtaining the time from the network time server. Command Center RX User Guide 1 Display the screen. [System Menu/Counter] key > [Date/Timer/Energy Saver - Kyocera ECOSYS M3655idn | M3655idn/M3660idn Operation Guide - Page 79
. If user login administration is disabled, the user authentication screen appears. Enter a login user name and password, and select [Login]. The factory default login user name and login password are set as shown below. Login User Name: Login Password: ECOSYS M3655idn ECOSYS M3660idn 5500 - Kyocera ECOSYS M3655idn | M3655idn/M3660idn Operation Guide - Page 80
]. [IP Address]: Enter the address. [Subnet Mask]: Enter the subnet mask in decimal representation (0 to 255). [Default Gateway]: Enter the address. [Auto-IP]: Set to [Off]. When using the Auto-IP, enter "0.0.0.0" in [ of the DNS Server, refer to the following: Command Center RX User Guide 2-26 - Kyocera ECOSYS M3655idn | M3655idn/M3660idn Operation Guide - Page 81
according to the instructions provided by the wizard User Guide For the IB-51, the connection can be set on the dedicated IB-51 Operation Guide Guide Using the Setup Utility of IB-51 use it on both Windows and Mac OS. NOTE When you want to switch to the network interface other than Wired (default - Kyocera ECOSYS M3655idn | M3655idn/M3660idn Operation Guide - Page 82
. IP address (link local address) of the machine and computer is generated automatically. 2 Insert the DVD. NOTE • Installation on Windows must be done by a user logged on with administrator privileges. • If the "Welcome to the Found New Hardware Wizard" dialog box displays, select [Cancel]. • If - Kyocera ECOSYS M3655idn | M3655idn/M3660idn Operation Guide - Page 83
the machine. 4 Select the machine > [Next] 5 Select [Use the device settings.] on [Authentication mode], and enter the login user name and password. Login user name and Password are both Admin. 6 Configure the communication settings > [Next] 7 Change the settings of access point as necessary > [Next - Kyocera ECOSYS M3655idn | M3655idn/M3660idn Operation Guide - Page 84
is displayed, click [Run setup.exe]. • If the user account management window appears, click [Yes] ([Allow]). 6 Display the screen. settings.] on [Authentication mode], and enter the login user name and password. Login user name and Password are both Admin. 6 Configure the communication settings - Kyocera ECOSYS M3655idn | M3655idn/M3660idn Operation Guide - Page 85
Panel on This Machine Connecting to Computers or Handheld Devices that Support Wi-Fi Direct 1 Display the screen. [System Menu/Counter Home] key > [Wi-Fi Direct] 5 Note the network name (SSID), IP address, and password. 6 Configure the handheld device. 1 [Settings] > [Wi-Fi] 2 Select the network name - Kyocera ECOSYS M3655idn | M3655idn/M3660idn Operation Guide - Page 86
three handheld devices at the same time using Wi-Fi Direct setting. When the devices that support Wi-Fi Direct are connected, if you want to connect other device, disconnect the alreadyconnected devices • Configuring auto disconnecting time from the Command Center RX Command Center RX User Guide 2-32 - Kyocera ECOSYS M3655idn | M3655idn/M3660idn Operation Guide - Page 87
. The amount of time before entering Low Power Mode: 1 minutes (default setting). If print data is received during Low Power Mode, the machine document processor. Recovery time from Low Power Mode is as follows. • 10 seconds or less Note that ambient environmental conditions, such as ventilation, - Kyocera ECOSYS M3655idn | M3655idn/M3660idn Operation Guide - Page 88
Setup Wizard (page 2-35) Power Off Rule (models for Europe) The Power Off Rule is used to stop the power from automatically turning off. The default preset time is 3 days. For more information on Power Off Rule settings, refer to the following: Power Off Rule (models for Europe) (page 8-48) 2-34 - Kyocera ECOSYS M3655idn | M3655idn/M3660idn Operation Guide - Page 89
Installing and Setting up the Machine > Quick Setup Wizard Quick Setup Wizard For FAX functions, paper settings, Energy Saver functions and network settings, the following settings can be configured in a wizard-style screen. FAX Setup Paper Setup Energy Saver Setup Configures basic fax settings. - Kyocera ECOSYS M3655idn | M3655idn/M3660idn Operation Guide - Page 90
Auto (DHCP)]. NOTE If the user authentication screen appears, enter your login user name and login password and select [Login]. The factory default login user name and login password are set as shown below. Login User Name: Login Password: ECOSYS M3655idn ECOSYS M3660idn 5500 6000 5500 6000 - Kyocera ECOSYS M3655idn | M3655idn/M3660idn Operation Guide - Page 91
KX DRIVER KX XPS DRIVER KPDL mini-driver/PCL minidriver FAX Driver Kyocera TWAIN Driver Kyocera WIA Driver KYOCERA Net Viewer Status Monitor File Management Utility KYOCERA Net Direct Print FONTS Description This driver on Windows must be done by a user logged on with administrator privileges. 2-37 - Kyocera ECOSYS M3655idn | M3655idn/M3660idn Operation Guide - Page 92
]. For details on Custom Installation, refer to the following: Custom Install (page 2-41) 1 Insert the DVD. NOTE • Installation on Windows must be done by a user logged on with administrator privileges. • If the "Welcome to the Found New Hardware Wizard" dialog box displays, select [Cancel]. • If - Kyocera ECOSYS M3655idn | M3655idn/M3660idn Operation Guide - Page 93
via a network or USB cable and that it is turned on and click (Reload). • If the Windows security window appears, click [Install this driver software anyway]. • To install Status Monitor on Windows versions preceding Windows 8, it is necessary to install Microsoft .NET Framework 4.0 beforehand. 2-39 - Kyocera ECOSYS M3655idn | M3655idn/M3660idn Operation Guide - Page 94
the machine. Click [Finish] to exit the wizard. If a system restart message appears, restart the computer by following the screen prompts. This completes the printer driver installation procedure. If you are installing the TWAIN driver, continue by configuring the following: Setting TWAIN - Kyocera ECOSYS M3655idn | M3655idn/M3660idn Operation Guide - Page 95
Hardware Wizard" dialog box displays, select [Cancel]. • If the autorun screen is displayed, click [Run setup.exe]. • If the user account management window appears, click [Yes]. 2 Display the screen. 1 Click [View License Agreement] and read the License Agreement. 2 Click [Accept]. 1 2 3 Select - Kyocera ECOSYS M3655idn | M3655idn/M3660idn Operation Guide - Page 96
it is turned on and click (Reload). • If the desired device does not appear, select [Add custom device] to directly select the device. 2 Select the driver to be installed. 1 2 3 3 Click [Utility] tab and select the utility to be installed. 1 2 3 2-42 - Kyocera ECOSYS M3655idn | M3655idn/M3660idn Operation Guide - Page 97
and click [OK]. NOTE • To install Status Monitor on Windows versions preceding Windows 8, it is necessary to install Microsoft .NET Framework 4.0 beforehand . This completes the printer driver installation procedure. If you are installing the TWAIN driver, continue by configuring the following: - Kyocera ECOSYS M3655idn | M3655idn/M3660idn Operation Guide - Page 98
Windows must be done by a user logged on with administrator privileges. 1 Display the screen. Click [Search] in charms, and enter "Uninstall Kyocera Product Library" in the search box. Select [Uninstall Kyocera , click [Uninstall], and follow the on-screen instructions to uninstall the software. 2-44 - Kyocera ECOSYS M3655idn | M3655idn/M3660idn Operation Guide - Page 99
be done by a user logged on with administrator screen, enter the name and password used to log in to Kyocera] icon. 2 Display the screen. 1 2 Double-click [Kyocera OS X x.x] depending on your Mac OS version. 3 Install the Printer Driver. Install the printer driver as directed by the instructions - Kyocera ECOSYS M3655idn | M3655idn/M3660idn Operation Guide - Page 100
up the Machine > Installing Software 4 Configure the printer. 1 Open System Preferences and add the printer. 1 2 2 Select [Default] and click the item that appears in "Name" and then select the driver in "Use". 1 2 3 4 NOTE When using an IP connection, click the IP icon for an IP connection and then - Kyocera ECOSYS M3655idn | M3655idn/M3660idn Operation Guide - Page 101
Setting up the Machine > Installing Software Setting TWAIN Driver Register this machine to the TWAIN Driver. Instructions are based on interface elements as they appear in Windows 8.1. 1 Display the screen. 1 Click [Search] in charms, and enter "TWAIN Driver Setting" in the search box. Select [TWAIN - Kyocera ECOSYS M3655idn | M3655idn/M3660idn Operation Guide - Page 102
Installing and Setting up the Machine > Installing Software NOTE When the machine's IP address or host name is unknown, contact Administrator. 3 Finish registering. NOTE Click [Delete] to delete the added machine. Click [Edit] to change names. 2-48 - Kyocera ECOSYS M3655idn | M3655idn/M3660idn Operation Guide - Page 103
Installing and Setting up the Machine > Installing Software Setting WIA Driver Register this machine to the WIA Driver. Instructions are based on interface elements as they appear in Windows 8.1. 1 Display the screen. 1 Click [Search] in charms, and enter "View scanners and cameras" in the search - Kyocera ECOSYS M3655idn | M3655idn/M3660idn Operation Guide - Page 104
Installing and Setting up the Machine > Checking the Counter Checking the Counter Check the number of sheets printed and scanned. 1 Display the screen. [System Menu/Counter] key > [Counter] 2 Check the counter. 2-50 - Kyocera ECOSYS M3655idn | M3655idn/M3660idn Operation Guide - Page 105
default users registered one with Machine Administrator rights, and another with Administrator rights.Logging in as this user will allow you to configure all settings; therefore, please change the login user name and password Function User Login Auto Panel Reset ID Guide. page 6-30 page 8-44 2-51 - Kyocera ECOSYS M3655idn | M3655idn/M3660idn Operation Guide - Page 106
Function SMTP Security POP3 Security FTP Encrypted TX Enhanced WSD (SSL) IPSec SNMPv3 Reference page page 8-34 page 8-33 Refer to the Command Center RX User Guide. page 8-37 page 8-37 page 6-34 page 8-35 page 8-31 page 8-33 2-52 - Kyocera ECOSYS M3655idn | M3655idn/M3660idn Operation Guide - Page 107
Book, and Settings on the navigation menu. The factory default setting for the default user with administrator privileges is shown below. (Upper case and lower case letters are distinguished (case sensitive).) Login User Name: Admin Login Password: Admin Settings that the administrator and general - Kyocera ECOSYS M3655idn | M3655idn/M3660idn Operation Guide - Page 108
pages, enter the User Name and Password and click [Login]. Entering the predefined administrator password allows the user to access all pages, including Document Box, Address Book, and Settings on the navigation menu. The factory default setting for the default user with administrator privileges is - Kyocera ECOSYS M3655idn | M3655idn/M3660idn Operation Guide - Page 109
/Network] 3 Log in with administrator privileges. The factory default setting for the default user with administrator privileges is shown below. (Upper case and lower case letters are distinguished (case sensitive).) Login User Name: Admin Login Password: Admin 4 Click [Security Settings]. 2-55 - Kyocera ECOSYS M3655idn | M3655idn/M3660idn Operation Guide - Page 110
Installing and Setting up the Machine > Command Center RX 2 Configure the Security Settings. From the [Security Settings] menu, select the setting you want to configure. NOTE For details on settings related to certificates, refer to the following: Command Center RX User Guide 2-56 - Kyocera ECOSYS M3655idn | M3655idn/M3660idn Operation Guide - Page 111
/Network] 3 Log in with administrator privileges. The factory default setting for the default user with administrator privileges is shown below. (Upper case and lower case letters are distinguished (case sensitive).) Login User Name: Admin Login Password: Admin 4 From the [Device Settings] menu - Kyocera ECOSYS M3655idn | M3655idn/M3660idn Operation Guide - Page 112
click [Submit]. IMPORTANT After changing the setting, restart the network or turn the machine OFF and then ON. To restart the network interface card, click [Reset] in the [Management Settings] menu, and then click [Restart Network] in "Restart". 2-58 - Kyocera ECOSYS M3655idn | M3655idn/M3660idn Operation Guide - Page 113
the home screen > [Identification/Network] 3 Log in with administrator privileges. The factory default setting for the default user with administrator privileges is shown below. (Upper case and lower case letters are distinguished (case sensitive).) Login User Name: Admin Login Password: Admin 2-59 - Kyocera ECOSYS M3655idn | M3655idn/M3660idn Operation Guide - Page 114
Installing and Setting up the Machine > Command Center RX 4 From the [Network Settings] menu, click [Protocol]. 1 2 2 Configure the settings. Set "SMTP (E-mail TX)" to [On] in the "Send Protocols". 2-60 - Kyocera ECOSYS M3655idn | M3655idn/M3660idn Operation Guide - Page 115
Installing and Setting up the Machine > Command Center RX 3 Display the screen. Display the E-mail Settings screen. From the [Function Settings] menu, click [E-mail]. 1 2 2-61 - Kyocera ECOSYS M3655idn | M3655idn/M3660idn Operation Guide - Page 116
Port Number Specify the port number to be used for SMTP. The default port number is 25. SMTP Server Timeout Set the amount of time the function of receiving e-mail on the machine. Command Center RX User Guide POP3 User Settings E-mail Send Settings E-mail Size Limit Sender Address*1 Enter - Kyocera ECOSYS M3655idn | M3655idn/M3660idn Operation Guide - Page 117
/Network] 3 Log in with administrator privileges. The factory default setting for the default user with administrator privileges is shown below. (Upper case and lower case letters are distinguished (case sensitive).) Login User Name: Admin Login Password: Admin 4 From the [Address Book] menu, click - Kyocera ECOSYS M3655idn | M3655idn/M3660idn Operation Guide - Page 118
. Enter the information for the custom box you want to register. For details on the fields to populate, refer to the following: Command Center RX User Guide 2 Click [Submit]. 2-64 - Kyocera ECOSYS M3655idn | M3655idn/M3660idn Operation Guide - Page 119
Installing and Setting up the Machine > Command Center RX Printing a document stored in a Custom Box 1 Display the screen. 1 Launch your Web browser. 2 In the address or location bar, enter the machine's IP address or the host name. Click in the following order to check the machine's IP address and - Kyocera ECOSYS M3655idn | M3655idn/M3660idn Operation Guide - Page 120
Installing and Setting up the Machine > Command Center RX 2 Print the document. 1 Select the document you wish to print. 2 1 Select the checkbox of the document to be printed. 2 Click [Print]. 3 Configure settings for printing, click [Print]. 2-66 - Kyocera ECOSYS M3655idn | M3655idn/M3660idn Operation Guide - Page 121
Net Viewer on the included DVD. For details on operating the KYOCERA Net Viewer, refer to the following: KYOCERA Net Viewer User Guide Backing Up Address Book Data to PC 1 Launch the KYOCERA Net Viewer. 2 Create a backup. 1 Right-click on the model name from which you want to back up the Address - Kyocera ECOSYS M3655idn | M3655idn/M3660idn Operation Guide - Page 122
Installing and Setting up the Machine > Transferring Data from Our Other Products 3 Select destination device group and click [Next]. 1 2 4 Select [Device Address Book] and click [Next]. 1 2 5 Select [Create from device] and remove the checkmark from [Overwrite settings on target device], and then - Kyocera ECOSYS M3655idn | M3655idn/M3660idn Operation Guide - Page 123
[Next]. 1 2 NOTE If the "Admin Login" screen appears, enter the "Admin Login" and "Login Password", and then click [OK]. The default settings are as follows (Upper case and lower case letters are distinguished (case sensitive)). Login User Name: Admin Login Password: Admin 7 Click on [Save to file - Kyocera ECOSYS M3655idn | M3655idn/M3660idn Operation Guide - Page 124
the screen. Please note that selecting [Finish] will write the data to the machine's Address Book. Writing Address Book Data to the Machine 1 Launch the KYOCERA Net Viewer. 2 Load the Address Book data. 1 Right-click on the model name to which you want to transfer the Address Book, and select - Kyocera ECOSYS M3655idn | M3655idn/M3660idn Operation Guide - Page 125
Installing and Setting up the Machine > Transferring Data from Our Other Products 3 Select destination device group and click [Next]. 1 2 4 Select [Device Address Book] and click [Next]. 1 2 5 Select [Create from file] and remove the checkmark from [Overwrite settings on target device], and then - Kyocera ECOSYS M3655idn | M3655idn/M3660idn Operation Guide - Page 126
Installing and Setting up the Machine > Transferring Data from Our Other Products 6 Click [Browse] and select the backup Address Book file, and then click [Next]. 1 2 7 Click [Finish]. The write process of the Address Book data starts. 8 Once the write process is complete, click [Close]. 2-72 - Kyocera ECOSYS M3655idn | M3655idn/M3660idn Operation Guide - Page 127
a note of the computer name and full computer name 3-18 Making a note of the user name and domain name 3-19 Creating a Shared Folder, Making a Note of a Shared Folder 3-20 Configuring Windows Firewall ...3-24 Registering Destinations in the Address Book 3-28 Adding a Destination (Address Book - Kyocera ECOSYS M3655idn | M3655idn/M3660idn Operation Guide - Page 128
Preparation before Use > Loading Paper Loading Paper Load paper in the cassettes and multipurpose tray. For the paper load methods for each cassette, refer to the page below. 1 2 3 4 5 6 No. Name 1 Multi Purpose Tray 2 Cassette 1 3 Cassette 2 4 Cassette 3 5 Cassette 4 6 Cassette 5 - Kyocera ECOSYS M3655idn | M3655idn/M3660idn Operation Guide - Page 129
. Paper that is curled or folded may cause a jam. • Avoid exposing opened paper to high temperatures and high humidity as dampness can be a cause of problems. Seal any remaining paper after loading in the multi purpose tray or cassettes back in the paper storage bag. • If the machine will not be - Kyocera ECOSYS M3655idn | M3655idn/M3660idn Operation Guide - Page 130
can be loaded in each cassette is shown below. Cassette Cassette 1 to 5 No. Sheets 500 sheets (Plain paper: 80 g/m2) For details of the supported paper sizes, refer to the following: Choosing the Appropriate Paper (page 11-15) NOTE A6 paper cannot be loaded in cassettes 2 to 5. For the paper - Kyocera ECOSYS M3655idn | M3655idn/M3660idn Operation Guide - Page 131
before Use > Loading Paper 2 Adjust the cassette size. 1 Adjust the position of the paper width guides located on the left and right sides of the cassette. Press the paper width adjusting tab and slide the guides to the paper size required. Paper sizes are marked on the cassette. 2 Adjust the paper - Kyocera ECOSYS M3655idn | M3655idn/M3660idn Operation Guide - Page 132
dial so that the size of the paper you are going to use appears in the paper size window. NOTE When the size dial is set to "Other" the paper size must be set into the ). • If paper is loaded without adjusting the paper length guide and paper width guide, the paper may skew or become jammed. 3-6 - Kyocera ECOSYS M3655idn | M3655idn/M3660idn Operation Guide - Page 133
Preparation before Use > Loading Paper 4 Gently push the cassette back in. 5 Specify the type of paper loaded in the cassette using the operation panel. Paper Size and Media Type for the Cassettes (page 3-15) 3-7 - Kyocera ECOSYS M3655idn | M3655idn/M3660idn Operation Guide - Page 134
completely out of the machine. NOTE When pulling the cassette out of the machine, ensure it is supported and does not fall out. 2 Adjust the cassette size. 1 Adjust the position of the paper width guides located on the left and right sides of the cassette. Press the paper width adjusting tab and - Kyocera ECOSYS M3655idn | M3655idn/M3660idn Operation Guide - Page 135
Preparation before Use > Loading Paper 3 Attach the auxiliary guide to the paper length guide as shown in the illustration. 4 Turn the size dial so that "Other" appears in the paper size window. 3 Load paper. 1 Fan the paper, then tap it on a level surface to avoid paper jams or skewed printing. 2 - Kyocera ECOSYS M3655idn | M3655idn/M3660idn Operation Guide - Page 136
of paper loaded in the cassette using the operation panel. Paper Size and Media Type for the Cassettes (page 3-15) NOTE When removing the auxiliary guide, hold down the paper length adjusting tab and removing the auxiliary - Kyocera ECOSYS M3655idn | M3655idn/M3660idn Operation Guide - Page 137
sheets of plain paper (80 g/m2). For details of the supported paper sizes, refer to the following: Choosing the Appropriate Paper ( 100 sheets • Hagaki (Cardstock): 1 sheets • Envelope DL, Envelope C5, Envelope #10, Envelope #9, Envelope #6 3/4, Envelope Monarch, Youkei 4, Youkei 2: 5 sheets • OHP - Kyocera ECOSYS M3655idn | M3655idn/M3660idn Operation Guide - Page 138
Preparation before Use > Loading Paper 2 Pull out the support tray section of the MP tray. 3 Adjust the multi purpose tray size. Paper sizes are marked on the multi purpose tray. 4 Load paper. Insert the paper along the paper width guides into the tray until it stops. After removing new paper from - Kyocera ECOSYS M3655idn | M3655idn/M3660idn Operation Guide - Page 139
it with the new paper before loading the paper back into the tray. • If there is a gap between the paper and the paper width guides, readjust the guides to fit the paper in order to prevent skewed feeding and paper jams. • Ensure that the loaded paper does not exceed the level indicator - Kyocera ECOSYS M3655idn | M3655idn/M3660idn Operation Guide - Page 140
purpose tray Load the paper with the print side facing up. For the procedure for printing, refer to the following: Printer Driver User Guide Example: When printing the address. Open the flap Close the flap. Oufuku hagaki (Return postcard) Hagaki (Cardstocks) Portrait form envelopes Landscape - Kyocera ECOSYS M3655idn | M3655idn/M3660idn Operation Guide - Page 141
optional paper feeder (cassettes 2 to 5) is "A4" or "Letter", and the default media type setting is "Plain". To change the type of paper to be used (Return postcard), Custom*2 Cassettes 2 to 5: 16K, ISO B5, Envelope #10, Envelope #9, Envelope #6, Envelope Monarch, Envelope DL, Envelope C5, Youkei 4, - Kyocera ECOSYS M3655idn | M3655idn/M3660idn Operation Guide - Page 142
standard sizes and custom sizes. Values: 16K, ISO B5, Envelope #10, Envelope #9, Envelope #6, Envelope Monarch, Envelope DL, Envelope C5, Hagaki Envelope, Thick (106 to 220 g/m2), High Quality, Custom 1-8 *1 For instructions on how to specify the custom paper size, refer to the following: Custom - Kyocera ECOSYS M3655idn | M3655idn/M3660idn Operation Guide - Page 143
Preparation before Use > Paper Stopper Paper Stopper When using paper A4/Letter or larger, open the paper stopper shown in the figure. 3-17 - Kyocera ECOSYS M3655idn | M3655idn/M3660idn Operation Guide - Page 144
-click [Computer] from [Libraries], and then select [Properties]. NOTE In Windows 7, from [Start] button on the Windows, select [Computer] and then [System Properties]. In Windows 10, right-click [Start] button on the Windows and select [System]. 2 Check the computer name. Check the computer name - Kyocera ECOSYS M3655idn | M3655idn/M3660idn Operation Guide - Page 145
All Programs] (or [Programs]), [Accessories] and then [Command Prompt]. In Windows 10, right-click [Start] button on the Windows and select [Command Prompt]. The Command Prompt window appears. 2 Check the domain name and user name. At the Command Prompt, enter "net config workstation" and then press - Kyocera ECOSYS M3655idn | M3655idn/M3660idn Operation Guide - Page 146
user or group. 1 Select [Settings] in charms on Desktop, and select [Control Panel], [Appearance and Personalization], and then [Folder Options]. In Windows 7, from [Start] button on the Windows, select [Control Panel], [Appearance and Personalization], and then [Folder Options]. In Windows 10 - Kyocera ECOSYS M3655idn | M3655idn/M3660idn Operation Guide - Page 147
Preparation before Use > Preparation for Sending a Document to a Shared Folder in a PC 2 Right-click the "scannerdata" folder, select [Property], and click [Sharing] and [Advanced Sharing]. 1 2 2 Configure permission settings. 1 Select the [Share this folder] checkbox and click the [Permissions] - Kyocera ECOSYS M3655idn | M3655idn/M3660idn Operation Guide - Page 148
location", click the [Locations] button, select the text after the dot (.), and click the [OK] button. Example: abcdnet.com Making a note of the user name and domain name (page 3-19) 2 Enter the user name that you made a note of on page in the text box, and click the [OK] button. Also the - Kyocera ECOSYS M3655idn | M3655idn/M3660idn Operation Guide - Page 149
Sending a Document to a Shared Folder in a PC 1 2 3 1 Select the [Security] tab. 2 Select the user you entered. If the user does not appear on "Group or user names", click [Edit] button to add user in a similar way of "configuration of permission settings". 3 Make sure that checkmarks appear on - Kyocera ECOSYS M3655idn | M3655idn/M3660idn Operation Guide - Page 150
privileges. 1 Check file and printer sharing. 1 In charms on Desktop, click [Settings], [Control Panel], [System and Security], and then [Windows Firewall]. NOTE If the User Account Control dialog box appears, click the [Continue] button. 2 Select the [File and Printer Sharing] checkbox. 1 2 3 3-24 - Kyocera ECOSYS M3655idn | M3655idn/M3660idn Operation Guide - Page 151
Preparation before Use > Preparation for Sending a Document to a Shared Folder in a PC 2 Add a port. 1 In charms on Desktop, click [Settings], [Control Panel], [System and Security], and [Check firewall status]. 2 Select [Advanced settings]. 3 Select [Inbound Rules]. 4 Select [New Rules]. 3-25 - Kyocera ECOSYS M3655idn | M3655idn/M3660idn Operation Guide - Page 152
Preparation before Use > Preparation for Sending a Document to a Shared Folder in a PC 5 Select [Port]. 1 2 6 Select [TCP] as the port to apply the rule to. Then select [Specific local ports] and enter "445" then click [Next]. 1 2 3 7 Select [Allow the connection] and click the [Next] button. 1 2 3- - Kyocera ECOSYS M3655idn | M3655idn/M3660idn Operation Guide - Page 153
to SMB" in "Name" and click [Finish]. 1 2 In Windows 7 In Windows 10 1 In Windows 7, from [Start] button on the Windows, select [Control Panel], [System and Security], and then [Allow a program through Windows Firewall]. If the User Account Control dialog box appears, click the [Continue] button - Kyocera ECOSYS M3655idn | M3655idn/M3660idn Operation Guide - Page 154
registering methods, contacts and groups. When adding a group, enter the group name and select group members from the Address Book. NOTE If user login administration is enabled, you can only edit destinations in the Address Book by logging in with administrator privileges. Contact (Up to 200) Each - Kyocera ECOSYS M3655idn | M3655idn/M3660idn Operation Guide - Page 155
Name For example: james.smith If the computer name and domain name are different: Domain name\User name For example: abcdnet\james.smith Up to 64 characters Login Password Windows logon password (Case sensitive.) Up to 64 characters To search for a folder on a PC on the network, select in the - Kyocera ECOSYS M3655idn | M3655idn/M3660idn Operation Guide - Page 156
is entered, the file is stored in the home directory. Port Port number (Normally 21.) 1 - 65535 Login User Name FTP server login user name Up to 64 characters Login Password FTP server login password Up to 64 characters *1 When the FTP server is based on Linux/UNIX, the path including the - Kyocera ECOSYS M3655idn | M3655idn/M3660idn Operation Guide - Page 157
Preparation before Use > Registering Destinations in the Address Book Group (Up to 50) Compile two or more contacts into a group. Designations in the group can be added at the same time. NOTE To add a group, you need individually added destinations. Register one or more individual destinations as - Kyocera ECOSYS M3655idn | M3655idn/M3660idn Operation Guide - Page 158
Preparation before Use > Registering Destinations in the Address Book Editing and Deleting Address Book Entries Edit and delete the destinations (contacts) you added to the Address Book. 1 Display the screen. [System Menu/Counter] key > [Address Book/One Touch] > [Address Book] 2 Edit or delete the - Kyocera ECOSYS M3655idn | M3655idn/M3660idn Operation Guide - Page 159
AAA 002 BBB 003 CCC 004 None 1 005 None 006 None 007 None 008 None 009 None 010 None 011 None 012 None Menu 10:10 2 1/9 End 2 Select a destination (contact or group) to add to the One Touch Key number > [Next] Selecting [ ] shows the detailed information of the selected destination - Kyocera ECOSYS M3655idn | M3655idn/M3660idn Operation Guide - Page 160
selected destination. Address Book (All) 001 ABCD 002 EFGH 003 IJKL 004 MNOP Menu 123456 [email protected] 12345.com 11111.com Cancel 10:10 1/2 OK NOTE Destinations can be sorted or searched by destination name or address number. Specifying Destination (page 5-20) 3 [OK] > [Save] > [Yes] Add - Kyocera ECOSYS M3655idn | M3655idn/M3660idn Operation Guide - Page 161
on Non-standard Sized Paper ...4-4 Banner printing ...4-5 Printer Driver Print Settings Screen ...4-9 Printer Driver Help ...4-10 Changing the Default Printer Driver Settings (Windows 8.1 4-10 Canceling Printing from a Computer ...4-10 Printing by AirPrint ...4-11 Printing by Google Cloud Print - Kyocera ECOSYS M3655idn | M3655idn/M3660idn Operation Guide - Page 162
Printing from PC > Printing from PC Printing from PC This section provides the printing method using the KX DRIVER. NOTE • To print the document from applications, install the printer driver on your computer from the supplied DVD (Product Library). • In some environments, the current settings are - Kyocera ECOSYS M3655idn | M3655idn/M3660idn Operation Guide - Page 163
Printing from PC > Printing from PC 2 Select the [Basic] tab. 3 Click "Print size" menu and select the paper size to use for printing. To load the paper of size that is not included in print sizes of the machine such as cardstock or envelopes, the paper size needs to be registered. Printing on Non- - Kyocera ECOSYS M3655idn | M3655idn/M3660idn Operation Guide - Page 164
in the [Basic] tab of the print settings screen of the printer driver. The registered size can be selected from the "Print size" menu. registered in steps 4 to 7. 9 Select the type of paper in the "Media type" menu. 10 Click [MP tray] in the "Source" menu. 43 5 6 7 NOTE If you loaded a postcard or - Kyocera ECOSYS M3655idn | M3655idn/M3660idn Operation Guide - Page 165
.03") is specified for printing, the print job is treated as banner printing. Follow the steps below to set banner paper in the printer driver. 1 Display the screen. Click [File] and select [Print] in the application. 2 Configure the settings. 1 Select the machine from the "Name" menu and click the - Kyocera ECOSYS M3655idn | M3655idn/M3660idn Operation Guide - Page 166
Printing from PC > Printing from PC 3 Register the paper size. 21 3 4 5 1 Click the [New] button. 2 Enter the length (356.1 mm (14.02") or longer), and width of the custom paper size being registered. 3 Enter the name of the paper. 4 Click the [Save] button. 5 Click the [OK] button. 4 Configure the - Kyocera ECOSYS M3655idn | M3655idn/M3660idn Operation Guide - Page 167
Printing from PC > Printing from PC 5 Load paper. 1 Open the multi purpose tray and extend the support tray section of the multi purpose tray. 2 Load paper. 4-7 - Kyocera ECOSYS M3655idn | M3655idn/M3660idn Operation Guide - Page 168
No.: xxxx Job Name: xxxxxx Use MP tray to print on the following paper. 915x216mm Set paper and press [Continue]. 10:10 Hold Cancel Continue IMPORTANT After pressing [Continue], support the paper with both hands so that it feeds in correctly. After printing starts, catch the paper when it is - Kyocera ECOSYS M3655idn | M3655idn/M3660idn Operation Guide - Page 169
you to configure a variety of print-related settings. Printer Driver User Guide 1 3 2 No. Description 1 [Quick Print] tab configure settings for adding text pages or watermarks to print data. 2 [Profiles] Printer driver settings can be saved as a profile. Saved profiles can be recalled at any - Kyocera ECOSYS M3655idn | M3655idn/M3660idn Operation Guide - Page 170
Printer Driver Settings (Windows 8.1) The default printer driver settings can be changed. By selecting frequently used settings, you can omit steps when printing. For the settings, refer to the following: Printer Driver User Guide 1 In charms on Desktop, click [Settings], [Control Panel], and - Kyocera ECOSYS M3655idn | M3655idn/M3660idn Operation Guide - Page 171
machine location information in Command Center RX. Command Center RX User Guide Printing by Google Cloud Print Google Cloud Print is a printing service provided by Google and does not require a printer driver. This service enables a user with a Google account to print from a machine connected to the - Kyocera ECOSYS M3655idn | M3655idn/M3660idn Operation Guide - Page 172
Printing Data Saved on the Printer If you configure settings in the [Job] tab of the printer driver and then print, the print job will be saved in the Job Box (memory) and printing • For information on how to use the printer driver software, refer to the following: Printer Driver User Guide 4-12 - Kyocera ECOSYS M3655idn | M3655idn/M3660idn Operation Guide - Page 173
not to be printed until you operate the machine. When sending the job from the application software, specify a 4-digit access code in the printer driver. The job is released for printing by entering the access code on the operation panel, ensuring confidentiality of the print job. The data will be - Kyocera ECOSYS M3655idn | M3655idn/M3660idn Operation Guide - Page 174
of the document. 2 Delete the document. 1 Select the document to delete > [ ] Document Box. Job Box - Private Print/Stored Job doc4100908135138 2014/10/10 10:10 doc0100908134821 2014/10/10 11:11 1 2 10:10 1/1 Menu < Back Print 2 Enter the access code. The document is deleted. 4-14 - Kyocera ECOSYS M3655idn | M3655idn/M3660idn Operation Guide - Page 175
> [Print] 2 Specify the number of copies to print as desired. 3 Select [OK]. Printing starts. NOTE If the document is protected by an access code, the password entry screen will be displayed. Enter the - Kyocera ECOSYS M3655idn | M3655idn/M3660idn Operation Guide - Page 176
the document. 1 Select the document to delete > [ ] Document Box. Job Box - Private Print/Stored Job doc4100908135138 2014/10/10 10:10 doc0100908134821 2014/10/10 11:11 1 2 10:10 1/1 Menu < Back Print 2 Select [Yes]. The document is deleted. NOTE If the document is protected by an access - Kyocera ECOSYS M3655idn | M3655idn/M3660idn Operation Guide - Page 177
already printed. Activating Quick Copy and printing a document using the printer driver allow the print data to be stored in the Quick Copy Job required, you can reprint the required number of copies from the touch panel. By default, up to 32 documents can be stored. When power is turned off, all - Kyocera ECOSYS M3655idn | M3655idn/M3660idn Operation Guide - Page 178
of the document. 2 Delete the document. 1 Select the document to delete > [ ] Document Box. Job Box - Quick Copy/Proof and Hold doc4100908135138 2014/10/10 10:10 doc0100908134821 2014/10/10 11:11 1 2 10:10 1/1 Menu Cancel < Back Print 2 Select [Yes]. The document is deleted. 4-18 - Kyocera ECOSYS M3655idn | M3655idn/M3660idn Operation Guide - Page 179
single proof print of multiple-print job and holds printing of the remaining copies. Printing a multiple-print job in Proof and Hold using the printer driver allows only a single copy to be printed while maintaining the document data in the Job Box. To continue to print the remaining copies, use the - Kyocera ECOSYS M3655idn | M3655idn/M3660idn Operation Guide - Page 180
of the document. 2 Delete the document. 1 Select the document to delete > [ ] Document Box. Job Box - Quick Copy/Proof and Hold doc4100908135138 2014/10/10 10:10 doc0100908134821 2014/10/10 11:11 1 2 10:10 1/1 Menu Cancel < Back Print 2 Select [Yes]. The document is deleted. 4-20 - Kyocera ECOSYS M3655idn | M3655idn/M3660idn Operation Guide - Page 181
you activate Status Monitor, check the status below. • KX DRIVER is installed. • Either [Enhanced WSD] or [ listed below to exit the Status Monitor. • Exit manually: Click the settings icon and select Exit in the Settings icon Expand button Alert Tab Toner Status Tab Paper Tray Status Tab Printing Progress - Kyocera ECOSYS M3655idn | M3655idn/M3660idn Operation Guide - Page 182
menu displayed with a right-click. Paper Tray Status Tab Information is displayed about the paper in the printer and about the amount of paper remaining. Toner Status Tab The amount of toner remaining is displayed. 4-22 - Kyocera ECOSYS M3655idn | M3655idn/M3660idn Operation Guide - Page 183
Center RX to modify or confirm the network settings.This menu is not displayed when using USB connection. Command Center RX User Guide • Notification... This sets the display of the Status Monitor. Status Monitor Notification Settings (page 4-24) • www.kyoceradocumentsolutions.com Open our website - Kyocera ECOSYS M3655idn | M3655idn/M3660idn Operation Guide - Page 184
Printing from PC > Status Monitor Status Monitor Notification Settings The Status Monitor settings and event list details are displayed. Select whether notification is performed when an error in the event list occurs. 1 Select Enable event notification. If this setting is set to Off, then the Status - Kyocera ECOSYS M3655idn | M3655idn/M3660idn Operation Guide - Page 185
Recalling Favorite ...5-9 Editing and Deleting Favorite ...5-10 Application ...5-11 Installing Applications ...5-11 Using Custom Box 5-47 Sending Documents in Custom Box to E-mail Address of Logged in user 5-48 Scanning Document Stored in a Custom Box 5-49 Printing Documents Stored in Removable - Kyocera ECOSYS M3655idn | M3655idn/M3660idn Operation Guide - Page 186
Operation on the Machine > Loading Originals Loading Originals Placing Originals on the Platen You may place books or magazines on the platen in addition to ordinary sheet originals. 1 Put the scanning side facedown. 2 Align it flush against the original 2 size indicator plates with the back - Kyocera ECOSYS M3655idn | M3655idn/M3660idn Operation Guide - Page 187
x 915 mm) to Minimum 105 x 148 mm 100 sheets or less (50 to 80 g/m2) Originals Not Supported by the Document Processor Do not use the document processor for the following types of originals. Otherwise, the originals may an error in the document processor. 1 Adjust the original width guides. 5-3 - Kyocera ECOSYS M3655idn | M3655idn/M3660idn Operation Guide - Page 188
on Original Orientation, refer to the following: Original Orientation (page 6-12) IMPORTANT Confirm that the original width guides exactly fit the originals. If there is a gap, readjust the original width guides. The gap may cause the originals to jam. Ensure that loaded originals do not exceed the - Kyocera ECOSYS M3655idn | M3655idn/M3660idn Operation Guide - Page 189
Operation on the Machine > Loading Originals 2 Open the original stopper to fit the size of the original set. A4, Letter, Legal 5-5 - Kyocera ECOSYS M3655idn | M3655idn/M3660idn Operation Guide - Page 190
pre-registered on this machine. You can delete these functions as well as register new functions. Favorites Name Description Default Registration ID Card Copy Use this when you want to copy a driver's license or an insurance card. When you scan the front and back of the card, both sides will be - Kyocera ECOSYS M3655idn | M3655idn/M3660idn Operation Guide - Page 191
• Wizard mode • Destination: Address Book Color Selection: [Full Color] File Name Entry: Default File Format: [PDF] Continuous Scan: [Off] Scan Resolution: [300×300 dpi] E-mail subject: Default E-mail body: Default NOTE Up to 20 settings can be registered as favorites. Registering Favorite When - Kyocera ECOSYS M3655idn | M3655idn/M3660idn Operation Guide - Page 192
the Destination Recall Method. Functions Selects the functions to be displayed in the wizard. Function Type Selects the method for recalling favorites. *1 If user login administration is enabled, you can only change the settings by logging in with administrator privileges. *2 Displayed when - Kyocera ECOSYS M3655idn | M3655idn/M3660idn Operation Guide - Page 193
owner of the favorite. Configures permission settings for favorites to determine how they are shared with other users. Function Type Selects the method for recalling favorites. *1 If user login administration is enabled, you can only change the settings by logging in with administrator privileges - Kyocera ECOSYS M3655idn | M3655idn/M3660idn Operation Guide - Page 194
. 3 Change the favorite number, favorite name, permission. Registering Favorite (page 5-7) 4 [Save] > [Yes] To delete 1 [Menu] > [Delete] 2 Select the favorite you wish to delete. 3 Select [Yes]. 5-10 - Kyocera ECOSYS M3655idn | M3655idn/M3660idn Operation Guide - Page 195
appears, enter your login user name and login password and select [Login]. For this, you need to login with administrator privileges. The factory default login user name and login password are set as shown below. Login User Name: Login Password: ECOSYS M3655idn ECOSYS M3660idn 5500 6000 5500 - Kyocera ECOSYS M3655idn | M3655idn/M3660idn Operation Guide - Page 196
Operation on the Machine > Application 4 Select [Yes]. Installation of the application begins. Depending on the application being installed, the installation may take some time. Once the installation ends, the original screen reappears. NOTE • To install another application, repeat steps 2-3 and - Kyocera ECOSYS M3655idn | M3655idn/M3660idn Operation Guide - Page 197
appears, enter your login user name and login password and select [Login]. For this, you need to login with administrator privileges. The factory default login user name and login password are set as shown below. Login User Name: Login Password: ECOSYS M3655idn ECOSYS M3660idn 5500 6000 5500 - Kyocera ECOSYS M3655idn | M3655idn/M3660idn Operation Guide - Page 198
users. When using user login administration, shared shortcuts can only be set by users who have logged in as administrators. NOTE If you select a shortcut number already registered, the currently registered shortcut can be replaced with a new one. Some shortcuts are preregistered at the factory - Kyocera ECOSYS M3655idn | M3655idn/M3660idn Operation Guide - Page 199
Operation on the Machine > Registering Shortcuts Editing and Deleting Shortcuts Follow the steps shown below to change a shortcut number/name or delete a shortcut. 1 In the "Functions" screen of each function, select [Add/Edit Shortcut] in the bottom of the screen. 2 Edit the shortcut. To edit a - Kyocera ECOSYS M3655idn | M3655idn/M3660idn Operation Guide - Page 200
Next] and configure the necessary settings for the copy job. Reserve Next Priority (page 8-20) Copying... Job No.:0005 Job Name:doc00000320101010101010 Scanned Pages Copies 10:10 Cancel Reserve Next 5-16 - Kyocera ECOSYS M3655idn | M3655idn/M3660idn Operation Guide - Page 201
Operation on the Machine > Copying Canceling Jobs You can also cancel jobs by selecting the [Stop] key. 1 Select the [Stop] key with the copy screen displayed. 2 Cancel a job. When there is a job is being scanned The copy job is canceled. When there is a job printing or on standby Canceling job - Kyocera ECOSYS M3655idn | M3655idn/M3660idn Operation Guide - Page 202
be specified in combination. Sending to Different Types of Destinations (Multi Sending) (page 5-28) • Here, information on the FAX settings has been omitted. FAX Operation Guide 5-18 - Kyocera ECOSYS M3655idn | M3655idn/M3660idn Operation Guide - Page 203
. Specifying Destination (page 5-20) Choosing a Destination from the External Address Book For details on the External Address Book, refer to the following: Command Center RX User Guide Choosing a Destination from the FAX For more information on using the FAX, refer to the following: FAX Operation - Kyocera ECOSYS M3655idn | M3655idn/M3660idn Operation Guide - Page 204
on the External Address Book, refer to the following: Command Center RX User Guide Choosing from the One Touch Key (page 5-22) Entering an E-mail FAX FAX Operation Guide NOTE • You can set the machine up so that the address book screen appears when you select the [Send] key. Default Screen (page 8- - Kyocera ECOSYS M3655idn | M3655idn/M3660idn Operation Guide - Page 205
registered in the Address Book can be searched. 1 Address Book (All) 001 ABCD 123456 10:10 3 002 EFGH [email protected] 1/2 003 IJKL 12345.com 004 MNOP 11111.com 2 later. Checking and Editing Destinations (page 5-25) . NOTE You can set the default "Sort" settings. Sort (page 8-23) 5-21 - Kyocera ECOSYS M3655idn | M3655idn/M3660idn Operation Guide - Page 206
Operation on the Machine > Sending Choosing from the One Touch Key Select the destination using the One Touch Keys. NOTE This procedure assumes that One Touch Keys have already been registered. For more information on adding One Touch keys, refer to the following: Adding a Destination on One Touch - Kyocera ECOSYS M3655idn | M3655idn/M3660idn Operation Guide - Page 207
name (PC name) that you want to specify in the screen that appears, and select [Next]. The login user name and login password entry screen appears. After you enter the login user name and login password name of the destination PC, the shared folders appear. Select the folder that you want to specify - Kyocera ECOSYS M3655idn | M3655idn/M3660idn Operation Guide - Page 208
name are different: Domain name\User name For example: abcdnet\james.smith Up to 64 characters Windows logon password (Case sensitive.) Up to 64 Up to 128 characters Login User Name FTP server login user name Up to 64 characters Login Password FTP server login password (Case sensitive.) Up - Kyocera ECOSYS M3655idn | M3655idn/M3660idn Operation Guide - Page 209
Operation on the Machine > Sending Checking and Editing Destinations Check and edit a selected destination. 1 Display the screen. 1 Specify the destination. Specifying Destination (page 5-20) 2 Select [Check]. 2 Check and edit the destination. To add a new destination, select [ ]. To display details - Kyocera ECOSYS M3655idn | M3655idn/M3660idn Operation Guide - Page 210
the destinations and press [Check]. Destinations Check A OFFICE 1234567890 B OFFICE 2345678901 C OFFICE 3456789012 D OFFICE Close 4567890123 Cancel 10:10 1/2 Check 1 Select [ ] or [ ] to confirm all destination. Selecting [ ] shows the detailed information of the selected destination. To - Kyocera ECOSYS M3655idn | M3655idn/M3660idn Operation Guide - Page 211
you send a next image (new recall information is registered) - When you log out Send to Me (E-mail) When user login is enabled, the document is sent to the E-mail address of the logged in user. 1 Select [Send to Me (E-mail)] on the Home screen. NOTE • To use this function, the function icon must - Kyocera ECOSYS M3655idn | M3655idn/M3660idn Operation Guide - Page 212
Operation on the Machine > Sending Sending to Different Types of Destinations (Multi Sending) You can specify destinations that combine E-mail addresses, folders (SMB or FTP) and fax numbers. This is referred to as Multi Sending. This is useful for sending to different types of destination (E-mail - Kyocera ECOSYS M3655idn | M3655idn/M3660idn Operation Guide - Page 213
Operation on the Machine > Sending Canceling Sending Jobs You can also cancel jobs by selecting the [Stop] key. 1 Select the [Stop] key with the send screen displayed. 2 Cancel a job. When there is a job is being scanned Job Cancel appears. When there is a job sending or on standby Canceling job - Kyocera ECOSYS M3655idn | M3655idn/M3660idn Operation Guide - Page 214
guide of your software. Installing the Driver Installing Driver Software (for Windows 8, Windows 8.1 and Microsoft Windows driver. Right-click the machine's icon and then click [Install]. NOTE If the "User Account Control" window appears, click [Continue]. If the "Found New Hardware" window - Kyocera ECOSYS M3655idn | M3655idn/M3660idn Operation Guide - Page 215
Operation on the Machine > Sending Installing Driver Software (for Windows 10) WSD scan 1 Right-click [Start] button on the Windows and select [Control Panel] and then [View devices and printer]. 2 Install the driver. Click [Add a device]. Select the machine's icon and then click [Next]. When the - Kyocera ECOSYS M3655idn | M3655idn/M3660idn Operation Guide - Page 216
or WIA This section explains how to scan an original using TWAIN. The WIA driver is used in the same way. 1 Display the screen. 1 Activate the display the dialog box. NOTE For selecting the machine, see the Operation Guide or Help for each application software. 2 Configure the scan settings. Select - Kyocera ECOSYS M3655idn | M3655idn/M3660idn Operation Guide - Page 217
using File Management Utility, refer to the following: File Management Utility User Guide 1 Make sure that File Management Utility is running on the computer key of the favorite you want to use. 4 Follow the on-screen instructions to enter the necessary information and press [Next]. 5 When the scan - Kyocera ECOSYS M3655idn | M3655idn/M3660idn Operation Guide - Page 218
administrator. Configuring Settings before Sending Before sending a fax, the following setting is required. FAX Server Settings (page 8-45) Command Center RX User Guide Using fax server to send a fax 1 [Home] key > [Send] 2 Place the originals. Loading Originals (page 5-2) 3 In the basic screen for - Kyocera ECOSYS M3655idn | M3655idn/M3660idn Operation Guide - Page 219
of Destinations (page 5-26) Choosing from the External Address Book 1 Select [Ext. Address Book]. 2 Select the destination. Command Center RX User Guide 3 Select [OK]. Destinations can be changed later. Confirmation Screen of Destinations (page 5-26) NOTE For details on the External Address Book - Kyocera ECOSYS M3655idn | M3655idn/M3660idn Operation Guide - Page 220
Operation on the Machine > How to use the FAX Function How to use the FAX Function On products with a FAX function, it is possible to use the FAX function. FAX Operation Guide 5-36 - Kyocera ECOSYS M3655idn | M3655idn/M3660idn Operation Guide - Page 221
you can reprint the required number of copies from the operation panel. By default, up to 32 documents can be stored. When power is turned off, copies. Printing a multiple-print job in Proof and Hold using the printer driver allows only a single copy to be printed while maintaining the document data - Kyocera ECOSYS M3655idn | M3655idn/M3660idn Operation Guide - Page 222
the fax data. FAX Operation Guide Basic Operation for Document Box This login administration is enabled. For details on User Logon privileges, refer to the following: Editing and Deleting Custom Box (page 5-41) Box List Operations Document Box. Custom Box 1 0001 Box 01 Menu 2 No Owner 10:10 - Kyocera ECOSYS M3655idn | M3655idn/M3660idn Operation Guide - Page 223
by logging in with administrator privileges. The factory default login user name and login password are set as shown below. ECOSYS M3655idn ECOSYS M3660idn Login User Name: 5500 6000 Login Password: 5500 6000 • If user login administration is enabled, log in with administrator privileges - Kyocera ECOSYS M3655idn | M3655idn/M3660idn Operation Guide - Page 224
Password User access to the box can be restricted by specifying a password to protect the box. Entering a password is not mandatory. Enter the same password of up to 16 characters in both [Password] and [Confirm Password [Off]. *1 Displayed when the user login administration is enabled. *2 Not - Kyocera ECOSYS M3655idn | M3655idn/M3660idn Operation Guide - Page 225
can edit all boxes. When user login administration is enabled, the settings that can be changed varies depending on the privileges of the logged in user. Privileges Administrator User Settings that can be changed Box Name Box No. Owner Permission Box Password Usage Restriction Auto File Deletion - Kyocera ECOSYS M3655idn | M3655idn/M3660idn Operation Guide - Page 226
Box To delete 1 [Menu] > [Delete] 2 Select the box you want to delete. NOTE • When you have logged in as a user, you can only delete a box whose owner is set to that user. • When you have logged in as administrator, you can edit all boxes. 3 Select [Yes]. Saving Scanned Documents to a Custom Box - Kyocera ECOSYS M3655idn | M3655idn/M3660idn Operation Guide - Page 227
Current Folder] > [Yes] This moves the selected documents. NOTE If the box to which the document is being moved is protected by a password, enter the correct password. Copying Documents in Custom Box into Other Boxes This function allows you to copy documents stored in custom boxes into other boxes - Kyocera ECOSYS M3655idn | M3655idn/M3660idn Operation Guide - Page 228
4 [Copy] > [Yes] The selected document is copied. NOTE If the box to which the document is being copied is protected by a password, enter the correct password. Copying Documents in Custom Box to Removable Memory This function allows you to copy documents stored in custom boxes to removable memory - Kyocera ECOSYS M3655idn | M3655idn/M3660idn Operation Guide - Page 229
beforehand. 1 Display the screen. Select [Custom Box] on the Home screen > Select the box. NOTE If a custom box is protected by a password, enter the correct password. 2 Join the document. 1 Select the documents in the list that you wish to join by selecting the checkbox. The document is marked with - Kyocera ECOSYS M3655idn | M3655idn/M3660idn Operation Guide - Page 230
in Custom Box 1 Display the screen. Select [Custom Box] on the Home screen > Select the box. NOTE If a custom box is protected by a password, enter the correct password. 2 Delete the document. 1 Select the document in the list that you want to delete by selecting the checkbox. The document is marked - Kyocera ECOSYS M3655idn | M3655idn/M3660idn Operation Guide - Page 231
in a Custom Box 1 Display the screen. Select [Custom Box] on the Home screen > Select the box. NOTE If a custom box is protected by a password, enter the correct password. 2 Send Start. 1 Select the document in the list that you want to send by selecting its checkbox. The document is marked with - Kyocera ECOSYS M3655idn | M3655idn/M3660idn Operation Guide - Page 232
the Machine > Using a Custom Box Sending Documents in Custom Box to E-mail Address of Logged in user. When user login is enabled, documents in the custom box are sent to the E-mail address of the logged in user. 1 Select [Custom Box] on the Home screen > [Send to Me(E-mail)] NOTE When this function - Kyocera ECOSYS M3655idn | M3655idn/M3660idn Operation Guide - Page 233
driver. NOTE Before sending a document, confirm that TWAIN driver is installed on a computer and the settings are configured. Setting TWAIN Driver machine, see the Operation Guide or Help for each application password has been set for the box, the password entry screen appears. Enter the password - Kyocera ECOSYS M3655idn | M3655idn/M3660idn Operation Guide - Page 234
Operation on the Machine > Printing Documents Stored in Removable USB Memory Printing Documents Stored in Removable USB Memory Plugging USB memory directly into the machine enables you to quickly and easily print the files stored in the USB memory without having to use a computer. The following file - Kyocera ECOSYS M3655idn | M3655idn/M3660idn Operation Guide - Page 235
Operation on the Machine > Printing Documents Stored in Removable USB Memory 2 Print the document. 1 Select the folder containing the file to be printed. The machine will display documents in the top 3 folder levels, including the root folder. NOTE • 1,000 documents can be displayed. • To return to - Kyocera ECOSYS M3655idn | M3655idn/M3660idn Operation Guide - Page 236
Operation on the Machine > Saving Documents to USB Memory (Scan to USB) Saving Documents to USB Memory (Scan to USB) This function allows you to store scanned image files in USB memory connected to the machine. You can store files in PDF, TIFF, JPEG, XPS, OpenXPS, Word*1, Excel*1, PowerPoint*1 or - Kyocera ECOSYS M3655idn | M3655idn/M3660idn Operation Guide - Page 237
will be stored. The machine will display the top 3 folder levels, including the root folder. 2 Select [ ]. Document Box. Removable Memory 11-3-3.JPG 7-9-2.JPG 10:10 1/1 Menu < Back Print 3 Set the type of original, file format, etc., as desired. For the features that can be set, refer to the - Kyocera ECOSYS M3655idn | M3655idn/M3660idn Operation Guide - Page 238
Operation on the Machine > Removing USB Memory Removing USB Memory Follow the steps below to remove the USB memory. IMPORTANT Be sure to follow the proper procedure to avoid damaging the data or USB memory. 1 Display the screen. Select [Removable Memory] on the Home screen. 2 [Menu] > [Remove Memory - Kyocera ECOSYS M3655idn | M3655idn/M3660idn Operation Guide - Page 239
without any print operation. NOTE If the machine is out of staples, add more staples. Replacing Staples (page 10-12) Maximum number of sheets available for manual stapling Paper weight 80 g/m2 90 g/m2 or less Number of stapled sheets 20 sheets maximum*1 15 sheets maximum*1 *1 Paper stack - Kyocera ECOSYS M3655idn | M3655idn/M3660idn Operation Guide - Page 240
Memory (Store File, Printing Documents 6-8 Functions ...6-10 ID Card Copy ...6-10 Original Size ...6-10 Paper Selection ...6-11 Original Orientation ...6-12 Mixed Size after Transmitted ...6-34 Storing Size ...6-35 Encrypted PDF Password ...6-35 JPEG/TIFF Print ...6-36 XPS Fit to Page ...6-36 6-1 - Kyocera ECOSYS M3655idn | M3655idn/M3660idn Operation Guide - Page 241
Card Copy Original Size Original Orientation Close 10:10 On Off 1/4 A4 Top Edge on Top copies. Use this when you want to copy a driver's license or an insurance card. When you scan the original image type for best results. EcoPrint saves toner when printing. Adjusts the sharpness of image outlines - Kyocera ECOSYS M3655idn | M3655idn/M3660idn Operation Guide - Page 242
Using Various Functions > Functions Available on the Machine Functions Continuous Scan Job Finish Notice File Name Entry Priority Override Description Scans a large number of originals in separate batches and then produce as one job. Sends E-mail notice when a job is complete. Adds a file name. - Kyocera ECOSYS M3655idn | M3655idn/M3660idn Operation Guide - Page 243
Removes dark background from originals, such as newspapers. Reference page page 6-15 page 6-25 page 6-29 page 6-10 page 6-12 page 6-13 page 6-27 page 6-28 page 6-33 page 6-33 page 6-13 page 6-14 . page 6-17 page 6-26 Refer to the FAX Operation Guide. page 6-18 page 6-24 page 6-25 page 6-33 6-4 - Kyocera ECOSYS M3655idn | M3655idn/M3660idn Operation Guide - Page 244
of a document is successful, or when an error occurs and transmission fails. Reference page page 6-34 page 6-24 page 6-34 Refer to the FAX Operation Guide. Refer to the FAX Operation Guide. Refer to the FAX Operation Guide. Refer to the FAX Operation - Kyocera ECOSYS M3655idn | M3655idn/M3660idn Operation Guide - Page 245
. You can adjust the contrast between light and dark areas of the image. Removes dark background from originals, such as newspapers. Reference page page 6-10 page 6-12 page 6-13 page 6-35 page 6-14 page 6-16 page 6-16 page 6-17 Hides background colors and image bleed-through when scanning thin - Kyocera ECOSYS M3655idn | M3655idn/M3660idn Operation Guide - Page 246
top priority. Adds a file name. Sends E-mail notice when a job is complete. EcoPrint saves toner when printing. Reference page page 6-11 page 6-13 page 6-23 page 6-34 page 6-25 Reference page 6-33 Refer to the FAX Operation Guide. page 6-25 page 6-33 page 6-24 page 6-34 Refer to the FAX Operation - Kyocera ECOSYS M3655idn | M3655idn/M3660idn Operation Guide - Page 247
Entry Color Selection doc Full Color Cancel Ready to store in Box. (FullColor) Functions Quiet Mode Original Size Original Orientation Mixed Size Originals Close 10:10 Off A4 1/4 Top Edge on Top Off Add/Edit Shortcut For details on each function, see the table below. Store File Function key - Kyocera ECOSYS M3655idn | M3655idn/M3660idn Operation Guide - Page 248
scan speed for quiet processing. Functions EcoPrint Job Finish Notice File Name Entry Priority Override Encrypted PDF Password JPEG/TIFF Print XPS Fit to Page Description EcoPrint saves toner when printing. Sends E-mail notice when a job is complete. Adds a file name. Suspends the current job and - Kyocera ECOSYS M3655idn | M3655idn/M3660idn Operation Guide - Page 249
Copy Use this when you want to copy a driver's license or an insurance card. When you scan standard sizes. Others 16K, ISO B5, Envelope #10, Envelope #9, Envelope #6, Envelope Monarch, Envelope DL, standard sizes and custom sizes. *1 For instructions on how to specify the custom original size - Kyocera ECOSYS M3655idn | M3655idn/M3660idn Operation Guide - Page 250
type 16K, ISO B5, Envelope #10, Envelope #9, Envelope #6, Envelope Monarch refer to the following: Measurement (page 8-18) *4 For instructions on how to specify the custom paper types 1 to 8, paper that will be used often and set them as default. Multi Purpose Tray (page 8-9) • If the specified - Kyocera ECOSYS M3655idn | M3655idn/M3660idn Operation Guide - Page 251
when the optional OCR Scan Activation Kit is installed. For Copying, this does not displayed if the optional expansion memory is not installed. NOTE The default setting for Original Orientation can be changed. Original Orientation (Copy) (page 8-15) 6-12 - Kyocera ECOSYS M3655idn | M3655idn/M3660idn Operation Guide - Page 252
Send Scan to Box Scan to USB Scans all sheets in the document processor, even if they are of different sizes. (Value: [Off] / [On]) Supported Combinations of Originals Legal and Letter (Folio and A4) Collate Copy Print from Box Print from USB Prints ordered sets of the copies. (Value: [Off - Kyocera ECOSYS M3655idn | M3655idn/M3660idn Operation Guide - Page 253
Using Various Functions > Functions Original Image Copy Send Scan to Box Scan to USB Select original image type for best results. Copying/Printing Text+Photo*1 Item Description Best for mixed text and photo documents. Photo Best for photos taken with a camera. Text Graphic/Map*2 Best - Kyocera ECOSYS M3655idn | M3655idn/M3660idn Operation Guide - Page 254
Using Various Functions > Functions EcoPrint Copy Print from Box Print from USB EcoPrint saves toner when printing. Use this function for test prints or any other occasion when high quality print is not required. (Value: [Off] / [On]) Color Selection Send - Kyocera ECOSYS M3655idn | M3655idn/M3660idn Operation Guide - Page 255
Using Various Functions > Functions Sharpness Copy Send Scan to Box Scan to USB Adjusts the sharpness of image outlines. When copying penciled originals with rough or broken lines, clear copies can be taken by adjusting sharpness toward "Sharpen". When copying images made up of patterned dots - Kyocera ECOSYS M3655idn | M3655idn/M3660idn Operation Guide - Page 256
adjust the ground color. Automatically adjusts the background density based on the original. Select [1] to [5] (Lighter - Darker) to adjust the background density manually. Prevent Bleed-thrugh Copy Send Scan to Box Scan to USB Hides background colors and image bleed-through when scanning thin - Kyocera ECOSYS M3655idn | M3655idn/M3660idn Operation Guide - Page 257
Statement Inch Models Zoom Level (Original Copy) 141% A5 >> A4 115% B5 >> A4 90% Folio>>A4 86% A4 >> B5 70% A4 >> A5 Zoom Entry Manually reduces or enlarges the original image in 1% increments between 25% and 400%. Use the numeric keys or select [+] or [-] to enter the any magnification. 6-18 - Kyocera ECOSYS M3655idn | M3655idn/M3660idn Operation Guide - Page 258
Using Various Functions > Functions Sending/Storing 100% Auto Item Description Reproduces the original size. Reduces or enlarges original to sending/storing size. NOTE To reduce or enlarge the image, select the paper size, sending size, or storing size. Paper Selection (page 6-11) Sending Size - Kyocera ECOSYS M3655idn | M3655idn/M3660idn Operation Guide - Page 259
Mark Top Edge on Top, Top Edge on Left Description Disables the function. Copy the original with the default setting. For the default settings, refer to the following: Function Defaults (page 8-15) Select the page layout of scanned originals. Select the boundary line type. Select the orientation of - Kyocera ECOSYS M3655idn | M3655idn/M3660idn Operation Guide - Page 260
in 1 Item L to R/T to B R to L/B to T 4 in 1 Right then Down Left then Down Down then Right Down then Left Image NOTE • The paper sizes supported in Combine mode are A4, A5, B5, Folio, 216 × 340 mm, Letter, Legal, Statement, Oficio II, and 16K. • When placing the original on the platen, - Kyocera ECOSYS M3655idn | M3655idn/M3660idn Operation Guide - Page 261
not rotated. • Binding Top: Images on the second sides are rotated 180 degrees. Produces two-sided copies from two-sided originals. NOTE The paper sizes supported in Two-sided to Two-sided mode are A4, B5, A5, Legal, Letter, Executive, Statement, Oficio II, 216 × 340 mm, Folio, ISO B5, and 16K - Kyocera ECOSYS M3655idn | M3655idn/M3660idn Operation Guide - Page 262
the function. 1-sided>>2-sided ― 2-sided>>1-sided ― 2-sided>>2-sided ― Copy the original with the default setting. For the default settings, refer to the following: Function Defaults (page 8-15) Others Duplex Binding in Original*1 Binding in Finishing*2 Original Orientation*1, *2 1-sided - Kyocera ECOSYS M3655idn | M3655idn/M3660idn Operation Guide - Page 263
until you select [Finish Scan]. (Value: [Off] / [On]) 1 11 21 1 1~10 11~20 21~30 1~30 Job Finish Notice Copy Print from Box Print from USB Send Send from Address Book, refer to the following: Command Center RX User Guide *2 Displayed when user login administration is enabled. 6-24 - Kyocera ECOSYS M3655idn | M3655idn/M3660idn Operation Guide - Page 264
Using Various Functions > Functions File Name Entry Copy Print from Box Print from USB Send Send from Box Scan to Box Scan to USB Adds a file name. Additional information such as job number and date and time can also be set. You can check a job history or job status using the file name, - Kyocera ECOSYS M3655idn | M3655idn/M3660idn Operation Guide - Page 265
Using Various Functions > Functions Skip Blank Page Copy Send Scan to Box Scan to USB When there are blank pages in a scanned document, this function skips the blank pages and prints only pages that are not blank. Blank pages can be set as pages that include ruled lines and a small number of - Kyocera ECOSYS M3655idn | M3655idn/M3660idn Operation Guide - Page 266
Using Various Functions > Functions Duplex (2-sided Original) Send Scan to Box Scan to USB Select the type and orientation of the binding based on the original. Item Value Description 1-sided ― Disables the function. 2-sided ― Set when using a 2-sided sheet original that will be bound - Kyocera ECOSYS M3655idn | M3655idn/M3660idn Operation Guide - Page 267
Inch series standard sizes. Select from special standard sizes and custom sizes. Relationship between Original Size, Sending Size, and Zoom Original Size (page 6-10), Sending Size, and Zoom (page 6-18) are related to each other. For details, see the table below. Original size and sending size are - Kyocera ECOSYS M3655idn | M3655idn/M3660idn Operation Guide - Page 268
/A-2b, PDF/A-2u Set PDF/A format type. ― You can use PDF encryption functions. PDF Encryption Functions (page 6-30) Off, On Set the default OCR Text Recognition. OCR Text Recognition (Option) (page 6-32) Text + Graphics, Text + Graphics with Scanned Image, Scanned Image with Searchable Text - Kyocera ECOSYS M3655idn | M3655idn/M3660idn Operation Guide - Page 269
have selected PDF or High Comp. PDF for file format, you can restrict the access level for displaying, printing, and editing PDF's by assigning a secure password. Select [Others], [PDF] or [High Comp. PDF] in [File Format], and select [Encryption]. Items that can be set vary depending on the setting - Kyocera ECOSYS M3655idn | M3655idn/M3660idn Operation Guide - Page 270
Using Various Functions > Functions When [Acrobat 5.0 and later, Encryption Level: High(128-bit)] is selected Item Password to Open Document Off, On Value Password to Edit/Print Document Off, On Printing Allowed Changes Allowed Not Allowed Allowed (Low Resolution only) Allowed Not Allowed - Kyocera ECOSYS M3655idn | M3655idn/M3660idn Operation Guide - Page 271
you send from the Custom Box. • If the proper language is not selected, file creation may take a long time or the creation may fail. The default language can be changed in System Menu. Primary OCR Language*1 (page 8-17) • If you do not set an original in the correct orientation, the text - Kyocera ECOSYS M3655idn | M3655idn/M3660idn Operation Guide - Page 272
Using Various Functions > Functions File Separation Send Send from Box Scan to USB Creates several files by dividing scanned original data page by page, and sends the files. (Value: [Off] / [Each Page]) Select [Each Page] to set File Separation. NOTE A three-digit serial number such as "abc_001 - Kyocera ECOSYS M3655idn | M3655idn/M3660idn Operation Guide - Page 273
sure that "SSL" of Secure Protocol Settings is "On" and one or more effective encryption are selected in Client side settings. Command Center RX User Guide Delete after Printed Print from Box Automatically deletes a document from the box once printing is complete. (Value: [Off] / [On]) Delete after - Kyocera ECOSYS M3655idn | M3655idn/M3660idn Operation Guide - Page 274
Size and the size you wish to store as are Original Size (page 6-10) Storing Size Zoom (page 6-18) the same Specify as necessary. Select [ Password Print from USB Enter the preassigned password to print the PDF data. Enter the Password, and select [OK]. NOTE For details on entering the password - Kyocera ECOSYS M3655idn | M3655idn/M3660idn Operation Guide - Page 275
Using Various Functions > Functions JPEG/TIFF Print Print from USB Select the image size when printing JPEG or TIFF files. (Value: [Paper Size] / [Image Resolution] / [Print Resolution]) Item Paper Size Image Resolution Print Resolution Description Fits the image size to the selected paper size. - Kyocera ECOSYS M3655idn | M3655idn/M3660idn Operation Guide - Page 276
Checking Job History ...7-8 Checking the Detailed Information of Histories 7-9 Sending the Log History ...7-9 Job Operation ...7-10 Pause and Resumption of Jobs ...7-10 Canceling of Jobs ...7-10 Device/Communication ...7-11 Checking the Remaining Amount of Toner and Paper (Paper/Supplies 7-13 7-1 - Kyocera ECOSYS M3655idn | M3655idn/M3660idn Operation Guide - Page 277
Status/Job Cancel > Checking Job Status Checking Job Status Check the status of jobs being processed or waiting to be printed. Available Status Screens The processing and waiting statuses of jobs are displayed as a list on the touch panel in four different screens - Printing Jobs, Sending Jobs, - Kyocera ECOSYS M3655idn | M3655idn/M3660idn Operation Guide - Page 278
changed from Command Center RX. Command Center RX User Guide Print Job Status Screen No. Item 1 Job No. 2 Type Status/Job Cancel. Print Job Status 1 0089 doc0000892010092514... doc0000892010092515... doc0000892010092520... 23 Cancel 6 10:10 - Kyocera ECOSYS M3655idn | M3655idn/M3660idn Operation Guide - Page 279
Status/Job Cancel > Checking Job Status Send Job Status Screen Status/Job Cancel. Send Job Status 1 0005 0123456 23 10:10 Process 45 1/1 No. Item 1 Job No. 2 Type 3 Job Name 4[] 5 Status 6 [Menu] 7 [Cancel] Menu Cancel 67 Close Description Acceptance No. of job Icons that indicate - Kyocera ECOSYS M3655idn | M3655idn/M3660idn Operation Guide - Page 280
Status/Job Cancel > Checking Job Status Store Job Status Screen Status/Job Cancel. Store Job Status 1 0016 doc0000162010082913... 23 4 10:10 Storing 5 1/1 No. Item 1 Job No. 2 Type 3 Job Name 4[] 5 Status 6 [Cancel] Cancel 6 Close Description Acceptance No. of job Icons that - Kyocera ECOSYS M3655idn | M3655idn/M3660idn Operation Guide - Page 281
Status/Job Cancel > Checking Job Status Scheduled Job Status Screen Status/Job Cancel. Scheduled Job 1 0014 A OFFICE 23 10:10 12:00 45 1/1 No. Item 1 Job No. 2 Type 3 Destination 4[] 5 Start Time 6 [Menu] 7 [Cancel] Menu Cancel 67 Close Description Acceptance No. of job Icons that - Kyocera ECOSYS M3655idn | M3655idn/M3660idn Operation Guide - Page 282
information of each job. NOTE When you have logged in as a user, you can only check your own jobs. When you have logged in to display detailed information. Status/Job Cancel. Send Job Status 0005 0123456 10:10 Process 1/1 Menu Cancel Close Detailed information of the selected job is displayed - Kyocera ECOSYS M3655idn | M3655idn/M3660idn Operation Guide - Page 283
of completed jobs. NOTE • Job history is also available by Command Center RX or KYOCERA Net Viewer from the computer. Command Center RX User Guide KYOCERA Net Viewer User Guide • You can show the job log of all users, or only your own job log. Display Status/Log (page 8-19) • This setting can - Kyocera ECOSYS M3655idn | M3655idn/M3660idn Operation Guide - Page 284
doc0000112010081817... 0010 doc0000102010081815... 0009 doc0000092010081815... 0008 doc 10:10 Completed Canceled 1/3 Completed Error Close Detailed information log history by E-mail. You can either send it manually as needed or have it sent automatically whenever a set number of jobs is reached. - Kyocera ECOSYS M3655idn | M3655idn/M3660idn Operation Guide - Page 285
screen. Select the [Status/Job Cancel] key. 2 Select the job to be canceled from the list, and select [Cancel]. 3 Select [Yes] in the confirmation screen. 7-10 - Kyocera ECOSYS M3655idn | M3655idn/M3660idn Operation Guide - Page 286
etc.) is displayed. "Printer" Error information such as paper jam, out of toner, or out of paper, and status such as waiting or printing are displayed , etc.) about a document in the FAX Memory RX Box. FAX Operation Guide "FAX" • The information such as sending/receiving and dialing is displayed. - Kyocera ECOSYS M3655idn | M3655idn/M3660idn Operation Guide - Page 287
Status/Job Cancel > Device/Communication "Option Network Connection Status" The connection status of an optional network interface kit appears. "Wi-Fi Direct" Shows the connection status of Wi-Fi Direct. "Wireless Network" The connection status of the Wireless Network Interface Kit is displayed. "Wi - Kyocera ECOSYS M3655idn | M3655idn/M3660idn Operation Guide - Page 288
the device you wish to check. 2 Check the status. The items you can check are described below. "Toner Status" The amount of toner remaining is shown in levels. And you can check the status of waste toner box. "Paper Status" You can check the size, orientation, type, and remaining amount of paper in - Kyocera ECOSYS M3655idn | M3655idn/M3660idn Operation Guide - Page 289
Property ...8-7 Cassette/MP Tray Settings ...8-8 Common Settings ...8-10 Home ...8-20 Copy ...8-20 Send ...8-21 Document Box ...8-22 FAX ...8-22 Application ...8-22 Internet ...8-23 Address Book/One Touch ...8-23 User Login/Job Accounting ...8-24 Printer ...8-24 System/Network ...8-27 Date/Timer - Kyocera ECOSYS M3655idn | M3655idn/M3660idn Operation Guide - Page 290
Format Time Zone Auto Panel Reset 10:10 10/10/2014 10:10 3 DD/MM/YYYY factory default login user name and login password are set as shown below. ECOSYS M3655idn ECOSYS M3660idn Login User Name: 5500 6000 Login Password: 5500 6000 • If function default settings have been changed, the [Reset - Kyocera ECOSYS M3655idn | M3655idn/M3660idn Operation Guide - Page 291
Report Settings Result Report Settings Sending Log History Counter User Property Cassette 1 (to 5) Multi Purpose Tray Default Screen Sound Original Settings Paper Settings Function Defaults Preset Limit Error Handling Measurement Low Toner Alert Keyboard Layout USB Keyboard Type Display Status/Log - Kyocera ECOSYS M3655idn | M3655idn/M3660idn Operation Guide - Page 292
User Login Administration (page 9-2) Job Accounting: Overview of Job Accounting (page 9-33) Printing from computers, settings are generally made on the application software screen. However, the following settings are available for configuring the defaults option used by service - personnel for - Kyocera ECOSYS M3655idn | M3655idn/M3660idn Operation Guide - Page 293
] Language Item Description Select the language displayed on the touch panel. Report Print reports to check the machine settings and status. Default settings for printing the result reports can also be configured. Report Print [System Menu/Counter] key > [Report] > [Report Print] Item Status - Kyocera ECOSYS M3655idn | M3655idn/M3660idn Operation Guide - Page 294
than on the Status Page. Service personnel usually print the service status pages for maintenance purpose. Prints the accounting report, allowing you to check the accounts that have been registered on the machine. Prints the report on the FAX function. FAX Operation Guide Prints the optional network - Kyocera ECOSYS M3655idn | M3655idn/M3660idn Operation Guide - Page 295
RX Result Report FAX Operation Guide Job Finish Notice Setting Attaches sent specified destinations manually. This function User Property [System Menu/Counter] key > [User Property] Allows you to view information about logged in users and edit some of that information. Enabling User Login - Kyocera ECOSYS M3655idn | M3655idn/M3660idn Operation Guide - Page 296
. Values Cassette 1: 16K, ISO B5, Envelope DL, Envelope C5, Oufukuhagaki (Return postcard), Custom*2 Cassettes 2 to 5: 16K, ISO B5, Envelope #10, Envelope #9, Envelope #6, Envelope Monarch, Envelope DL, Envelope C5, Youkei 4, Youkei 2, Custom*2 Select the media type. Values Cassette 1: Plain (60 - Kyocera ECOSYS M3655idn | M3655idn/M3660idn Operation Guide - Page 297
special standard sizes and custom sizes. Values: 16K, ISO B5, Envelope #10, Envelope #9, Envelope #6, Envelope Monarch, Envelope DL, Envelope C5, Hagaki , Thick (106 to 220 g/m2), High Quality, Custom 1 - 8 *1 For instructions on how to specify the custom paper size. Custom Paper Size (page 8-12) *2 - Kyocera ECOSYS M3655idn | M3655idn/M3660idn Operation Guide - Page 298
operation. Default Screen [System Menu/Counter] key > [Common Settings] > [Default Screen] Item Description Default Screen Select the screen appearing right after start-up (default screen). a sound to confirm keypresses with a sound. Value: Off, On FAX Operation Guide FAX Operation Guide 8-10 - Kyocera ECOSYS M3655idn | M3655idn/M3660idn Operation Guide - Page 299
original size. Value Metric: A4, A5, A6, B5, B6, Folio, 216 × 340 mm Inch: Letter, Legal, Statement, Executive, Oficio II Others: 16K Select a default size for the originals placed on the platen. If [Off] is selected, a confirmation will be displayed before each job is processed. Value Off Metric - Kyocera ECOSYS M3655idn | M3655idn/M3660idn Operation Guide - Page 300
Setup and Registration (System Menu) > System Menu Paper Settings [System Menu/Counter] key > [Common Settings] > [Paper Settings] Configure settings for paper. Item Custom Paper Size Cassette 1 Size*1 Description Set up frequently-used custom paper size. One custom paper size is set for each - Kyocera ECOSYS M3655idn | M3655idn/M3660idn Operation Guide - Page 301
type. For Custom 1-8, settings for duplex printing and media type name can be changed. Media Type Setting (page 8-14) Select the default paper source from Cassette 1 - 5 and multi purpose tray. Value: Cassette 1 to 5, Multipurpose Tray NOTE [Cassette 2] to [Cassette 5] are displayed when optional - Kyocera ECOSYS M3655idn | M3655idn/M3660idn Operation Guide - Page 302
printing and media type name can be changed. Weight (g/m2) 106 g/m² to 135 g/m² 136 g/m² to 163 g/m² 164 g/m² to 220 g/m² Transparencies Default Heavy 1 Normal 2 Normal 2 Normal 2 Heavy 2 Heavy 2 Normal 2 Normal 2 Item Duplex Print Permit Prohibit Name Description Duplex printing allowed. Duplex - Kyocera ECOSYS M3655idn | M3655idn/M3660idn Operation Guide - Page 303
Auto (Color/B & W)] or [Black & White]. Set the default Backgrnd Density (Copy). Value: Off, Auto, Manual (Darker 5) Set the default Backgrnd Density (Send/Store). Value: Off, Auto, Manual (Darker 5) Select the EcoPrint default. Value: Off, On Set the default value for preventing bleed-through (Copy - Kyocera ECOSYS M3655idn | M3655idn/M3660idn Operation Guide - Page 304
Page (Copy) settings. Value: Off, On Skip Blank Page (Send/Store) Set the default Skip Blank Page (Send/Store) settings. Value: Off, On FAX TX Resolution FAX Operation Guide Zoom Select the enlarged/reduced default when paper size/sending size changed after the originals set. Value: 100%, Auto - Kyocera ECOSYS M3655idn | M3655idn/M3660idn Operation Guide - Page 305
adjustment range when selecting the file format with which to send and store images. Value: 1 Low (High Comp.), 2, 3, 4, 5 High (Low Comp.) PDF/A Set the default value for PDF/A when selecting the file format with which to send and store images. Value: Off, PDF/A-1a, PDF/A-1b, PDF/A-2a, PDF/A-2b - Kyocera ECOSYS M3655idn | M3655idn/M3660idn Operation Guide - Page 306
Paper Mismatch Multi Originals Fed*1 *1 ECOSYS M3660idn only Description Set what to do Toner Alert [System Menu/Counter] key > [Common Settings] > [Low Toner Alert] Item Low Toner Alert Description Set the amount of remaining toner to notify the administrator when to order a toner when the toner - Kyocera ECOSYS M3655idn | M3655idn/M3660idn Operation Guide - Page 307
that is performed without operating the machine. When [Prohibit] is selected, a document that has been stored in the document box from the printer driver can be printed from the machine. This prevents another person from seeing that document. Value: Permit, Prohibit NOTE If [Prohibit] is selected - Kyocera ECOSYS M3655idn | M3655idn/M3660idn Operation Guide - Page 308
. When a paper source of different size from the original is selected, select whether automatic zoom (reduce/zoom) is performed. Value: Off, On Specify whether the default screen appears when a subsequent copy job is reserved while printing is in progress. To have the - Kyocera ECOSYS M3655idn | M3655idn/M3660idn Operation Guide - Page 309
Select the compression method for TIFF images handled on this machine. Value: TIFF V6, TTN2 Default Screen New Destination Entry Recall Destination Use this procedure to set the default screen displayed when you select the [Send] key. Value: Destination, Address Book, Ext. Address Book - Kyocera ECOSYS M3655idn | M3655idn/M3660idn Operation Guide - Page 310
Box, Sub Address Box and Polling Box. Item Custom Box Add/Edit Default Setting Sub Address Box Job Box Quick Copy Job Retention Deletion of Deletion Time Set the time to automatically delete stored documents. FAX Operation Guide Configure settings for Job Box. To maintain free space on the box, - Kyocera ECOSYS M3655idn | M3655idn/M3660idn Operation Guide - Page 311
. Adding a Destination on One Touch Key (One Touch Key) (page 3-33) Address Book Defaults [System Menu/Counter] key > [Address Book/One Touch] > [Address Book Defaults] Item Sort Address Book Description Select the default sort setting of the address for the address book. Value: No., Name Specify - Kyocera ECOSYS M3655idn | M3655idn/M3660idn Operation Guide - Page 312
Guide User Login/Job Accounting [System Menu/Counter] key > [User Login/Job Accounting] Configure settings related to machine management. Overview of User Login for configuring the defaults to customize the toner when printing. This is recommended for test copies where faded printing is not - Kyocera ECOSYS M3655idn | M3655idn/M3660idn Operation Guide - Page 313
default orientation, [Portrait] or [Landscape]. Value: Portrait, Landscape Turn this to on to increase the maximum number of characters that can be printed in a line for an A4 page (78 characters at 10 ] & [Job No.]]. Set whether the user name set in the printer driver is displayed. Value: Off, On If - Kyocera ECOSYS M3655idn | M3655idn/M3660idn Operation Guide - Page 314
resolution used for printing. Value: 300 dpi, 600 dpi, Fine1200, Fast1200 NOTE Settings that are received from the printer driver have priority over the operation panel settings. Select the default KIR (smoothing) setting. Value: Off, On Set the condition to be regarded as the job end if the print - Kyocera ECOSYS M3655idn | M3655idn/M3660idn Operation Guide - Page 315
Setup and Registration (System Menu) > System Menu System/Network Configures machine system settings. Network [System Menu/Counter] key > [System/Network] > [Network] Configures network settings. Host Name Item Host Name Description Check the host name of the machine. Host name can be changed - Kyocera ECOSYS M3655idn | M3655idn/M3660idn Operation Guide - Page 316
by pressing the push button on the access point. NOTE The push button method supports only the WPS. PIN Code Method (Device) Starts connection using the machine's PIN LAN can be changed. Network Name (SSID) Set the SSID (Service Set Identifier) of the wireless LAN to which the machine connects. - Kyocera ECOSYS M3655idn | M3655idn/M3660idn Operation Guide - Page 317
Setup and Registration (System Menu) > System Menu Item TCP/IP Setting TCP/IP IPv4 Settings DHCP Auto-IP IP Address Subnet Mask Default Gateway Description - Select whether to use TCP/IP Protocol. Value: Off, On Set up TCP/IP (IPv4) to connect to the network. This setting is - Kyocera ECOSYS M3655idn | M3655idn/M3660idn Operation Guide - Page 318
and gateway address of TCP/IP (IPv6). Value IP Address (Manual): 128-bits address is expressed in eight groups consisting of fourdigit hexadecimal digits. The groups are separated by colon (:). Prefix Length: 0 to 128 Default Gateway: 128-bits address is expressed in eight groups consisting of - Kyocera ECOSYS M3655idn | M3655idn/M3660idn Operation Guide - Page 319
Setup and Registration (System Menu) > System Menu Bonjour Item Description Protocol Setting Select whether to use Bonjour. Value: Off, On Available Network (Wi-Fi Direct)*1 Available Network (Wi-Fi)*1 Available Network (Wired Network) Set whether to enable this function for each network. - Kyocera ECOSYS M3655idn | M3655idn/M3660idn Operation Guide - Page 320
send documents using FTP. When selecting [On], set the FTP Port Number. The default port number is 21. Value: Off, On (Port Number: 1-65535) FTP Server to use our proprietary web services. WIA driver, TWAIN driver and Network FAX driver use this Enhanced WSD web service.*1 Value: Off, On Available - Kyocera ECOSYS M3655idn | M3655idn/M3660idn Operation Guide - Page 321
Setup and Registration (System Menu) > System Menu Item DSM Scan Description Select whether to use DSM scan.*1 Value: Off, On LDAP Select whether to use LDAP. Value: Off, On SNMP Protocol Setting - Select whether to communicate using SNMP.*1 Value: Off, On Available Network (Wi-Fi Direct)*2 - Kyocera ECOSYS M3655idn | M3655idn/M3660idn Operation Guide - Page 322
Port Number NOTE When selecting [On], it also requires a certificate for SSL. the default certificate is the selfcertificate of the machine. Command Center RX User Guide Set the IPP over SSL default Port Number. The default port number is 443.*1 Value: 1-32767 NOTE This function is displayed when - Kyocera ECOSYS M3655idn | M3655idn/M3660idn Operation Guide - Page 323
a certificate for SSL. The default certificate is the self- certificate of the machine. Command Center RX User Guide Available Network (Wi-Fi Direct)*2 proprietary web services.*1 Value: Off, On NOTE Selecting [Off] will disable the functionality of WIA, TWAIN, and Network FAX driver. Available - Kyocera ECOSYS M3655idn | M3655idn/M3660idn Operation Guide - Page 324
Network Interface Kit is installed. REST Protocol Setting Port Number - Select whether to use REST. *1 Value: Off, On Set the REST default Port Number. The default port number is 9080.*1 Value: 1-32767 NOTE This function is displayed when [Protocol Setting] is set to [On]. Available Network (Wi - Kyocera ECOSYS M3655idn | M3655idn/M3660idn Operation Guide - Page 325
SSL.*1, *3 Value: Off, On Set the REST over SSL default Port Number. The default port number is 9081.*1 Value: 1-32767 NOTE This function is displayed Security HTTP Security SMTP Security POP3 Security (User 1) POP3 Security (User 2) POP3 Security (User 3) Description Select whether or not to use - Kyocera ECOSYS M3655idn | M3655idn/M3660idn Operation Guide - Page 326
button. This setting executes push button, and the connection is started by pressing the push button on the access point. NOTE The push button method supports only the WPS. Starts connection using the machine's PIN code. Enter the PIN code into the access point. The PIN code of the machine is - Kyocera ECOSYS M3655idn | M3655idn/M3660idn Operation Guide - Page 327
(System Menu) > System Menu Item Description Custom Setup Network Name (SSID) The detailed settings for wireless LAN can be changed. Set the SSID (Service Set Identifier) of the wireless LAN to which the machine connects. NOTE Up to 32 characters can be entered. Connection Mode Set the - Kyocera ECOSYS M3655idn | M3655idn/M3660idn Operation Guide - Page 328
This function is displayed when the optional Network Interface Kit is installed. MAC Address Filter Select whether to use MAC Address Filter. Operation Guide for the optional Network Interface Kit Value: Off, On Restart Network Restarts the network card of the device. *1 The setting will be - Kyocera ECOSYS M3655idn | M3655idn/M3660idn Operation Guide - Page 329
Setup and Registration (System Menu) > System Menu Interface Block Setting [System Menu/Counter] key > [System/Network] > [Interface Block Setting] This allows you to protect this machine by blocking the interface with external devices such as USB hosts or optional interfaces. USB Host Item USB - Kyocera ECOSYS M3655idn | M3655idn/M3660idn Operation Guide - Page 330
Setup and Registration (System Menu) > System Menu Restart [System Menu/Counter] key > [System/Network] > [Restart] Restart Item Description Restart the CPU without turning the power switch off. Use this to deal with any unstable operation by the machine. (Same as the computer restart.) RAM - Kyocera ECOSYS M3655idn | M3655idn/M3660idn Operation Guide - Page 331
/Network] > [Data Security] Configure settings for data stored in the optional SSD and machine's memory. Item SSD Initialization Security Password System Initialization Description This changes security function settings. NOTE • This function is displayed when the optional SSD is installed and the - Kyocera ECOSYS M3655idn | M3655idn/M3660idn Operation Guide - Page 332
Return the following information registered in the machine to the factory defaults. • Address Book • Favorites • System settings • Fax Install the OCR Dictionary. NOTE • For information on dictionary data, consult your Service Representative. • To install the OCR dictionary, an SSD or SD/SDHC memory - Kyocera ECOSYS M3655idn | M3655idn/M3660idn Operation Guide - Page 333
[On] is set in fax server. • For the fax server information, ask your fax server administrator. Select the default type of the files to be sent. Value: PDF, TIFF, XPS NOTE This appears when [On] is set does not appear when extension address book is not enabled, . Command Center RX User Guide 8-45 - Kyocera ECOSYS M3655idn | M3655idn/M3660idn Operation Guide - Page 334
a region that utilizes summer time, configure settings for summer time. Auto Panel Reset If no jobs are run for a certain period of time, automatically reset settings and return to the default setting. Select to use Auto Panel Reset or not. Value: Off, On NOTE The time allowed to elapse before - Kyocera ECOSYS M3655idn | M3655idn/M3660idn Operation Guide - Page 335
this machine. Value: Limited Retries, Unlimited Retries NOTE If [Limited Retries] is selected, set the number of retry. The setting range is 0 to 10. Retry is not performed when "0" is set. If [Unlimited Retries] is selected, retry is performed until the machine turns OFF. Retry Interval Set the - Kyocera ECOSYS M3655idn | M3655idn/M3660idn Operation Guide - Page 336
processing, processing stops to wait for the next step to be taken by the user. In the Auto Error Clear mode, automatically clear the error after a set [Auto Error Clear] is set to [On]. Unusable Time FAX Operation Guide. Ping Timeout Set the time until timeout occurs when [Ping] is executed - Kyocera ECOSYS M3655idn | M3655idn/M3660idn Operation Guide - Page 337
sending images or storing them in the Document Box. Value: -3 (Lighter), -2, -1, 0 (Normal), +1, +2, +3 (Darker) Toner Save Level (EcoPrint) Select the default Toner Save Level (EcoPrint). Copy Select the default Toner Save Level (EcoPrint) at the time of copying. Value: 1 to 5 Raising the level - Kyocera ECOSYS M3655idn | M3655idn/M3660idn Operation Guide - Page 338
Correcting Black Line Display Brightness Drum Refresh Auto Drum Refresh Service Setting Description This setting allows you to adjust the detection operating environment and this process may take time. Drum Refresh (page 10-30) NOTE Drum Refresh cannot be performed while printing. Execute Drum - Kyocera ECOSYS M3655idn | M3655idn/M3660idn Operation Guide - Page 339
Transmitted from a Computer 9-43 Configuring Job Accounting ...9-44 Default Setting ...9-44 Counting the Number of Pages Printed 9-45 Print Accounting Report ...9-46 Using Job Accounting ...9-47 Login/Logout ...9-47 Unknown User Settings ...9-48 Unknown ID Job ...9-48 Registering Information for - Kyocera ECOSYS M3655idn | M3655idn/M3660idn Operation Guide - Page 340
(User Login, Job Accounting) > Overview of User Login Administration Overview of User Login Administration User login administration specifies how the user access is administered on this machine. Enter a correct login user name and password for user authentication to login. 1 Enable User Login - Kyocera ECOSYS M3655idn | M3655idn/M3660idn Operation Guide - Page 341
password, and select [Login]. For this, you need to login with administrator privileges. The factory default login user name and login password are set as shown below. Login User Name: Login Password: ECOSYS M3655idn ECOSYS M3660idn 5500 6000 5500 6000 2 [User Login Setting] > [User Login 10 - Kyocera ECOSYS M3655idn | M3655idn/M3660idn Operation Guide - Page 342
a login user name and password, and select [Login]. For this, you need to login with administrator privileges. The factory default login user name and login password are set as shown below. Login User Name: Login Password: ECOSYS M3655idn ECOSYS M3660idn 5500 6000 5500 6000 2 [User Login - Kyocera ECOSYS M3655idn | M3655idn/M3660idn Operation Guide - Page 343
a login user name and password, and select [Login]. For this, you need to login with administrator privileges. The factory default login user name and login password are set as shown below. Login User Name: Login Password: ECOSYS M3655idn ECOSYS M3660idn 5500 6000 5500 6000 2 [User Login - Kyocera ECOSYS M3655idn | M3655idn/M3660idn Operation Guide - Page 344
a login user name and password, and select [Login]. For this, you need to login with administrator privileges. The factory default login user name and login password are set as shown below. Login User Name: Login Password: ECOSYS M3655idn ECOSYS M3660idn 5500 6000 5500 6000 2 [User Login - Kyocera ECOSYS M3655idn | M3655idn/M3660idn Operation Guide - Page 345
as needed. Item User Name*1 Login User Name*1 Login Password Account Name Descriptions Enter the name displayed on the user list (up to 32 characters). Enter the login user name to login (up to 64 characters). The same login user name cannot be registered. Enter the password to login (up to 64 - Kyocera ECOSYS M3655idn | M3655idn/M3660idn Operation Guide - Page 346
NOTE For details on entering characters, refer to the the following: Character Entry Method (page 11-11) 4 Select [Save]. A new user is added on the local user list. NOTE If simple login is enabled, a confirmation screen appears when new registration is finished asking if you will configure simple - Kyocera ECOSYS M3655idn | M3655idn/M3660idn Operation Guide - Page 347
a login user name and password, and select [Login]. For this, you need to login with administrator privileges. The factory default login user name and login password are set as shown below. Login User Name: Login Password: ECOSYS M3655idn ECOSYS M3660idn 5500 6000 5500 6000 2 [User Login - Kyocera ECOSYS M3655idn | M3655idn/M3660idn Operation Guide - Page 348
List)" to change a user property. Adding a User (Local User List) (page 9-6) 3 [Save] > [Yes] The user information is changed. Deleting a user 1 Select the user to delete. 2 [ ] > [Yes] The selected user will be deleted. NOTE The default user with machine administrator rights cannot be deleted. 9-10 - Kyocera ECOSYS M3655idn | M3655idn/M3660idn Operation Guide - Page 349
Accounting (User Login, Job Accounting) > Setting User Login Administration To change the user information of logged in user (User Property) These users can partially change their own user properties including user name, login password, E-mail address, and Simple Login. Although "Login User Name - Kyocera ECOSYS M3655idn | M3655idn/M3660idn Operation Guide - Page 350
. NOTE This function does not appear when Simple Login is set to [Off] or the user is not registered in Simple Login. Register the language, default screen and shortcut for each user. Once registered, the setting will be applied simply by login. Network users are not displayed. 2 Select [Save]. The - Kyocera ECOSYS M3655idn | M3655idn/M3660idn Operation Guide - Page 351
. The user name and password stored in the Login user name list needs to be entered. The user name and password must be entered each time a printing is attempted. [Validate user name (computer) or prompt for login user name]: When printing, the Windows user name is searched in the "Login user names - Kyocera ECOSYS M3655idn | M3655idn/M3660idn Operation Guide - Page 352
User Authentication and Accounting (User Login, Job Accounting) > Setting User Login Administration 3 Click [OK]. NOTE For other settings of job accounting, refer to the following: Printer Driver User Guide 9-14 - Kyocera ECOSYS M3655idn | M3655idn/M3660idn Operation Guide - Page 353
[Start] button on the Windows, [All Programs], [Kyocera] and then [TWAIN Driver Setting]. 2 Select the machine,and click [Edit]. 2 Configure the settings. 1 Click [User Authentication Settings]. 2 Select the checkbox beside [Authentication], and enter Login User Name and Password. 3 Click [OK]. 9-15 - Kyocera ECOSYS M3655idn | M3655idn/M3660idn Operation Guide - Page 354
WIA It is possible to manage the users that scan using WIA. Setting WIA Driver To manage the users that scan using WIA, the following settings are necessary in the WIA driver. Instructions are based on interface elements as they appear in Windows 8.1. 1 Display the screen. 1 Click [Search] in charms - Kyocera ECOSYS M3655idn | M3655idn/M3660idn Operation Guide - Page 355
the printer driver. 3 Click [FAX TX Setting] on the [Printing Preferences] window. 2 Configure the settings. 1 Select [User Login] on the [Authentication] tab. 1 2 2 Set the User Login Administration. [Use Specific Login User Name]: This option can be used to specify a user name and password to use - Kyocera ECOSYS M3655idn | M3655idn/M3660idn Operation Guide - Page 356
a login user name and password, and select [Login]. For this, you need to login with administrator privileges. The factory default login user name and login password are set as shown below. Login User Name: Login Password: ECOSYS M3655idn ECOSYS M3660idn 5500 6000 5500 6000 2 [User Login - Kyocera ECOSYS M3655idn | M3655idn/M3660idn Operation Guide - Page 357
a login user name and password, and select [Login]. For this, you need to login with administrator privileges. The factory default login user name and login password are set as shown below. Login User Name: Login Password: ECOSYS M3655idn ECOSYS M3660idn 5500 6000 5500 6000 2 [User Login - Kyocera ECOSYS M3655idn | M3655idn/M3660idn Operation Guide - Page 358
during operations, enter a login user name and password, and select [Login]. For this, you need to login with administrator privileges. The factory default login user name and login password are set as shown below. Login User Name: Login Password: ECOSYS M3655idn ECOSYS M3660idn 5500 6000 5500 - Kyocera ECOSYS M3655idn | M3655idn/M3660idn Operation Guide - Page 359
Authentication and Accounting (User Login, Job Accounting) > Setting User Login Administration 2 [User Login Setting] > [Group Authorization] > [Group List] > [ ] System Menu/Counter. Group Authorization Set. - Group List Others 10:10 1/1 Menu End 2 Configure the settings. 1 Enter the group - Kyocera ECOSYS M3655idn | M3655idn/M3660idn Operation Guide - Page 360
a login user name and password, and select [Login]. For this, you need to login with administrator privileges. The factory default login user name and login password are set as shown below. Login User Name: Login Password: ECOSYS M3655idn ECOSYS M3660idn 5500 6000 5500 6000 2 [User Login - Kyocera ECOSYS M3655idn | M3655idn/M3660idn Operation Guide - Page 361
Authorization Rules Descriptions Enter the name displayed on the user list (up to 32 characters). The default setting is "Guest User". The authority of the user appears. This cannot be changed. Add an account where the user belongs. If the user does not belong to any account, select [Other]. Set - Kyocera ECOSYS M3655idn | M3655idn/M3660idn Operation Guide - Page 362
a login user name and password, and select [Login]. For this, you need to login with administrator privileges. The factory default login user name and login password are set as shown below. Login User Name: Login Password: ECOSYS M3655idn ECOSYS M3660idn 5500 6000 5500 6000 2 [User Login - Kyocera ECOSYS M3655idn | M3655idn/M3660idn Operation Guide - Page 363
a login user name and password, and select [Login]. For this, you need to login with administrator privileges. The factory default login user name and login password are set as shown below. Login User Name: Login Password: ECOSYS M3655idn ECOSYS M3660idn 5500 6000 5500 6000 2 [User Login - Kyocera ECOSYS M3655idn | M3655idn/M3660idn Operation Guide - Page 364
and Accounting (User Login, Job Accounting) > Setting User Login Administration 2 Configure the settings. 1 [Server Name] > Enter the LDAP server name or the IP address > [OK] 2 [Port] > Enter the LDAP port number > [OK] 3 [Name 1] > Enter the LDAP Attribute to obtain the user name to be - Kyocera ECOSYS M3655idn | M3655idn/M3660idn Operation Guide - Page 365
a login user name and password, and select [Login]. For this, you need to login with administrator privileges. The factory default login user name and login password are set as shown below. Login User Name: Login Password: ECOSYS M3655idn ECOSYS M3660idn 5500 6000 5500 6000 2 [User Login - Kyocera ECOSYS M3655idn | M3655idn/M3660idn Operation Guide - Page 366
a login user name and password, and select [Login]. For this, you need to login with administrator privileges. The factory default login user name and login password are set as shown below. Login User Name: Login Password: ECOSYS M3655idn ECOSYS M3660idn 5500 6000 5500 6000 2 [User Login - Kyocera ECOSYS M3655idn | M3655idn/M3660idn Operation Guide - Page 367
(User Login, Job Accounting) > Setting User Login Administration Specifying the user from network users System Menu/Counter. Add - Network User Login User Name 10:10 Keyboard Login Password Keyboard Cancel < Back Next > Select [Keyboard] for "Login User Name" and "Login Password", enter - Kyocera ECOSYS M3655idn | M3655idn/M3660idn Operation Guide - Page 368
a login user name and password, and select [Login]. For this, you need to login with administrator privileges. The factory default login user name and login password are set as shown below. Login User Name: Login Password: ECOSYS M3655idn ECOSYS M3660idn 5500 6000 5500 6000 2 [User Login - Kyocera ECOSYS M3655idn | M3655idn/M3660idn Operation Guide - Page 369
a login user name and password, and select [Login]. For this, you need to login with administrator privileges. The factory default login user name and login password are set as shown below. Login User Name: Login Password: ECOSYS M3655idn ECOSYS M3660idn 5500 6000 5500 6000 2 [User Login - Kyocera ECOSYS M3655idn | M3655idn/M3660idn Operation Guide - Page 370
and Accounting (User Login, Job Accounting) > Using User Login Administration Using User Login Administration This section explains procedures while setting job accounting. Login/Logout If user login administration is enabled, the login user name and login password entry screen appears - Kyocera ECOSYS M3655idn | M3655idn/M3660idn Operation Guide - Page 371
Authentication and Accounting (User Login, Job Accounting) > Overview of Job Accounting Overview of by Using TWAIN To manage the scan job account by using TWAIN, you need to configure the TWAIN driver settings on the computer connected to the machine. Job Accounting for Scan Using TWAIN (page 9-41) - Kyocera ECOSYS M3655idn | M3655idn/M3660idn Operation Guide - Page 372
during operations, enter a login user name and password, and select [Login]. For this, you need to login with administrator privileges. The factory default login user name and login password are set as shown below. Login User Name: Login Password: ECOSYS M3655idn ECOSYS M3660idn 5500 6000 5500 - Kyocera ECOSYS M3655idn | M3655idn/M3660idn Operation Guide - Page 373
during operations, enter a login user name and password, and select [Login]. For this, you need to login with administrator privileges. The factory default login user name and login password are set as shown below. Login User Name: Login Password: ECOSYS M3655idn ECOSYS M3660idn 5500 6000 5500 - Kyocera ECOSYS M3655idn | M3655idn/M3660idn Operation Guide - Page 374
during operations, enter a login user name and password, and select [Login]. For this, you need to login with administrator privileges. The factory default login user name and login password are set as shown below. Login User Name: Login Password: ECOSYS M3655idn ECOSYS M3660idn 5500 6000 5500 - Kyocera ECOSYS M3655idn | M3655idn/M3660idn Operation Guide - Page 375
Authentication and Accounting (User Login, Job Accounting) > Setting an Account Restricting the Use of the Machine This section explains how to restrict the use of the machine by account or - Kyocera ECOSYS M3655idn | M3655idn/M3660idn Operation Guide - Page 376
during operations, enter a login user name and password, and select [Login]. For this, you need to login with administrator privileges. The factory default login user name and login password are set as shown below. Login User Name: Login Password: ECOSYS M3655idn ECOSYS M3660idn 5500 6000 5500 - Kyocera ECOSYS M3655idn | M3655idn/M3660idn Operation Guide - Page 377
during operations, enter a login user name and password, and select [Login]. For this, you need to login with administrator privileges. The factory default login user name and login password are set as shown below. Login User Name: Login Password: ECOSYS M3655idn ECOSYS M3660idn 5500 6000 5500 - Kyocera ECOSYS M3655idn | M3655idn/M3660idn Operation Guide - Page 378
User Login, Job Accounting) > Setting an Account Job Accounting for Printing The number of jobs to be printed from the computer can be managed by Job Accounting. Setting Printer Driver using the printer driver on the PC. Instructions are based on interface elements as they appear in Windows 8.1. 1 - Kyocera ECOSYS M3655idn | M3655idn/M3660idn Operation Guide - Page 379
search list then the TWAIN Driver Setting screen appears. NOTE In Windows 7, select [Start] button on the Windows, [All Programs], [Kyocera] and then [TWAIN Driver Setting]. 2 Select the machine, click [Edit]. 2 Configure the settings. 1 Click [User Authentication Settings]. 2 Select the checkbox - Kyocera ECOSYS M3655idn | M3655idn/M3660idn Operation Guide - Page 380
number of jobs scanned by using WIA, you need to configure the following settings by using the WIA Driver on the computer. Instructions are based on interface elements as they appear in Windows 8.1. 1 Display the screen. 1 Click [Search] in charms, and enter "Scanner" in the search box. Click [View - Kyocera ECOSYS M3655idn | M3655idn/M3660idn Operation Guide - Page 381
jobs transmitted from the computer, you need to configure the following settings by using the FAX Driver on the computer. Instructions are based on interface elements as they appear in Windows 8.1. 1 Display the screen. 1 Select [Settings] in charms on Desktop, and select [Control Panel], and then - Kyocera ECOSYS M3655idn | M3655idn/M3660idn Operation Guide - Page 382
for job accounting. To configure the settings, select the item in Default Setting and select the setting item. [System Menu/Counter] key > [User Login/Job Accounting] > [Job Accounting Settings] > [Default Setting] For details on each function, see the table below. Item Description Apply Limit - Kyocera ECOSYS M3655idn | M3655idn/M3660idn Operation Guide - Page 383
Total Job Accounting and Each Job Accounting. A new count can also be started after resetting the count data which was stored for a certain period of time. [System Menu/Counter] key > [User Login/Job Accounting] > [Job Accounting Settings] > [Total Accounting] or [Each Job Account] Total Accounting - Kyocera ECOSYS M3655idn | M3655idn/M3660idn Operation Guide - Page 384
during operations, enter a login user name and password, and select [Login]. For this, you need to login with administrator privileges. The factory default login user name and login password are set as shown below. Login User Name: Login Password: ECOSYS M3655idn ECOSYS M3660idn 5500 6000 5500 - Kyocera ECOSYS M3655idn | M3655idn/M3660idn Operation Guide - Page 385
scanned. When the screen to enter the login user name and password appears If user login administration is enabled, the screen to enter the login user name and password appears. Enter a login user name and password to login. If the user has already registered the account information, the account - Kyocera ECOSYS M3655idn | M3655idn/M3660idn Operation Guide - Page 386
during operations, enter a login user name and password, and select [Login]. For this, you need to login with administrator privileges. The factory default login user name and login password are set as shown below. Login User Name: Login Password: ECOSYS M3655idn ECOSYS M3660idn 5500 6000 5500 - Kyocera ECOSYS M3655idn | M3655idn/M3660idn Operation Guide - Page 387
during operations, enter a login user name and password, and select [Login]. For this, you need to login with administrator privileges. The factory default login user name and login password are set as shown below. Login User Name: Login Password: ECOSYS M3655idn ECOSYS M3660idn 5500 6000 5500 - Kyocera ECOSYS M3655idn | M3655idn/M3660idn Operation Guide - Page 388
...10-2 Cleaning ...10-2 Toner Container Replacement ...10-6 Waste Toner Box Replacement ...10-10 Replacing Staples ...10-12 Troubleshooting ...10-13 Solving Malfunctions ...10-13 Responding to Messages ...10-18 Adjustment/Maintenance ...10-30 Clearing Paper Jams ...10-31 Clearing a Staple Jam ...10 - Kyocera ECOSYS M3655idn | M3655idn/M3660idn Operation Guide - Page 389
Troubleshooting > Regular Maintenance Regular Maintenance Cleaning Clean the machine regularly to ensure optimum printing quality. CAUTION For safety, always unplug the glass platen with a soft cloth dampened with alcohol or mild detergent. IMPORTANT Do not use thinner or other organic solvents. 10-2 - Kyocera ECOSYS M3655idn | M3655idn/M3660idn Operation Guide - Page 390
Troubleshooting > Regular Maintenance Slit Glass When using the document processor, clean the slit glass surface and the reading guide with the dry cloth. IMPORTANT Do not use water, soap or solvents for cleaning. NOTE Dirt on the slit glass or the reading guide may cause black streaks to appear in - Kyocera ECOSYS M3655idn | M3655idn/M3660idn Operation Guide - Page 391
Troubleshooting > Regular Maintenance Registration Roller 1 2 3 Transfer roller (Black) IMPORTANT Be careful not to touch the black transfer roller and brown transfer belt during cleaning as this may adversely affect print quality. 10-4 - Kyocera ECOSYS M3655idn | M3655idn/M3660idn Operation Guide - Page 392
Troubleshooting > Regular Maintenance 4 Vents Use a lint free cloth to clean dust and dirt away from the vents. 10-5 - Kyocera ECOSYS M3655idn | M3655idn/M3660idn Operation Guide - Page 393
model) ECOSYS M3655idn (except for North America and Latin America model) ECOSYS M3660idn Life of the Toner Container (Printable pages) 21,000 images 25,000 images 25,000 images NOTE • The average number of images that can be printed with the toner container provided with the machine is 10,000 - Kyocera ECOSYS M3655idn | M3655idn/M3660idn Operation Guide - Page 394
Troubleshooting > Regular Maintenance Replacing the Toner Container 1 2 3 NOTE When removing the toner container from the machine, lift up the right hand side first. 10-7 - Kyocera ECOSYS M3655idn | M3655idn/M3660idn Operation Guide - Page 395
Troubleshooting > Regular Maintenance 4 5 IMPORTANT Do not touch the points shown below. 6 10-8 - Kyocera ECOSYS M3655idn | M3655idn/M3660idn Operation Guide - Page 396
Troubleshooting > Regular Maintenance 7 8 9 NOTE • If the front cover does not close, check that the new toner container is installed correctly (in step 7). • Return the exhausted toner container to your dealer or service representative. The collected toner container will be recycled or disposed in - Kyocera ECOSYS M3655idn | M3655idn/M3660idn Operation Guide - Page 397
Troubleshooting > Regular Maintenance Waste Toner Box Replacement When the waste toner box becomes full, immediately replace the waste toner box. CAUTION Do not attempt to incinerate parts which contain toner. Dangerous sparks may cause burns. 1 2 3 10-10 - Kyocera ECOSYS M3655idn | M3655idn/M3660idn Operation Guide - Page 398
Troubleshooting > Regular Maintenance 4 5 NOTE Return the exhausted waste toner box to your dealer or service representative. The collected waste toner box will be recycled or disposed in accordance with the relevant regulations. 10-11 - Kyocera ECOSYS M3655idn | M3655idn/M3660idn Operation Guide - Page 399
Troubleshooting > Regular Maintenance Replacing Staples Add staples to the optional manual stapler. NOTE If the Staple Unit runs out of staples, contact your dealer or service representative. 1 2 10-12 - Kyocera ECOSYS M3655idn | M3655idn/M3660idn Operation Guide - Page 400
> Troubleshooting Troubleshooting Solving Malfunctions The table below provides general guidelines for problem solving. If a problem occurs with your machine, look into the checkpoints and perform procedures indicated on the following pages. If the problem persists, contact your Service - Kyocera ECOSYS M3655idn | M3655idn/M3660idn Operation Guide - Page 401
Troubleshooting > Troubleshooting glass platen dirty? Clean the original holder or the glass platen. page 10-2 Printouts are fuzzy. Images are skewed. Is the machine being used in processor, align the original width guides securely before placing the originals. page 5-3 Check the position of - Kyocera ECOSYS M3655idn | M3655idn/M3660idn Operation Guide - Page 402
Troubleshooting > Troubleshooting key ― > [Adjustment/Maintenance] > [Service Setting] > [Altitude Adjustment], and set paper loaded correctly? Is the paper of the supported type? Is it in good condition? Is the correctly. page 3-2 page 3-4 page 3-4 page 10-31 page 3-2 Printouts are wrinkled. Is the - Kyocera ECOSYS M3655idn | M3655idn/M3660idn Operation Guide - Page 403
Troubleshooting > Troubleshooting of the paper. Clean the interior of the machine. page 10-4 Part of the image is ― periodically faint or shows white the [System Menu/Counter] key ― > [Adjustment/Maintenance] > [Service Setting] > [MC] and decrease the adjustment value. Decrease the adjustment - Kyocera ECOSYS M3655idn | M3655idn/M3660idn Operation Guide - Page 404
been used for Delete the domain name and backslash [Host Name] and [Login User Name]? ("/") from [Login User Name]. page 5-23 Has [Login Password] been entered properly? Check the login password. page 5-23 Have exceptions for Windows Firewall been configured properly? Configure exceptions for - Kyocera ECOSYS M3655idn | M3655idn/M3660idn Operation Guide - Page 405
Troubleshooting > Troubleshooting Responding to Messages If the touch panel or the computer displays Page Turn the main power switch off and on. If the error exists, contact administrator. page 2-10 Select [Continue] to continue - printing. Select [Cancel] to cancel the job. Load paper. Select - Kyocera ECOSYS M3655idn | M3655idn/M3660idn Operation Guide - Page 406
Troubleshooting > Troubleshooting by User toner - container. The toner container is not installed page 10-6 correctly. Set it correctly. Check waste toner box. - The waste toner box is not installed page 10-10 correctly. Set it correctly. Is the waste toner box full? Replace the waste toner - Kyocera ECOSYS M3655idn | M3655idn/M3660idn Operation Guide - Page 407
Troubleshooting > Troubleshooting E Message Error occurred at cassette #. Checkpoints ― Corrective Actions Remove the indicated cassette. Select [Next >] to follow the instructions [End]. Incorrect Login User - Name or Password.*1 The login user name or password - was incorrect when 10-20 - Kyocera ECOSYS M3655idn | M3655idn/M3660idn Operation Guide - Page 408
Troubleshooting > Troubleshooting J Message Job Accounting restriction exceeded. Make a note of the error code displayed on the screen, and contact your Service Representative. Only one copy of the scanned pages is available. Select [Continue] to or delete unneeded data. Reference Page ― - - 10-21 - Kyocera ECOSYS M3655idn | M3655idn/M3660idn Operation Guide - Page 409
Troubleshooting > Troubleshooting (page 8-48) N Message Non-genuine Toner. Checkpoints Is the installed toner container our own brand? Corrective Actions Reference Leave the machine on and follow the instruction to remove the jammed paper. page 10-31 The machine is under the - adjustment - Kyocera ECOSYS M3655idn | M3655idn/M3660idn Operation Guide - Page 410
Troubleshooting > Troubleshooting R Message RAM disk error. Checkpoints ― Removable memory error. Is writing to a removable memory prohibited? ― Removable Memory is ― their original order, and place them again. Select [Continue] to resume printing. Select [Cancel] to cancel the job. 10-23 - Kyocera ECOSYS M3655idn | M3655idn/M3660idn Operation Guide - Page 411
Troubleshooting > Troubleshooting Message Checkpoints Corrective Actions Reference Page Replace MK. - Replacement of the parts in the - maintenance kit is necessary at every 500,000 pages of printing and requires professional servicing. Contact your Service Representative. Running - Kyocera ECOSYS M3655idn | M3655idn/M3660idn Operation Guide - Page 412
Troubleshooting > Troubleshooting instructions toner. The password does not meet password login password. Job is canceled. Select Press [End]. Confirm the password policy requirements and change the login password. Job is canceled. Select Press [End]. Clean the slit glass. page 9-5 page 9-5 page 10 - Kyocera ECOSYS M3655idn | M3655idn/M3660idn Operation Guide - Page 413
Troubleshooting > Troubleshooting Message Toner is empty. - Toner is low. (Replace - when empty.) Checkpoints U Corrective Actions Reference Page Replace the toner container to our specified toner container. page 10-6 It is almost time to replace the toner ― container. Obtain a new - Kyocera ECOSYS M3655idn | M3655idn/M3660idn Operation Guide - Page 414
Troubleshooting > Troubleshooting Responding to Send Error Error login user name and login password • POP3 login user name and login password • E-mail size limit Check the FTP settings. • Login user name and login password NOTE If the sender is a domain user 23 page 5-23 page 5-23 page 5-22 10-27 - Kyocera ECOSYS M3655idn | M3655idn/M3660idn Operation Guide - Page 415
Troubleshooting > Troubleshooting Error Code 1105 Message SMTP over SSL available? • Is the encryption available? Refer to the Command Center RX User Guide. Check the following of the FTP server. - • Is FTPS available? • Is the • POP3 server name of the POP3 user • SMTP server name page 2-59 - Kyocera ECOSYS M3655idn | M3655idn/M3660idn Operation Guide - Page 416
Troubleshooting > Troubleshooting properly. • The server is not operating properly. Check the SMTP user authentication method of the recipient. Turn the main power switch off code and contact your service representative. Reference Page - - - - page 2-59 - - - page 2-10 The scanned original exceeds - Kyocera ECOSYS M3655idn | M3655idn/M3660idn Operation Guide - Page 417
Troubleshooting > Troubleshooting Adjustment/Maintenance Drum Refresh Remove image blur and white dots from the printout. NOTE Drum Refresh cannot be screen. [System Menu/Counter] key > [Adjustment/Maintenance] > [Drum Refresh] 2 Perform the drum refresh. Select [Start]. "Drum Refresh" begins. 10-30 - Kyocera ECOSYS M3655idn | M3655idn/M3660idn Operation Guide - Page 418
Troubleshooting > Troubleshooting Clearing Paper Jams If a paper jam occurs, the touch panel will of the jam will be displayed on the touch panel as well as the clearing instructions. Paper jam. Open cassette 1 and remove paper. Set cassette 1. 10:10 JAM 0501 < Back 1/2 Next > F A D E B C B - Kyocera ECOSYS M3655idn | M3655idn/M3660idn Operation Guide - Page 419
Troubleshooting > Troubleshooting Precautions with Paper Jams • Do not reuse jammed papers. • If the paper tears during removal, be sure to remove any loose unit is extremely hot. Take sufficient care when working in this area, as there is a danger of getting burned. Multi Purpose Tray 1 2 10-32 - Kyocera ECOSYS M3655idn | M3655idn/M3660idn Operation Guide - Page 420
Troubleshooting > Troubleshooting Cassettes 1 to 5 Procedures for handling a paper jam in Cassettes 1 to 5 are all the same. This section explains procedures using Cassette 1 as an example. 1 2 10-33 - Kyocera ECOSYS M3655idn | M3655idn/M3660idn Operation Guide - Page 421
Troubleshooting > Troubleshooting Duplex Unit 1 2 3 10-34 - Kyocera ECOSYS M3655idn | M3655idn/M3660idn Operation Guide - Page 422
Troubleshooting > Troubleshooting Inside the Machine 1 2 3 If the jammed paper appears to be pinched by rollers, pull it along the normal running direction of the paper. If you cannot find a paper jam, try checking inside the rear of the printer. Inner Tray / Inside Rear Cover (page 10-36) 4 10-35 - Kyocera ECOSYS M3655idn | M3655idn/M3660idn Operation Guide - Page 423
Troubleshooting > Troubleshooting Inner Tray / Inside Rear Cover 1 2 3 If you cannot find a paper jam, try checking inside the rear of the machine. CAUTION The fixing unit is extremely hot. Take sufficient care when working in this area, as there is a danger of getting burned. 4 10-36 - Kyocera ECOSYS M3655idn | M3655idn/M3660idn Operation Guide - Page 424
Troubleshooting > Troubleshooting Document Processor 1 2 3 4 10-37 - Kyocera ECOSYS M3655idn | M3655idn/M3660idn Operation Guide - Page 425
Troubleshooting > Troubleshooting Clearing a Staple Jam 1 2 3 10-38 - Kyocera ECOSYS M3655idn | M3655idn/M3660idn Operation Guide - Page 426
...11-22 Copy Functions ...11-24 Printer Functions ...11-24 Scanner Functions ...11-25 Document Processor ...11-25 Paper Feeder (500-sheet) (Option) ...11-26 Manual Stapler ...11-26 Glossary ...11-27 11-1 - Kyocera ECOSYS M3655idn | M3655idn/M3660idn Operation Guide - Page 427
-5100 (3) Expansion Memory (4) SD Memory Card SDHC Memory Card Software option (12) Data Security Kit(E) (13) UG-33 (14) Scan extension kit(A) (15) USB Keyboard (10) MS-5100B (9) PT-320 (8) IB-32B (5) HD-6/HD-7 (6) IB-50 (7) IB-51 11-2 - Kyocera ECOSYS M3655idn | M3655idn/M3660idn Operation Guide - Page 428
login administration can be performed using ID cards. To do so, it is necessary to register ID card information on the previously registered local user list. For more information about how to register this information, refer to the following: Card Authentication Kit(B) Operation Guide (2) PF-3110 - Kyocera ECOSYS M3655idn | M3655idn/M3660idn Operation Guide - Page 429
Appendix > Optional Equipment (3) "Expansion Memory" The machine can perform the more multiple jobs simultaneously by adding more memories. You can increase the machine's memory up to 3,072 MB by plugging in the optional memory modules. Precautions for Handling the Memory Modules To protect - Kyocera ECOSYS M3655idn | M3655idn/M3660idn Operation Guide - Page 430
card can be read from the operation panel or automatically when you power on or reset the machine. Installing and Formatting the SD/SDHC Memory Card To use an unused SD /SDHC memory card, consult your Service Representative. 1 Power off the machine and unplug the power cord. 2 Remove the cover. 11 - Kyocera ECOSYS M3655idn | M3655idn/M3660idn Operation Guide - Page 431
Network Interface Kit provides a high-speed connection for the Gigabit-per-second interface. Settings are possible for a variety of OS and network protocols. IB-50 User's Manual 11-6 - Kyocera ECOSYS M3655idn | M3655idn/M3660idn Operation Guide - Page 432
OS and network protocols. IB-51 User's Manual (8) IB-32B "Parallel Interface Kit" The parallel interface kit supports communications speeds up to 2 Mbps. . 2 Install the rear tray on the rear of the machine. (10) MS-5100B "Manual stapler" It can staple the originals or the printouts. The number of - Kyocera ECOSYS M3655idn | M3655idn/M3660idn Operation Guide - Page 433
ThinPrint Option" This application allows print data to be printed directly without a print driver. (14) Scan extension kit(A) "OCR Scan Activation Kit" This option enables the machine. Please contact your dealer or service representative for information on keyboards that are compatible with your machine before - Kyocera ECOSYS M3655idn | M3655idn/M3660idn Operation Guide - Page 434
during operations, enter a login user name and password, and select [Login]. For this, you need to login with administrator privileges. The factory default login user name and login password are set as shown below. Login User Name: Login Password: ECOSYS M3655idn ECOSYS M3660idn 5500 6000 5500 - Kyocera ECOSYS M3655idn | M3655idn/M3660idn Operation Guide - Page 435
login user name and password, and select [Login]. For this, you need to login with administrator privileges. The factory default login user name and login password are set as shown below. Login User Name: Login Password: ECOSYS M3655idn ECOSYS [Extend] > [Yes] The trial period is extended. 11-10 - Kyocera ECOSYS M3655idn | M3655idn/M3660idn Operation Guide - Page 436
may use another layout following the same steps. Entry Screens Lower-case Letter Entry Screen 12 11 10 9 8 1 Add - Name Abc ABC A/a Input: 3 Limit: 32 Del. qwe Key 7 Space Key 8 Delete Key 9 [Input] / [Limit] Display 10 Cursor Key 11 [A/a] / [a/A] 12 [ABC] / [Symbol] Description Displays - Kyocera ECOSYS M3655idn | M3655idn/M3660idn Operation Guide - Page 437
Appendix > Character Entry Method Upper-case Letter Entry Screen Add - Name AB ABC A/a Input: 2 Limit: 32 Del. QW E R T Y U I O P ASDFGHJ KL _ Z X C V B N M~ Cancel < Back Next > Number/Symbol Entry Screen Add - Name 123 Symbol ņ Input: 3 Limit: 32 Del. 13 Cancel < Back Next > No - Kyocera ECOSYS M3655idn | M3655idn/M3660idn Operation Guide - Page 438
Appendix > Character Entry Method Entering Characters Follow the steps below to enter 'List A-1' for an example. 1 Enter 'List', (space). Add - Name L QW AS 1, 3 ABC A/a E RT Y DFGH Input: 1 Limit: 32 Del. 2 U I O P J KL _ Z X C V B N M~ Cancel < Back Next > Add - Name List 8 Input: - Kyocera ECOSYS M3655idn | M3655idn/M3660idn Operation Guide - Page 439
used in regular ('dry') copiers and page printers such as laser printers. It also supports a variety of other types of paper that conform to the specifications given in this are not responsible for the problems occurred from the use of paper that does not conform to our specifications. 11-14 - Kyocera ECOSYS M3655idn | M3655idn/M3660idn Operation Guide - Page 440
Paper of the following sizes is supported by the machine. Measurements in the table take into account a ±0.7 mm dimensional accuracy for length and width. Corner angles must be 90° ± 0.2°. Paper Size Envelope Monarch (3-7/8 × 7-1/2") Envelope #10 (4-1/8 × 9-1/2") Envelope DL (110 × 220 mm) Envelope - Kyocera ECOSYS M3655idn | M3655idn/M3660idn Operation Guide - Page 441
paper weight (i.e., thickness) may cause several sheets to be supplied at once accidentally and may also cause blurring or other printing problems if the toner fails to adhere correctly. Moisture Content Paper moisture content is the ratio of moisture to dryness expressed as a percentage. Moisture - Kyocera ECOSYS M3655idn | M3655idn/M3660idn Operation Guide - Page 442
electricity: During printing, paper is electrostatically charged so that the toner adheres. Choose paper that can be discharged quickly so that uncut, or edges or corners are crushed. In order to prevent these problems, be especially careful when you cut the paper yourself. Packaging: Choose paper - Kyocera ECOSYS M3655idn | M3655idn/M3660idn Operation Guide - Page 443
Thus, special paper is more likely than regular paper to cause printing problems. Before purchasing special paper in volume, try testing a sample to given below. Note that we are not responsible for any harm to the user or damage to the machine caused by moisture or specifications of special paper - Kyocera ECOSYS M3655idn | M3655idn/M3660idn Operation Guide - Page 444
labels, you must be liable for the print quality and possible trouble. Top sheet Adhesive layer Carrier sheet Labels consist of three layers sheet until the label is used. This composition of labels may cause more problems. The label surface must be covered completely with the top sheet. Gaps - Kyocera ECOSYS M3655idn | M3655idn/M3660idn Operation Guide - Page 445
Do not load paper above the load limits located on the paper width guide of the optional paper feeder. Due to the structure of envelopes, winding a string to close the flap or envelopes with an open or film-covered window. • If paper jams occur, load fewer envelopes at once. Thick Paper Before - Kyocera ECOSYS M3655idn | M3655idn/M3660idn Operation Guide - Page 446
Appendix > Paper Colored Paper Colored paper must conform to the specifications. Basic Paper Specifications (page 11-14) In addition, the pigments in the paper must be able to withstand the heat of printing (up to 200°C or 392°F). Preprinted Paper Preprinted paper must conform to the specifications. - Kyocera ECOSYS M3655idn | M3655idn/M3660idn Operation Guide - Page 447
the FAX, refer to the following: FAX Operation Guide Machine Item Description Type Printing Method Paper Weight Cassette Multi × 356 mm), Banner sheet (216 × 356.1 mm to 216 × 915 mm) 25 seconds or less 10 seconds or less 25 seconds or less 500 sheets (80 g/m2)*1 100 sheets (80 g/m2) *1 Up - Kyocera ECOSYS M3655idn | M3655idn/M3660idn Operation Guide - Page 448
Altitude Brightness Dimension (W × D × H) Weight (without toner container) Space Required (W × D) (Using multi purpose . 23.3 kg 18.9" × 24.89" 480 × 632 mm 120 V Specification Model: 120 V 60 Hz 10.0 A 230 V Specification Model: 220 to 240 V 50/60 Hz 5.6 A The information is available at the - Kyocera ECOSYS M3655idn | M3655idn/M3660idn Operation Guide - Page 449
or less Fast 1200, Fine 1200, 600 dpi Windows 7, Windows 8, Windows 8.1, Windows 10, Windows Server 2008/R2, Windows Server 2012/R2, Windows Server 2016 Mac OS 10.5 or later USB Interface Connector: 1 (Hi-Speed USB) Network interface: 1 (10 BASE-T/100 BASE-TX/1000 BASE-T) Optional Interface (Option - Kyocera ECOSYS M3655idn | M3655idn/M3660idn Operation Guide - Page 450
TWAIN and WIA scanning) *4 Available Operating System: Windows Server 2008/Windows Server 2008 R2/Windows 7/Windows 8/ Windows 8.1/Windows 10/Windows Server 2012/Windows Server 2012 R2/Windows Server 2016 Document Processor Item Supported Original Types Paper Size Maximum Minimum Paper Weight - Kyocera ECOSYS M3655idn | M3655idn/M3660idn Operation Guide - Page 451
Supply Method Paper Size Supported Paper Dimensions (W) × II, 16K, B5 (ISO), Envelope #10, Envelope #9, Envelope #6 3/4, Envelope Monarch 8.4 lbs. or less/ 3.8 kg or less Manual Stapler Item Paper Weight Number of stapled sheets*1 Dimensions service representative for recommended paper types. 11-26 - Kyocera ECOSYS M3655idn | M3655idn/M3660idn Operation Guide - Page 452
OS, the Windows firewall will be set up correctly for Bonjour. Custom Box The Custom Box function stores print data for each individual user on the printer and allows the user to print single or multiple copies of the stored data later using the printer's operation panel. Default Gateway This - Kyocera ECOSYS M3655idn | M3655idn/M3660idn Operation Guide - Page 453
Dynamic Host Configuration Protocol and supports IPv6. It extends the Mode A printing mode that helps save toner. Copies made in this mode are ). Enhanced WSD Kyocera's proprietary web services. FTP (File information on its functions or are having problems getting the machine to work properly, press - Kyocera ECOSYS M3655idn | M3655idn/M3660idn Operation Guide - Page 454
in remote locations. It also supports the HTTP authentication mechanisms along users to print single or multiple copies of the stored data later using the printer's operation panel. KPDL (Kyocera Page Description Language) Kyocera Windows as a standard protocol for file sharing and printing services. - Kyocera ECOSYS M3655idn | M3655idn/M3660idn Operation Guide - Page 455
application software. The printer driver for the machine is contained in the DVD enclosed in the package. Install the printer driver on the computer connected protocol and expands the available address space, which resolves the problem of the lack of addresses under IPv4, while also introducing - Kyocera ECOSYS M3655idn | M3655idn/M3660idn Operation Guide - Page 456
The maximum transfer rate is 480 Mbps. This machine is equipped with USB 2.0 for high-speed data transfer. WIA (Windows Imaging Acquisition) A function to import images supported after Windows Me/XP from digital cameras and other peripheral devices. This function replaces what TWAIN used to do. The - Kyocera ECOSYS M3655idn | M3655idn/M3660idn Operation Guide - Page 457
Form Feed Timeout 11-27 Auto Panel Reset 8-46 Auto Paper Selection 11-27 Auto Toner 7-13 Cleaning 10-2 Glass Platen 10-2 Registration Roller 10-4 Slit Glass 10-3 Collate 6-13 Default 8-15 Color Selection 6-15 Default 8-15 Combine 6-20 Command Center RX 2-53 Common Settings 8-10 Default Screen 8-10 - Kyocera ECOSYS M3655idn | M3655idn/M3660idn Operation Guide - Page 458
48 Low Power Timer 8-46 Panel Reset Timer 8-46 Ping Timeout 8-48 8-47 Default Gateway 11-27 Settings 8-29 Default Screen 8-10 Delete after Originals Not Supported by the Document Processor 5-3 Originals Supported by the 6-33 Default 8-16 Emulation 11-28 Selection 8-24 Encrypted PDF Password 6-35 - Kyocera ECOSYS M3655idn | M3655idn/M3660idn Operation Guide - Page 459
Page 8-16 Zoom 8-16 Function Key Assignment 8-19 Fuser Cover 2-4 G Glossary 11-27 Google Cloud Print Guides Provided with the Machine xvi H Handle 2-2 Help 11-28 Help Screen 2-21 High Comp. PDF Image 6-29 Default 6-29 Default 8-17 Inner Tray 2-2 Install Macintosh 2-45 Software 2-37 Windows 2-38 - Kyocera ECOSYS M3655idn | M3655idn/M3660idn Operation Guide - Page 460
Pause and Resumption 7-10 Sending the Log History 7-9 Job Accounting 9-33 Adding an Account 9-36 Counting the Number of Pages Printed 9-45 Default Setting 9-44 Deleting an Account 9-39 Editing an Account 9-38 Enabling Job Accounting 9-34 FAX Driver 9-43 Job Accounting Access 9-35 Login 9-47 Logout - Kyocera ECOSYS M3655idn | M3655idn/M3660idn Operation Guide - Page 461
Kit 11-8 Expansion Memory 11-4 Manual stapler 11-7 Network Interface Kit 11 Default 8-15 Original Settings 8-11 Original Size 6-10 Original Size Indicator Plates 2-2 Original SSLeay License 1-12 Original Stopper 2-2, 5-5 Original Table 2-2 Original Width Guides 2-2 Outline font 11-29 P Panel Reset - Kyocera ECOSYS M3655idn | M3655idn/M3660idn Operation Guide - Page 462
26 Resolution 8-26 User Name 8-25 Wide A4 8-25 Printer Driver 11-30 Help 4-10 Printing Documents Stored Service Setting 8-50 Setting Date and Time 2-24 Sharpness 6-16 Shortcuts 5-14 Adding 5-14 Editing and Deleting Shortcuts 5-15 Simple Login 2-23 Simple Login Settings Simple Login 9-27 Simple Login - Kyocera ECOSYS M3655idn | M3655idn/M3660idn Operation Guide - Page 463
/Network 8-27 User Login/Job Accounting 8-24 User Property 8-7, 9- Toner Container 2-5 Toner Container Lock Lever 2-5 Toner Container Replacement 10-6 Toner Save Level (EcoPrint) 8-49 Touch Panel 2-13 Tray Extension 2-4 Troubleshooting 10-13 TWAIN 11-31 Scanning using TWAIN 5-32 Setting TWAIN Driver - Kyocera ECOSYS M3655idn | M3655idn/M3660idn Operation Guide - Page 464
/Job Accounting 8-24 Job Accounting 9-33 Unknown ID Job 9-48 Unknown User Settings 9-48 User Login 9-2 User Property 8-7 W Waste Toner Box 2-5 Waste Toner Box Replacement 10-10 Weekly Timer Settings 8-47 WIA 11-31 Setting WIA Driver 2-49 Wi-Fi Settings 2-27, 8-27 Wi-Fi Direct Printing 4-11 Settings - Kyocera ECOSYS M3655idn | M3655idn/M3660idn Operation Guide - Page 465
- Kyocera ECOSYS M3655idn | M3655idn/M3660idn Operation Guide - Page 466
. Santiago, Chile Phone: +562-2350-7000 Fax: +562-2350-7150 KYOCERA Document Solutions Australia Pty. Ltd. Level 3, 6-10 Talavera Road North Ryde N.S.W, 2113, Australia Phone: +61-2-9888-9999 Fax: +61-2-9888-9588 KYOCERA Document Solutions New Zealand Ltd. Ground Floor, 19 Byron Avenue, Takapuna - Kyocera ECOSYS M3655idn | M3655idn/M3660idn Operation Guide - Page 467
ße 11, Turm A, 18. OG, 1100 Wien, Austria Phone: +43-1-863380 Fax: +43-1-86338-400 KYOCERA Document Solutions Nordic AB Esbogatan 16B 164 75 Kista, Sweden Phone: +46-8-546-550-00 Fax: +46-8-546-550-10 KYOCERA Document Solutions Norge Nuf Olaf Helsetsv. 6, 0619 Oslo, Norway Phone: +47-22-62-73-00 Fax - Kyocera ECOSYS M3655idn | M3655idn/M3660idn Operation Guide - Page 468
First edition 2017.11 2V3KDEN000
-
 1
1 -
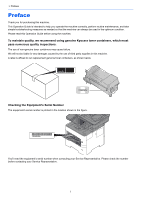 2
2 -
 3
3 -
 4
4 -
 5
5 -
 6
6 -
 7
7 -
8
-
9
-
10
-
11
-
12
-
13
-
14
-
15
-
16
-
17
-
18
-
19
-
20
-
21
-
22
-
23
-
24
-
25
-
26
-
27
-
28
-
29
-
30
-
31
-
32
-
33
-
34
-
35
-
36
-
37
-
38
-
39
-
40
-
41
-
42
-
43
-
44
-
45
-
46
-
47
-
48
-
49
-
50
-
51
-
52
-
53
-
54
-
55
-
56
-
57
-
58
-
59
-
60
-
61
-
62
-
63
-
64
-
65
-
66
-
67
-
68
-
69
-
70
-
71
-
72
-
73
-
74
-
75
-
76
-
77
-
78
-
79
-
80
-
81
-
82
-
83
-
84
-
85
-
86
-
87
-
88
-
89
-
90
-
91
-
92
-
93
-
94
-
95
-
96
-
97
-
98
-
99
-
100
-
101
-
102
-
103
-
104
-
105
-
106
-
107
-
108
-
109
-
110
-
111
-
112
-
113
-
114
-
115
-
116
-
117
-
118
-
119
-
120
-
121
-
122
-
123
-
124
-
125
-
126
-
127
-
128
-
129
-
130
-
131
-
132
-
133
-
134
-
135
-
136
-
137
-
138
-
139
-
140
-
141
-
142
-
143
-
144
-
145
-
146
-
147
-
148
-
149
-
150
-
151
-
152
-
153
-
154
-
155
-
156
-
157
-
158
-
159
-
160
-
161
-
162
-
163
-
164
-
165
-
166
-
167
-
168
-
169
-
170
-
171
-
172
-
173
-
174
-
175
-
176
-
177
-
178
-
179
-
180
-
181
-
182
-
183
-
184
-
185
-
186
-
187
-
188
-
189
-
190
-
191
-
192
-
193
-
194
-
195
-
196
-
197
-
198
-
199
-
200
-
201
-
202
-
203
-
204
-
205
-
206
-
207
-
208
-
209
-
210
-
211
-
212
-
213
-
214
-
215
-
216
-
217
-
218
-
219
-
220
-
221
-
222
-
223
-
224
-
225
-
226
-
227
-
228
-
229
-
230
-
231
-
232
-
233
-
234
-
235
-
236
-
237
-
238
-
239
-
240
-
241
-
242
-
243
-
244
-
245
-
246
-
247
-
248
-
249
-
250
-
251
-
252
-
253
-
254
-
255
-
256
-
257
-
258
-
259
-
260
-
261
-
262
-
263
-
264
-
265
-
266
-
267
-
268
-
269
-
270
-
271
-
272
-
273
-
274
-
275
-
276
-
277
-
278
-
279
-
280
-
281
-
282
-
283
-
284
-
285
-
286
-
287
-
288
-
289
-
290
-
291
-
292
-
293
-
294
-
295
-
296
-
297
-
298
-
299
-
300
-
301
-
302
-
303
-
304
-
305
-
306
-
307
-
308
-
309
-
310
-
311
-
312
-
313
-
314
-
315
-
316
-
317
-
318
-
319
-
320
-
321
-
322
-
323
-
324
-
325
-
326
-
327
-
328
-
329
-
330
-
331
-
332
-
333
-
334
-
335
-
336
-
337
-
338
-
339
-
340
-
341
-
342
-
343
-
344
-
345
-
346
-
347
-
348
-
349
-
350
-
351
-
352
-
353
-
354
-
355
-
356
-
357
-
358
-
359
-
360
-
361
-
362
-
363
-
364
-
365
-
366
-
367
-
368
-
369
-
370
-
371
-
372
-
373
-
374
-
375
-
376
-
377
-
378
-
379
-
380
-
381
-
382
-
383
-
384
-
385
-
386
-
387
-
388
-
389
-
390
-
391
-
392
-
393
-
394
-
395
-
396
-
397
-
398
-
399
-
400
-
401
-
402
-
403
-
404
-
405
-
406
-
407
-
408
-
409
-
410
-
411
-
412
-
413
-
414
-
415
-
416
-
417
-
418
-
419
-
420
-
421
-
422
-
423
-
424
-
425
-
426
-
427
-
428
-
429
-
430
-
431
-
432
-
433
-
434
-
435
-
436
-
437
-
438
-
439
-
440
-
441
-
442
-
443
-
444
-
445
-
446
-
447
-
448
-
449
-
450
-
451
-
452
-
453
-
454
-
455
-
456
-
457
-
458
-
459
-
460
-
461
-
462
-
463
-
464
-
465
-
466
-
467
-
468
 |
 |

OPERATION GUIDE
ECOSYS M3655idn
ECOSYS M3660idn
PRINT
COPY
SCAN
FAX