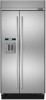
Jenn-Air JS42PPDUDE Instruction Sheet
Jenn-Air JS42PPDUDE Manual
 |
View all Jenn-Air JS42PPDUDE manuals
Add to My Manuals
Save this manual to your list of manuals |
Jenn-Air JS42PPDUDE manual content summary:
- Jenn-Air JS42PPDUDE | Instruction Sheet - Page 1
installed without this extra tightening. W11366733A 8. Repeat steps 2 through 7 to install the other handle onto the adjacent refrigerator door. 9. Save the hex key and all instructions. REMOVE THE HANDLES 1. While holding the handle, insert the short end of the hex key into a setscrew hole - Jenn-Air JS42PPDUDE | Instruction Sheet - Page 2
Répéter les étapes 2 à 7 pour installer l'autre poignée sur la porte adjacente du réfrigérateur. 9. Conserver la clé à tête hexagonale et toutes les instructions. DÉMONTAGE DES POIGNÉES 1. Tout en maintenant la poignée, introduire le côté court de la clé à tête hexagonale dans le trou d'une vis de
-
 1
1 -
 2
2
 |
 |

i�stA
Ll
RISE™ HANDLES
Parts Included:
Door handles (2), 1/8" hex key, spare setscrew(s)
INSTALL HANDLES
NOTE:
Handle mounting setscrews are preinstalled inside the handle.
1.
Remove the handles from the packaging inside the refrigerator, and
place them on a soft surface.
2.
Open a refrigerator compartment door. On the closed door, place a
handle onto the shoulder screws so that the setscrews are facing the
adjacent door.
3.
Firmly push the handle toward the door until the handle base is flush
against the door.
4.
While holding the handle, insert the short end of the hex key into the
upper hole and slightly rotate the hex key until it is engaged in the
setscrew.
5.
Using a clockwise motion tighten the setscrew just until it begins to
contact the shoulder screw. Do not fully tighten.
6.
Repeat steps 4 and 5 to fasten the lower setscrew.
7.
Once both setscrews have been partially tightened as instructed in the
previous steps, fully tighten both setscrews.
IMPORTANT:
When the screws feel tight, tighten them
an additional
quarter-turn. The handle is not properly installed without this extra
tightening.
8.
Repeat steps 2 through 7 to install the other handle onto the adjacent
refrigerator door.
9.
Save the hex key and all instructions.
REMOVE THE HANDLES
1.
While holding the handle, insert the short end of the hex key into a
setscrew hole and slightly rotate the hex key until it is engaged in the
setscrew.
2.
Using a right to left motion loosen the setscrew a quarter-turn at a
time.
3.
Repeat steps 1 and 2 for the other setscrew. Slowly pull the handle
away from the door or drawer.
4.
If necessary, use a Phillips screwdriver to remove the shoulder screws
from the door.
W11366733A
A. Shoulder screws
B. Setscrews inside the handle
1
2
1
2
A
B