JVC LM-H191U Instruction Manual
JVC LM-H191U - Professional Lcd Monitor Manual
 |
UPC - 046838039102
View all JVC LM-H191U manuals
Add to My Manuals
Save this manual to your list of manuals |
JVC LM-H191U manual content summary:
- JVC LM-H191U | Instruction Manual - Page 1
LM-H191 LM-H171 LCD DISPLAY MONITOR LCD-DISPLAYMONITOR MONITEUR LCD SCHERMO A CRISTALLI LIQUIDI MONITOR PANTALLA LCD INSTRUCTIONS BEDIENUNGSANLEITUNG MANUEL D'INSTRUCTIONS ISTRUZIONI MANUAL DE INSTRUCCIONES ИHCТРУK LCT2401-002B-H The illustration of the monitor is of LM-H191. ITALIANO FRANÇ - JVC LM-H191U | Instruction Manual - Page 2
LM-H191 LM-H171 LCD DISPLAY MONITOR The illustration of the monitor is of LM-H191. INSTRUCTIONS Table of Contents Safety Precautions 2 IMPORTANT SAFEGUARDS 2 the MAKE/TRIGGER system 13 Troubleshooting 14 Specifications 15 General 15 Input/output terminals 16 Dimensions 16 ENGLISH - JVC LM-H191U | Instruction Manual - Page 3
use, and service. Please read these "IMPORTANT SAFEGUARDS" carefully before use. • All the safety and operating instructions should be etc. on the product may cause a fire.) • Do not apply any strong shock to the LCD panel. (Do not hit any object against it or push it with a sharp-pointed tool.) - JVC LM-H191U | Instruction Manual - Page 4
energy and, if not installed and used in accordance with the instructions, may cause harmful interference to radio communications. However, there is no European representative of Victor Company of Japan, Limited is: JVC Technical Services Europe GmbH Postfach 10 05 04 61145 Friedberg Germany - JVC LM-H191U | Instruction Manual - Page 5
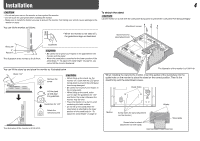
the stand, lay the monitor on a cloth with the LCD panel facing down to prevent the LCD panel from being damaged. monitor is of LM-H191. The illustration of the monitor is of LM-H191. When installing the stand to the monitor, insert the guides of the stand plate into the guide holes on the monitor - JVC LM-H191U | Instruction Manual - Page 6
the VESA mounting holes on the rear panel using M4 x 10 mm screws (not provided). Bind the hooks on the rear panel of the monitor to a wall or a pillar using durable string. The illustration of the monitor is of LM-H191. Hook and screws (M4 x 10 mm) (not provided) Hook (not provided) ENGLISH 5 - JVC LM-H191U | Instruction Manual - Page 7
not light). 1 23 45 6 7 8 9 p The illustration of the monitor is of LM-H191. 1 Speaker (monaural) The speaker emits the audio signal for the the top and the bottom of the screen because the aspect ratio of the LCD panel is 5:4. • This setting is not available for signals from a computer - JVC LM-H191U | Instruction Manual - Page 8
buttons to select an item, then press buttons to make adjustments. Setup Menu Operations 1 Press button while pressing MENU button. Selected item Operation guide 2 Press buttons to select an item, then press . • For some items, adjustments will be made by pressing . Ex.: When "COLOR SYSTEM" is - JVC LM-H191U | Instruction Manual - Page 9
a security wire to this slot. 7 The illustration of the monitor is of LM-H191. Attaching the Ferrite Core Attach the ferrite core to the power power cord until all connections are completed. • Refer also to the user manual of each piece of equipment. 1 AC IN terminal AC power input connector - JVC LM-H191U | Instruction Manual - Page 10
When the signal condition of the current input changes - When you turn on the monitor • "NO SYNC" is displayed when no video signal comes in. • " Pin No. Input signal 17 T.M.D.S Data 0- 18 T.M.D.S Data 0+ 19 T.M.D.S Data 0 shield 20 NC 21 NC 22 T.M.D.S Clock shield 23 T.M.D.S Clock+ 24 T.M.D.S - JVC LM-H191U | Instruction Manual - Page 11
• After performing "AUTO ADJUST," you can adjust each item manually. Item To do H.SIZE*4 Adjust the horizontal picture size. -10 - 00 - +10 000 - 082*5 000 - 100 000 - 063 Operation guide Shows the buttons for each operation. • The menu automatically disappears in about 30 seconds after the - JVC LM-H191U | Instruction Manual - Page 12
Menu Configuration-SET UP MENU For the operation procedure, see page 7. Operation guide Shows the buttons for each operation. Selected screen size Select by pressing SCAN SIZE on the front panel (☞ 6 on page 6). • The menu automatically disappears in - JVC LM-H191U | Instruction Manual - Page 13
15 min. • The C.SYNC input level is TTL (☞ page 16). Operation guide Shows the buttons for each operation. STATUS DISPLAY Setting value: AUTO, OFF SYSTEM" is "MAKE." all reset Restores all the settings and adjustments of the monitor to the default. • "HOUR METER X100h" will not be reset. HOUR - JVC LM-H191U | Instruction Manual - Page 14
the control method ("SYSTEM") in "REMOTE SETTING." 2 Short-circuit the 7th pin terminal (ENABLE) to the 8th pin terminal (GND) so that the monitor can be controlled by the external control. 3 When selecting "MAKE": Operate each function by short-circuiting the corresponding pin terminal to the 8th - JVC LM-H191U | Instruction Manual - Page 15
Troubleshooting Solutions to common problems related to the monitor are described here. If none of the solutions presented here solves the problem, unplug the monitor and consult an authorized dealer or service a normal characteristic of LCD displays, and not a problem. The LCD display is built with - JVC LM-H191U | Instruction Manual - Page 16
monitor as normal. Specifications 7 General Model name LM-H191 LM-H171 Type LCD Display Monitor Screen size Type 19 format Type 17 format Aspect ratio 5:4 LCD panel 19 A (AC 120 V)/0.5 A (AC 220 - 240 V) External dimensions (excluding protruding parts) Width: 413 mm (16 3/8˝) 413 mm - JVC LM-H191U | Instruction Manual - Page 17
their respective companies. Notice on transportation This monitor is precision equipment and needs dedicated packing material for transportation. Never use any packing material supplied from sources other than JVC or JVC-authorized dealers. 7 Dimensions LM-H191 413 (16 3/8˝) 16 - JVC LM-H191U | Instruction Manual - Page 18
LM-H191/LM-H171 LCD DISPLAY MONITOR © 2008 Victor Company of Japan, Limited 1108TKH-MW-MT
-
 1
1 -
 2
2 -
 3
3 -
 4
4 -
 5
5 -
 6
6 -
 7
7 -
8
-
9
-
10
-
11
-
12
-
13
-
14
-
15
-
16
-
17
-
18
 |
 |
LCT2401-002B-H
LM-H191
LM-H171
INSTRUCTIONS
BEDIENUNGSANLEITUNG
MANUEL D’INSTRUCTIONS
ISTRUZIONI
MANUAL DE INSTRUCCIONES
И
HC
ТРУ
K
ЦИЯ
ПО
ЭКСПЛУАТАЦИИ
LCD DISPLAY MONITOR
LCD-DISPLAYMONITOR
MONITEUR LCD
SCHERMO A CRISTALLI LIQUIDI
MONITOR PANTALLA LCD
МОНИТОР
С
ЖК
-
ДИСПЛЕЕМ
The illustration of the monitor is of LM-H191.
ESPAÑOL
ITALIANO
ENGLISH
DEUTSCH
FRANÇAIS
РУССКИЙ