JVC DT-V17L2DU Instructions
JVC DT-V17L2DU - High-Definition DTV Monitor Manual
 |
UPC - 046838032172
View all JVC DT-V17L2DU manuals
Add to My Manuals
Save this manual to your list of manuals |
JVC DT-V17L2DU manual content summary:
- JVC DT-V17L2DU | Instructions - Page 1
DT-V17L2D MULTI FORMAT LCD MONITOR MULTI FORMAT LCD MONITOR MONITEUR LCD MULTI-FORMAT MONITOR LCD MULTIFORMATO MONITOR LCD MULTIFORMATO INSTRUCTIONS BEDIENUNGSANLEITUNG MANUEL D'INSTRUCTIONS ISTRUZIONI MANUAL DE INSTRUCCIONES ИHCТРУK LCT2346-001A ITALIANO FRANÇAIS DEUTSCH ENGLISH ESPAÑOL - JVC DT-V17L2DU | Instructions - Page 2
-MAIN MENU 10 Menu Configuration-SET-UP MENU 12 External Control 14 About the external control 14 Using the MAKE/TRIGGER system 14 Using the serial communication 15 Troubleshooting 16 Self-check program 16 Specifications 17 General 17 Input/output terminals 17 Dimensions 18 ENGLISH - JVC DT-V17L2DU | Instructions - Page 3
service to qualified service personnel. Do not use the product for a long time if the sound is distorted. Use only the power source specified on the unit. • AC power: 120 V/220 - 240 V, 50 Hz/60 Hz • DC power: 12 - 17 V 2 • The AC power electric shock. • Use only the accessory cord designed for this - JVC DT-V17L2DU | Instructions - Page 4
uses, and can radiate radio frequency energy and, if not installed and used in accordance with the instruction manual household waste disposal service or the shop please visit our web page www.jvc-europe.com to obtain information about the use cables not exceeding the following length: Cable Power - JVC DT-V17L2DU | Instructions - Page 5
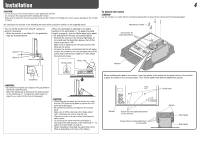
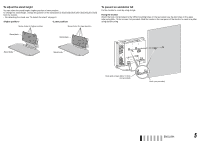
. • Do not touch the LCD panel when installing the monitor. • Make sure to install the monitor securely to prevent the monitor from falling over, which causes damage to the monitor or injury. You can place the monitor in the following two ways when using the monitor on the supplied stand. You - JVC DT-V17L2DU | Instructions - Page 6
Screw holes for lower position To prevent an accidental fall Fix the monitor to a wall by using strings. Fixing the monitor Attach the hook (not provided) to the VESA mounting holes on the rear panel (use the two holes on the upper side) using M4 x 10 mm screws (not provided). Bind the hooks on the - JVC DT-V17L2DU | Instructions - Page 7
• This function works when the picture is displayed in 16:9 aspect ratio. • This function does not work when "MARKER SELECT" or "R- power voltage is being lowered due to the battery consumption, the lamp changes to orange from green. When the voltage becomes lower than a certain level, the monitor - JVC DT-V17L2DU | Instructions - Page 8
pressing button. MAIN MENU Selected item Operation guide Selected item SET-UP MENU Operation guide 2 Press buttons to select an item, When the signal condition of the current input changes - When you turn on the monitor 1 Signal format • "*" is displayed at the end of the indication when a - JVC DT-V17L2DU | Instructions - Page 9
10). • The DVI-D (HDCP) terminal on this monitor does not conform to the HDMI standard. 9 DC IN 12V terminal DC 12 V (maximum DC 17 V) power input connector. When using DC 12 V power (maximum DC 17 V), check the DC IN 12V terminal pin signal, and use the correct polarity. If the polarity is reversed - JVC DT-V17L2DU | Instructions - Page 10
terminals on this monitor and the equipment. • Plugs should be firmly inserted; poor connections could cause noise. • When unplugging a cord, be sure to grasp its plug and pull it out. • DO NOT connect the power cord until all connections are completed. • Refer also to the user manual of each piece - JVC DT-V17L2DU | Instructions - Page 11
see page 7. Operation guide Shows the buttons for displayed correctly with "AUTO." • DVI-D input of the monitor is compatible with HDCP. AREA MARKER*1 Setting for area activate by using external control (☞ "External Control" on page 14). • When a picture is displayed in 4:3 aspect ratio, the safety - JVC DT-V17L2DU | Instructions - Page 12
Operation guide Shows the buttons for using buttons on the front panel or the menu is performed, or when the signal format changes. Setting value OFF, P.SAVE (power save mode), GRAY B. (gray screen) 30sec., 5min., 15min. ON, OFF • Setting "NO SYNC ACTION" to "GRAY B." saves the power consumption - JVC DT-V17L2DU | Instructions - Page 13
MENU For the operation procedure, see page 7. Operation guide Shows the buttons for each operation. • The menu input video signal. Item To do Setting value CONTRAST*1 Adjust the standard level for the contrast adjusted -20 - +20 with CONTRAST knob on the front panel. BRIGHT*1 Adjust the - JVC DT-V17L2DU | Instructions - Page 14
Operation guide Shows the buttons for each operation. • The menu automatically disappears of the monitor to the default. • "HOUR METER" and the settings done by using the adjustment knobs on the front panel will not be reset. • When you operate the monitor with the AC power supply, the monitor is - JVC DT-V17L2DU | Instructions - Page 15
buttons and menu on the monitor • You can use the external control even when "CONTROL LOCK" is set to "ON" (☞ page 13). • When the monitor is off (on standby), OFF Color off Color Monochrome ASPECT Changes the 4:3 16:9 aspect ratio. A.MARKER The area marker Off On display S.MARKER The safety - JVC DT-V17L2DU | Instructions - Page 16
Using the serial communication You can control the monitor from a personal computer etc. via the RS-485 or RS-232C terminal. • Consult your dealer for the details of the external control specification. - JVC DT-V17L2DU | Instructions - Page 17
Troubleshooting 16 Solutions to common problems related to the monitor are described here. If none of the solutions presented here solves the problem, unplug the monitor and consult an authorized dealer or service center. Symptom No power supply No picture with the power on No sound "OTHERS" or " - JVC DT-V17L2DU | Instructions - Page 18
) (TYP.) Contrast ratio (TYP.) Horizontal/vertical frequency (computer signal) Compliant video signal format Format Audio output Operating conditions Power requirements Rated current External dimensions (excluding protruding parts) Weight Accessories DT-V17L2D Multi format LCD monitor Type 17 wide - JVC DT-V17L2DU | Instructions - Page 19
Specifications (cont.) 7 Dimensions Unit: mm 395 86 40 1.5 VESA mounting holes (4-M4, depth: 10 mm) 100 18 100 344.6*/309.6** 304 115 300 * at the higher position ** at the lower position 64 243 - JVC DT-V17L2DU | Instructions - Page 20
© 2007 Victor Company of Japan, Limited 0907MKH-MW-VP
-
 1
1 -
 2
2 -
 3
3 -
 4
4 -
 5
5 -
 6
6 -
 7
7 -
8
-
9
-
10
-
11
-
12
-
13
-
14
-
15
-
16
-
17
-
18
-
19
-
20
 |
 |

LCT2346-001A
DT-V17L2D
INSTRUCTIONS
BEDIENUNGSANLEITUNG
MANUEL D’INSTRUCTIONS
ISTRUZIONI
MANUAL DE INSTRUCCIONES
И
HC
ТРУ
K
ЦИЯ
ПО
ЭКСПЛУАТАЦИИ
MULTI FORMAT LCD MONITOR
MULTI FORMAT LCD MONITOR
MONITEUR LCD MULTI-FORMAT
MONITOR LCD MULTIFORMATO
MONITOR LCD MULTIFORMATO
МУЛЬТИФОРМАТНЫЙ
ЖК
МОНИТОР
ESPAÑOL
ITALIANO
ENGLISH
DEUTSCH
FRANÇAIS
РУССКИЙ