HP Latex 260 HP Designjet L26500/L26100 Printer Series - User's Guide
HP Latex 260 Manual
 |
View all HP Latex 260 manuals
Add to My Manuals
Save this manual to your list of manuals |
HP Latex 260 manual content summary:
- HP Latex 260 | HP Designjet L26500/L26100 Printer Series - User's Guide - Page 1
DESIGNJET L26500 / L26100 printer series User's guide - HP Latex 260 | HP Designjet L26500/L26100 Printer Series - User's Guide - Page 2
as constituting an additional warranty. HP shall not be liable for technical or editorial errors or omissions contained herein. Trademarks Microsoft® and Windows® are U.S. registered trademarks of Microsoft Corporation. NOTE: The HP Designjet L26100 Printer is available in selected countries - HP Latex 260 | HP Designjet L26500/L26100 Printer Series - User's Guide - Page 3
19 Porous substrates ...23 Load a roll onto the spindle ...23 Load a roll into the printer (automatically 27 Load a roll into the printer (manually 30 Load a cut sheet into the printer 33 Unload a roll from the printer 33 The take-up reel ...34 The edge holders ...49 The loading accessory ...50 - HP Latex 260 | HP Designjet L26500/L26100 Printer Series - User's Guide - Page 4
7 The ink system ...76 Ink system components ...76 Order ink supplies ...80 8 Print options ...81 Printer states ...81 Change margins ...81 Request the printer's internal prints 82 9 Accessories ...83 Order accessories ...83 10 Printer specifications ...84 Functional specifications ...84 Physical - HP Latex 260 | HP Designjet L26500/L26100 Printer Series - User's Guide - Page 5
to the installation instructions before connecting the printer to the supply. ● There are no operator-serviceable parts inside the printer except those covered by HP's Customer Self Repair program (see http://www.hp.com/go/selfrepair/). Refer servicing of other parts to qualified service personnel - HP Latex 260 | HP Designjet L26500/L26100 Printer Series - User's Guide - Page 6
curing subsystems of the printer operate at high temperatures. Call your service representative if the printer's built-in Residual Current tap) to connect both power cords. ● Use only the power cords supplied by HP with the printer. Do not use a damaged power cord. Do not use the power cords with - HP Latex 260 | HP Designjet L26500/L26100 Printer Series - User's Guide - Page 7
problems associated with them. However, HP recommends that you wear gloves when handling ink system components. Warnings and cautions The following symbols are used in this manual to ensure the proper use of the printer and to prevent the printer from being damaged. Follow the instructions - HP Latex 260 | HP Designjet L26500/L26100 Printer Series - User's Guide - Page 8
printer. Risk of burns. Do not touch the drying enclosure of the printer parts inside the printer. Refer servicing to qualified service personnel. Disconnect all power cords before servicing. See installation instructions power cords supplied by HP with the printer. Risk of trapped hands. Do - HP Latex 260 | HP Designjet L26500/L26100 Printer Series - User's Guide - Page 9
of the printer are shown below: ● Printing speeds in draft mode of up to 22.8 m²/h (246 ft²/h). ● Environmentally friendly, odorless, aqueous latex inks in six ink cartridges ● Print on a wide range of substrates-including most low-cost, uncoated, solvent-compatible substrates ● A range of HP - HP Latex 260 | HP Designjet L26500/L26100 Printer Series - User's Guide - Page 10
cartridge 2. Platen 3. Printhead 4. Printhead carriage 5. Ink funnel and ink tube assembly 6. Front panel 7. Printhead cleaning cartridge 8. Substrate-adjustment lever 9. Spindle lock lever 10. Take-up reel motor 11. Take-up reel cable and sensor - HP Latex 260 | HP Designjet L26500/L26100 Printer Series - User's Guide - Page 11
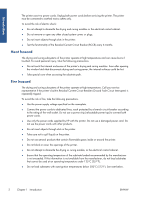
Rear view Introduction 1. Printhead cleaning container 2. Sockets for communication cables and optional accessories 3. Power switch and power sockets 4. Residual current circuit breakers for the heating components 5. Ink filter Edge holders case ENWW The printer's main components 7 - HP Latex 260 | HP Designjet L26500/L26100 Printer Series - User's Guide - Page 12
Introduction The case is normally attached to the rear of the printer, and contains the two edge holders when they are not in use. Drying enclosure Take-up reel motor 1. Take-up reel spindle lever 2. Wind-direction switch 3. Manual winding buttons 8 Chapter 1 Introduction ENWW - HP Latex 260 | HP Designjet L26500/L26100 Printer Series - User's Guide - Page 13
it. See The loading accessory on page 50. The front panel Your printer's front panel is located at the front right of the printer. It has the following important functions: ● Assists you in troubleshooting issues ● Is used when performing certain physical operations, such as unloading substrate - HP Latex 260 | HP Designjet L26500/L26100 Printer Series - User's Guide - Page 14
specific uses of the front panel can be found throughout this guide. The Embedded Web Server The Embedded Web Server is a Web server running inside the printer. You can use it to obtain printer information, manage settings and presets, align printheads, upload new firmware and troubleshoot problems - HP Latex 260 | HP Designjet L26500/L26100 Printer Series - User's Guide - Page 15
ink usage and accounting Setup tab The Setup tab enables you to complete these tasks. ● Specify printer printer. ● Browse helpful information from a variety of sources ● Troubleshoot problems ● Access HP Designjet links for technical support with your printer and accessories ● Access service support - HP Latex 260 | HP Designjet L26500/L26100 Printer Series - User's Guide - Page 16
this way, the printheads are automatically stored with the printhead cleaning cartridge, which prevents them from drying out. However, if you plan to leave the printer turned off for a long period of time, you are recommended to turn it off using the Power button, and then also turn off the power - HP Latex 260 | HP Designjet L26500/L26100 Printer Series - User's Guide - Page 17
Connectivity 2 Connectivity and software instructions Connection method Your printer can be connected in the following way on the network. Connect to a network Before you begin, check your equipment: ● The printer should be set up and turned on. ● The Gigabit switch or router should be on and - HP Latex 260 | HP Designjet L26500/L26100 Printer Series - User's Guide - Page 18
IP address, either the printer is not successfully connected to the network, or your network has no DHCP server. In the latter case, you will have to set the IP address manually: see the Maintenance and troubleshooting guide. Refer to the RIP instructions (not provided by HP) to install the software - HP Latex 260 | HP Designjet L26500/L26100 Printer Series - User's Guide - Page 19
front panel and select the icon, then select Front panel options > Select language. ● If you cannot understand the current front panel language, start with the printer powered off. At the front panel, press the OK button and hold it down. While holding down the OK button, press the Power button and - HP Latex 260 | HP Designjet L26500/L26100 Printer Series - User's Guide - Page 20
Basic setup options Request e-mail notification of specific error conditions 1. In the Embedded Web Server from 5 to 60 minutes, then press the OK button. Change the sleep mode setting If the printer is left turned on but unused for a certain period of time, it automatically goes into sleep mode - HP Latex 260 | HP Designjet L26500/L26100 Printer Series - User's Guide - Page 21
printer's front panel (http://192.168.1.1 in this example): Basic setup options If you follow these instructions but fail to open the Embedded Web Server, see the Maintenance and troubleshooting guide If you specify a language that it cannot support, it functions in English. To change the language - HP Latex 260 | HP Designjet L26500/L26100 Printer Series - User's Guide - Page 22
set an administrator password. Once set, this password must be given in order to perform the following printer functions. ● Change printer settings. ● Update the firmware. ● Change the printer's date and time. ● Clear accounting information. For more information, see the Embedded Web Server's online - HP Latex 260 | HP Designjet L26500/L26100 Printer Series - User's Guide - Page 23
variety of printing materials, all of which are referred to in this guide as substrates. Substrate tips Choosing the correct substrate for your needs is edge of the roll to the core just before removing the roll from the printer. You can keep the roll taped during storage. If the roll starts to - HP Latex 260 | HP Designjet L26500/L26100 Printer Series - User's Guide - Page 24
the printer manually without using the front panel could damage the printer. Do this only when necessary to clear a substrate jam. Supported substrate water-based inks, or offset paper. These substrates are not compatible with solvent inks. Weight is usually around 100 g/m². Example: HP Heavyweight - HP Latex 260 | HP Designjet L26500/L26100 Printer Series - User's Guide - Page 25
be compatible with your printer. The tool allows searching by manufacturer brand, substrate type, application or geographical availability. It can be found at http://www.hp.com/go/latexmediafinder/. Supported HP substrates Substrate Banners HP HDPE Reinforced Banner HP Double-sided HDPE Reinforced - HP Latex 260 | HP Designjet L26500/L26100 Printer Series - User's Guide - Page 26
HP Blue Back Billboard Paper HP Coated Paper HP Universal Coated Paper HP Universal Heavyweight Coated Paper HP Heavyweight Coated Paper HP Universal Bond Paper HP Super Heavyweight Plus Matte Paper Specialty materials HP DuPont Tyvek Banner HP Satin Canvas HP of quality specifications, with support - HP Latex 260 | HP Designjet L26500/L26100 Printer Series - User's Guide - Page 27
and troubleshooting guide. If you use a substrate that is too porous, or fail to clean the platen as recommended, you could experience a decrease in print quality that would require a service repair not covered by your warranty. Load a roll onto the spindle 1. Make sure that the printer wheels - HP Latex 260 | HP Designjet L26500/L26100 Printer Series - User's Guide - Page 28
spindle. 3. Remove the first end of the spindle from the right side of the printer, then move the spindle to the right in order to extract the other end. Do not insert your fingers into the spindle supports during the removal process. The spindle has a stop at each end to keep the - HP Latex 260 | HP Designjet L26500/L26100 Printer Series - User's Guide - Page 29
5. Remove the stop from the left end of the spindle. 6. Rest the roll of substrate that you want to load on the loading table. If the roll is long and heavy, you may need two people to handle it. 7. Slide the spindle into the roll. Handle the substrate ENWW Load a roll onto the spindle 25 - HP Latex 260 | HP Designjet L26500/L26100 Printer Series - User's Guide - Page 30
8. The right stop of the spindle has two positions: one for rolls of the printer's maximum width, and another for narrower rolls. Remember to use the second position for narrower rolls, which improves the drying process and allows higher printing - HP Latex 260 | HP Designjet L26500/L26100 Printer Series - User's Guide - Page 31
substrates, or substrates with a tendency to curl, you should follow the manual loading procedure to reduce the risk of substrate jams and printhead crashes; see Load a roll into the printer (manually) on page 30. 1. At the printer's front panel, select the icon, then select Substrate load > Load - HP Latex 260 | HP Designjet L26500/L26100 Printer Series - User's Guide - Page 32
leading edge of the substrate above the black-ribbed roller, making sure the substrate remains taut during the process. Avoid rewinding the substrate manually, unless the printer asks you to do so. WARNING! Take care not to touch the rubber wheels on the platen while loading substrate. These wheels - HP Latex 260 | HP Designjet L26500/L26100 Printer Series - User's Guide - Page 33
> Max skew setting. 7. Wait until the substrate emerges from the printer, as shown below. NOTE: If you have an unexpected problem at any stage of the substrate loading process, see the Maintenance and troubleshooting guide. 8. If you are loading transparent substrate without opaque borders, you are - HP Latex 260 | HP Designjet L26500/L26100 Printer Series - User's Guide - Page 34
For instructions on how to use the take-up reel see The take-up reel on page 34. Load a roll into the printer (manually) The manual loading process should be used in the following cases: ● The substrate is unusually thin or unusually thick. ● The substrate has ragged edges. ● The substrate tends - HP Latex 260 | HP Designjet L26500/L26100 Printer Series - User's Guide - Page 35
edge of the substrate above the black-ribbed roller, making sure the substrate remains taut during the process. Avoid rewinding the substrate manually, unless the printer asks you to do so. The front panel displays the following. 4. Continue to feed the substrate until it reaches the printing platen - HP Latex 260 | HP Designjet L26500/L26100 Printer Series - User's Guide - Page 36
always select the substrate type as HP Photorealistic to maximize the vacuum pressure. substrate > Change loaded substrate. TIP: When manually loading textile substrates that you intend to use with . 7. The printer checks the substrate in various ways and may ask you to correct problems with skew or - HP Latex 260 | HP Designjet L26500/L26100 Printer Series - User's Guide - Page 37
at least 1067 mm (42 in) long. ● Load the sheet by following the normal roll loading process (automatic or manual, depending on the substrate). ● During the loading process, the printer tries to detect the winding direction of the roll by turning the spindle in both directions. When the substrate is - HP Latex 260 | HP Designjet L26500/L26100 Printer Series - User's Guide - Page 38
end on the right side of the printer first. Do not insert your fingers into the spindle supports during the removal process. The take- loop-shaper is used with banner, textile and mesh substrates. It is attached to supports on either side of the substrate. The spindle stops should not be used with - HP Latex 260 | HP Designjet L26500/L26100 Printer Series - User's Guide - Page 39
with all other substrates. It lies in the substrate loop, supported only by the substrate, unattached at either end. It page 41. Load a roll onto the take-up reel (banner/textile/mesh substrates) 1. On the printer's front panel, select the icon, then select Take-up reel > Enable take-up reel. 2. - HP Latex 260 | HP Designjet L26500/L26100 Printer Series - User's Guide - Page 40
3. For easier access to the take-up reel spindle, lift the loading table into its upright position. 4. Unlock the take-up reel spindle by pushing the spindle lever to its uppermost position. 5. Remove the take-up reel spindle. NOTE: The take-up reel spindle is longer than the input spindle: the two - HP Latex 260 | HP Designjet L26500/L26100 Printer Series - User's Guide - Page 41
onto the take-up reel spindle. The core should be at least as wide as the substrate. 8. Load the take-up reel spindle into the printer by pushing firmly on both ends of the spindle. Handle the substrate ENWW The take-up reel 37 - HP Latex 260 | HP Designjet L26500/L26100 Printer Series - User's Guide - Page 42
to straighten the substrate. Do not attempt to pull more substrate out of the printer. NOTE: If you are loading the take-up reel during printing you do to the spindle core when an adequate length of substrate has fed from the printer after printing begins. 11. Adjust the position of the core on the - HP Latex 260 | HP Designjet L26500/L26100 Printer Series - User's Guide - Page 43
14. Press the blue arrow on the take-up reel motor to rotate the spindle one full turn. This will help to support the weight of the loop-shaper. 15. Gently lower the loading table, to avoid wrinkles and improve winding. 16. Carefully insert the heavy loop-shaper. - HP Latex 260 | HP Designjet L26500/L26100 Printer Series - User's Guide - Page 44
17. Fit the loop-shaper into the supports at either side. 18. Use the wind-direction switch been successfully installed message appears. 20. The following image shows how the printer looks when it is operating. As substrate is fed from the printer, it drops down in a loop and then up into the take- - HP Latex 260 | HP Designjet L26500/L26100 Printer Series - User's Guide - Page 45
, familiarize yourself with the procedural steps. Loading the take-up reel during printing requires you to complete the procedure while the printer is feeding and printing substrate. Loading the take-up reel during printing saves approximately 1 m (3 ft) of substrate. The following steps assume - HP Latex 260 | HP Designjet L26500/L26100 Printer Series - User's Guide - Page 46
5. Remove the right-hand end of the take-up reel spindle, then the left. NOTE: The take-up reel spindle is longer than the input spindle: the two are not interchangeable. 6. Lift the lever to remove one of the stops from the spindle. 7. Load the core onto the take-up reel spindle. The width of the - HP Latex 260 | HP Designjet L26500/L26100 Printer Series - User's Guide - Page 47
to straighten the substrate. Do not attempt to pull more substrate out of the printer. NOTE: If you are loading the take-up reel during printing you do to the spindle core when an adequate length of substrate has fed from the printer after printing begins. 12. Adjust the position of the core on the - HP Latex 260 | HP Designjet L26500/L26100 Printer Series - User's Guide - Page 48
core in the center, then at each side. Make sure that the substrate is straight. 14. Press the OK button on the front panel. The printer advances the substrate. 15. Press the blue arrow on the take-up reel motor to rotate the spindle one full turn. This will help to - HP Latex 260 | HP Designjet L26500/L26100 Printer Series - User's Guide - Page 49
: The front-panel display shows the required length of the loop-shaper based on the width of the roll that you have loaded into the printer. Handle the substrate 18. Carefully insert the light loop-shaper. This is essential: the take-up reel will not function correctly without it. The loop - HP Latex 260 | HP Designjet L26500/L26100 Printer Series - User's Guide - Page 50
the front panel. The Take-up reel has been successfully installed message appears. 22. The following image shows how the printer looks when it is operating. As substrate is fed from the printer, it drops down in a loop and then up into the take-up reel spindle. Handle the substrate NOTE: While - HP Latex 260 | HP Designjet L26500/L26100 Printer Series - User's Guide - Page 51
select the icon, then select Take-up reel > Disable take-up reel. The printer advances the substrate to allow for cutting. 2. Switch the wind-direction switch to is cut. To remove the heavy loop-shaper, first lift the support, then press the lever. Handle the substrate ENWW The take-up reel 47 - HP Latex 260 | HP Designjet L26500/L26100 Printer Series - User's Guide - Page 52
reel motor to wind the excess substrate around the take-up reel spindle. 5. Press the OK button on the front panel. The printer asks you to cut the substrate manually. 6. Use the winding button on the take-up reel motor to wind the remainder of the substrate around the take-up reel - HP Latex 260 | HP Designjet L26500/L26100 Printer Series - User's Guide - Page 53
end on the right side of the printer first. Do not insert your fingers into the spindle supports during the removal process. Handle the substrate 10. To remove the roll from the printer after you have unloaded the take-up reel, see Unload a roll from the printer on page 33. The edge holders The - HP Latex 260 | HP Designjet L26500/L26100 Printer Series - User's Guide - Page 54
The following picture shows an edge holder correctly placed. Handle the substrate NOTE: When you use the edge holders, your prints should have a minimum margin of 10 mm. The loading accessory The loading accessory is designed to help in loading flimsy substrates. It is recommended when loading - HP Latex 260 | HP Designjet L26500/L26100 Printer Series - User's Guide - Page 55
2. Lay the textile loading accessory on the loading table and flip forward enough of the white flaps to cover the width of the substrate. 3. Pull some of the textile substrate from the roll and put the leading edge on the loading accessory. 4. Flip the white flaps back to cover the leading edge of - HP Latex 260 | HP Designjet L26500/L26100 Printer Series - User's Guide - Page 56
loading accessory and the leading edge of the substrate together. 6. Load the substrate manually, see Load a roll into the printer (manually) on page 30. 7. The loading accessory passes through the printer's substrate path with the substrate. Handle the substrate 8. The front panel asks whether - HP Latex 260 | HP Designjet L26500/L26100 Printer Series - User's Guide - Page 57
when loading very thick substrates, always select the substrate type as HP Photorealistic to maximize the vacuum pressure. After loading and before hand. Handle the substrate 11. The printer checks the substrate in various ways and may ask you to correct problems with skew or tension. NOTE: You - HP Latex 260 | HP Designjet L26500/L26100 Printer Series - User's Guide - Page 58
first side should be face down and near the leading edge. 5. The printer finds the reference line, and uses it to start printing the second side Double-sided printing can be selected in your RIP software or at the printer's front panel. The RIP setting takes precedence: if double-sided printing is - HP Latex 260 | HP Designjet L26500/L26100 Printer Series - User's Guide - Page 59
it is not strictly necessary, you may find it quicker to use the manual loading procedure as an initial approximation, and then allow the printer to find the reference line more accurately. See Load a roll into the printer (manually) on page 30. If you use only the automatic loading procedure, the - HP Latex 260 | HP Designjet L26500/L26100 Printer Series - User's Guide - Page 60
in size to compensate for the contraction of the substrate after passing once through the printer. See also the Maintenance and troubleshooting guide. View information about the substrate On the printer's front panel, select the icon, then select View loaded substrate > View substrate details. The - HP Latex 260 | HP Designjet L26500/L26100 Printer Series - User's Guide - Page 61
amount remaining so that you can note it for future reference. 3. Next time the substrate is loaded, you can enter the remaining length, and the printer will again track the substrate as it is used. If the substrate was never actually unloaded, for example if there was a substrate jam and the - HP Latex 260 | HP Designjet L26500/L26100 Printer Series - User's Guide - Page 62
Enable/disable the length tracking feature 1. The length tracking feature can be disabled or enabled from the front panel. Select the then Substrate handling options > Substrate length tracking. 2. Select On or Off. icon, Store the substrate The following are tips for storing substrate: ● Always - HP Latex 260 | HP Designjet L26500/L26100 Printer Series - User's Guide - Page 63
Download media presets Each supported substrate has its own characteristics. The printer changes the way it prints on page 59. ● Further information can be found at http://www.hp.com/go/L26500/solutions/ http://www.hp.com/go/L26100/solutions/ Add a new substrate This section is provided in case - HP Latex 260 | HP Designjet L26500/L26100 Printer Series - User's Guide - Page 64
for your substrate may be available from your RIP vendor or substrate vendor. If not, you can start by copying printer settings from a similar substrate of the same family. See Supported substrate families on page 20. If you cannot find a similar substrate for some reason, here are some recommended - HP Latex 260 | HP Designjet L26500/L26100 Printer Series - User's Guide - Page 65
some colors. The substrate may wrinkle on the platen, causing vertical banding, ink smears or substrate jams. Curing is needed to coalesce the latex, creating printed images. The print may emerge not fully polymerized, so that the ink smears when rubbed. The print may appear wet, after printing or - HP Latex 260 | HP Designjet L26500/L26100 Printer Series - User's Guide - Page 66
ink level Description If too low If too high Your printer was calibrated at the factory to ensure that it advances the substrate accurately when using supported The substrate may be permanently deformed or damaged. Substrate advance problems may appear in extreme cases. The vacuum applied to the - HP Latex 260 | HP Designjet L26500/L26100 Printer Series - User's Guide - Page 67
● The substrate allows ink to pass through to the platen. Clean the sensor after using this substrate. ● You are instructed to do so by the is the IP address of your printer. You can also find it at http://www.hp.com/go/L26500/manuals/ http://www.hp.com/go/L26100/manuals/ 3. Select a suitable number - HP Latex 260 | HP Designjet L26500/L26100 Printer Series - User's Guide - Page 68
not saved for the next job. See also the Maintenance and troubleshooting guide. ● To enable or disable extra printhead cleaning while printing: change, unless you have problems that you cannot resolve any other way. The drying and curing temperatures used by the printer are determined by adding - HP Latex 260 | HP Designjet L26500/L26100 Printer Series - User's Guide - Page 69
A longer time to start printing is required. Vertical banding or ink smears may occur. The base temperature that the substrate in the curing not stopped until this temperature is reached. This setting is determined by the printer. You cannot change it. This offset is added to the base cool-down - HP Latex 260 | HP Designjet L26500/L26100 Printer Series - User's Guide - Page 70
for correct printing results with latex inks on a wide variety of substrates. temperatures and time are not to scale. For the specific values used for a given substrate type (family), above. NOTE: tp time can be modified through the printer's front panel. Select the number of passes Increasing the - HP Latex 260 | HP Designjet L26500/L26100 Printer Series - User's Guide - Page 71
speed ● Start here, Yes: recommended NOTE: More specific settings for many substrates from different vendors are available in the HP Media Finder at http://www.hp.com/go/latexmediafinder/. Check the quantity of ink on the substrate Check that the ink quantities in your media preset are adequate - HP Latex 260 | HP Designjet L26500/L26100 Printer Series - User's Guide - Page 72
● Coalescence, grain (can be caused by an excess of light ink). Substrate settings Try reducing the amount of ink in your RIP software, then reprint the chart and check again. You may have chosen a media preset that uses more ink than your substrate allows. Consult your RIP documentation to make - HP Latex 260 | HP Designjet L26500/L26100 Printer Series - User's Guide - Page 73
each patch shows a smooth gradient, there are no visible defects and increasing amounts of ink result in increasing color density. 3. Too little ink: The whole chart looks washed out. Try increasing the amount of ink in your RIP software, then reprint the chart and check again. You may have chosen - HP Latex 260 | HP Designjet L26500/L26100 Printer Series - User's Guide - Page 74
slight substrate deformation, depending on the substrate. See also the Maintenance and troubleshooting guide. Color calibration The purpose of color calibration is to produce consistent colors with the specific printheads, inks and substrate that you are using, and in your particular environmental - HP Latex 260 | HP Designjet L26500/L26100 Printer Series - User's Guide - Page 75
phases of color calibration. To avoid this problem, proceed as follows. 1. Ensure that the take until the loop-shaper reaches its lowest position. 3. Manually rewind the take-up reel, using the buttons on printer, your inks and your substrate. A color profile is a description of a printer, ink - HP Latex 260 | HP Designjet L26500/L26100 Printer Series - User's Guide - Page 76
Presets for HP-branded substrates have been created following the above recommendations in order to optimize black and dark colors. You can find the HP media preset for your substrate family at http://www.hp.com/go/latexmediafinder/. Substrate settings 72 Chapter 5 Substrate settings ENWW - HP Latex 260 | HP Designjet L26500/L26100 Printer Series - User's Guide - Page 77
Usage information 6 Retrieving usage information ● Get accounting information ● Check usage statistics ● Check usage statistics for a job ● Request accounting data by E-mail ENWW 73 - HP Latex 260 | HP Designjet L26500/L26100 Printer Series - User's Guide - Page 78
usage or job accounting data from the product through the Internet. The product provides data in XML to the application whenever requested. HP provides a Software Development Kit to facilitate the development of such applications. Check usage statistics There are two ways of checking your product - HP Latex 260 | HP Designjet L26500/L26100 Printer Series - User's Guide - Page 79
the Configuration menu, select Printer settings. 11. In the department or to a specific project or client. If ink used and various other attributes of the job. Accounting data are also provided on scan and copy jobs. You can download an Excel template from HP's Web site (http://www.hp.com/go/designjet - HP Latex 260 | HP Designjet L26500/L26100 Printer Series - User's Guide - Page 80
The ink system 7 The ink system Ink system components Ink cartridges The printer's six ink cartridges provide magenta, light magenta, black, yellow, light cyan and cyan ink to the printheads. Each cartridge has a capacity of 775 ml. Ink cartridges require no maintenance or cleaning, but must be - HP Latex 260 | HP Designjet L26500/L26100 Printer Series - User's Guide - Page 81
ink cartridges contain a low level of ink. To maintain optimum print quality, the printheads are automatically tested at regular intervals, and automatically serviced roll lasts for at least 1850 m² (20000 ft²) of printed area. The printer will refuse to start a print job if it detects the end of the - HP Latex 260 | HP Designjet L26500/L26100 Printer Series - User's Guide - Page 82
The ink system Ink funnel The ink funnel collects waste ink produced during printhead servicing. It is important that this funnel is installed, as it prevents significant deposits of ink over various other printer parts. From the ink funnel, the waste ink passes through the ink tube assembly into - HP Latex 260 | HP Designjet L26500/L26100 Printer Series - User's Guide - Page 83
produced during printhead servicing. The ink system ● The ink tube assembly, which passes tiny droplets of waste ink collected by the ink funnel to the printhead cleaning container If the printer asks you to replace the ink tube assembly, you should replace the ink funnel and the ink filter at the - HP Latex 260 | HP Designjet L26500/L26100 Printer Series - User's Guide - Page 84
any problem with these components. Order ink supplies You can order the following ink supplies for your printer. Table 7-1 Ink cartridges Cartridge Capacity (ml) HP 792 Black Latex Designjet Ink Cartridge 775 HP 792 Cyan Latex Designjet Ink Cartridge 775 HP 792 Magenta Latex Designjet Ink - HP Latex 260 | HP Designjet L26500/L26100 Printer Series - User's Guide - Page 85
different print modes, it is better to print them all together without delays to minimize the time spent in Preparing to print. Change margins The printer margins determine the area between the edges of your image and the edges of the substrate. The margins for a particular print job are selected in - HP Latex 260 | HP Designjet L26500/L26100 Printer Series - User's Guide - Page 86
the RIP. Request the printer's internal prints The internal prints provide various kinds of information about your printer. Request these prints amount of ink used per color. The accuracy of these estimates is not guaranteed. ● Service information: Provides information that service engineers require - HP Latex 260 | HP Designjet L26500/L26100 Printer Series - User's Guide - Page 87
different substrates. Name HP Designjet Soft Media Loading Accessory HP Designjet L26500 61 × 2-inch Spindle HP Designjet L26500 61 × 3-inch Spindle HP Designjet L26500 User Maintenance Kit HP Designjet L26500/28500 Edge Holders HP Designjet L26500/28500 Platen Cover HP Designjet L26100 61-in Take - HP Latex 260 | HP Designjet L26500/L26100 Printer Series - User's Guide - Page 88
10 Printer specifications Functional specifications Table 10-1 HP No. 792 ink supplies Printheads Yellow/black, cyan/light cyan and light magenta/magenta Ink cartridges Yellow, black, magenta, light magenta, cyan and light cyan. All cartridges contain 775 ml of ink. Printhead cleaning kit - HP Latex 260 | HP Designjet L26500/L26100 Printer Series - User's Guide - Page 89
(extra) 500 mm (19.7 in) (extra) Physical specifications Table 10-5 Printer physical specifications Weight (including stand) L26500 - 202kg / L26100 - 180kg Width 2465 mm Depth 690 mm Height 1370 mm Memory specifications Table 10-6 Memory specifications Memory (DRAM) Hard disk 512 MB 160 - HP Latex 260 | HP Designjet L26500/L26100 Printer Series - User's Guide - Page 90
on the printer parts and cartridges and can result in ink leaks and printer errors. In this case, HP recommends that you wait at least 3 hours before turning on the printer or installing the ink cartridges, to allow the condensate to evaporate. Acoustic specifications Table 10-9 Printer acoustic - HP Latex 260 | HP Designjet L26500/L26100 Printer Series - User's Guide - Page 91
colors in a particular print job, from print to print and from printer to printer. Curing The substrate is heated in the curing zone to coalesce the the substrate. Drying The substrate is heated in the printing zone to dry the ink and fix the image to the substrate. Too high or too low a drying - HP Latex 260 | HP Designjet L26500/L26100 Printer Series - User's Guide - Page 92
Polylactic Acid. Platen The flat surface within the printer over which the substrate passes while it is being printed on. PP Polypropylene. Printhead A removable printer component that takes ink of one or more colors from the corresponding ink cartridge(s) and deposits it on the substrate, through - HP Latex 260 | HP Designjet L26500/L26100 Printer Series - User's Guide - Page 93
passes, to compensate for the characteristics of different substrate types. The printer normally performs this adjustment automatically, but may need to be recalibrated for substrates not supported by HP, or for an unusual ambient temperature or humidity. Incorrect substrate advance compensation - HP Latex 260 | HP Designjet L26500/L26100 Printer Series - User's Guide - Page 94
specifications 86 F faster printing 70 features of printer 27 load with accessory 50 manual load 30 max skew setting specifications 84 H hard disk specification 85 HP diagnostic plot 60 I ink usage 74 ink cartridge about 76 ordering 80 specification 84 ink filter about 78 ink funnel about 78 ink - HP Latex 260 | HP Designjet L26500/L26100 Printer Series - User's Guide - Page 95
printer 12 restore factory settings 17 S safety labels 4 safety precautions 1 scanner usage 74 security 18 sleep mode wait time 16 specifications acoustic 86 environmental 86 functional 84 hard disk 85 ink manual load 30 overview 19 porous 23 print on both sides 54 settings 60 storage 58 supported
-
 1
1 -
 2
2 -
 3
3 -
 4
4 -
 5
5 -
 6
6 -
 7
7 -
8
-
9
-
10
-
11
-
12
-
13
-
14
-
15
-
16
-
17
-
18
-
19
-
20
-
21
-
22
-
23
-
24
-
25
-
26
-
27
-
28
-
29
-
30
-
31
-
32
-
33
-
34
-
35
-
36
-
37
-
38
-
39
-
40
-
41
-
42
-
43
-
44
-
45
-
46
-
47
-
48
-
49
-
50
-
51
-
52
-
53
-
54
-
55
-
56
-
57
-
58
-
59
-
60
-
61
-
62
-
63
-
64
-
65
-
66
-
67
-
68
-
69
-
70
-
71
-
72
-
73
-
74
-
75
-
76
-
77
-
78
-
79
-
80
-
81
-
82
-
83
-
84
-
85
-
86
-
87
-
88
-
89
-
90
-
91
-
92
-
93
-
94
-
95
 |
 |

DESIGNJET L26500
/ L26100
printer series
User’s guide