GE PCR06WATSS Use and Care Manual
GE PCR06WATSS - Wine Center With A 57 Bottle Capacity Manual
 |
UPC - 084691143772
View all GE PCR06WATSS manuals
Add to My Manuals
Save this manual to your list of manuals |
GE PCR06WATSS manual content summary:
- GE PCR06WATSS | Use and Care Manual - Page 1
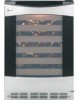
Prof ile Beverage Center and Wine Chiller ge.com Safety Instructions 2, 3 Operating Instructions Beverage Center Glass Shelves 4 Loading Tips and Suggestions 4 Temperature Control 4 Owner's Manual and Installation Instructions PCR06BATSS PCR06WATSS Wine Chiller Inserting Wine Bottles 5 - GE PCR06WATSS | Use and Care Manual - Page 2
OF THE BEVERAGE CENTER OR WINE CHILLER Child entrapment and suffocation are not problems of the past. Junked or abandoned refrigeration products are still dangerous... even if they will sit for "just a few days." If you are getting rid of your old appliance, please follow the instructions below to - GE PCR06WATSS | Use and Care Manual - Page 3
The appliance should always be plugged into its own individual electrical outlet which has a voltage rating that matches the rating plate. READ AND FOLLOW THIS SAFETY INFORMATION CAREFULLY. SAVE THESE INSTRUCTIONS Care and Cleaning Installation Instructions Troubleshooting Tips Consumer Support - GE PCR06WATSS | Use and Care Manual - Page 4
Safety Instructions Operating Instructions Care and Cleaning Controls and features-Beverage Center. Temperature Control The operating temperatures of the beverage center range from the low forties to the mid fifties. This appliance is not a refrigerator and does not maintain temperatures like a - GE PCR06WATSS | Use and Care Manual - Page 5
Safety Instructions Operating Instructions Care and Cleaning Controls and features-Wine Chiller. ge.com 8 bottle arrangement 9 bottle arrangement Temperature Control The temperature range of the wine chiller is from the low forties to the mid sixties. This appliance is not a refrigerator and - GE PCR06WATSS | Use and Care Manual - Page 6
Instructions Operating Instructions Care and Cleaning Controls and features-Beverage Center and Wine Chiller. Tab (push tab down on right drawer guide, pull tab up on left drawer guide) the light when it is no longer needed. Installation Instructions Troubleshooting Tips Consumer Support 6 - GE PCR06WATSS | Use and Care Manual - Page 7
Magic® is available through GE Parts and Accessories, 800.626.2002, or ge.com. Order part number WX10X15. Do not use appliance wax or polish on the stainless steel. Cleaning the Inside IMPORTANT: Unplug the beverage center or wine chiller before cleaning. The vinyl door gasket may be cleaned with - GE PCR06WATSS | Use and Care Manual - Page 8
Installer - Be sure to leave these instructions with the Consumer. • Note to Consumer - Keep these instructions for future reference. WARNING - • This appliance must be properly grounded. See "Electrical Supply." • If you received a damaged beverage center or wine chiller, you should immediately - GE PCR06WATSS | Use and Care Manual - Page 9
Installation Instructions THE INSTALLATION SPACE The beverage center and wine chiller can be a free-standing model or it can be built in using the cut-out dimensions below. 34-1/2"-35" Locate Outlet 10-1/2" 24" 9" Max. 1-1/2" 24" Min. 25-1/2" Product dimensions: Height: 34-1/2″ (876 mm) Width: - GE PCR06WATSS | Use and Care Manual - Page 10
Instructions TOOLS REQUIRED • #2 Phillips screwdriver • Adjustable wrench PARTS SUPPLIED • Hardware for changing door swing • Left and right side hinge covers • Top screw hole cover GROUNDING THE BEVERAGE CENTER AND WINE CHILLER IMPORTANT- Please read carefully. FOR PERSONAL SAFETY, THIS APPLIANCE - GE PCR06WATSS | Use and Care Manual - Page 11
Installation Instructions 2 REVERSE DOOR SWING SKIP THIS STEP IF DOOR SWING SUITS THE INSTALLATION Parts Included: • Top left case and electric drill to remove the 3 screws holding the top case hinge. Lift off the hinge. (Screws will be used to install the new hinge.) • Lift the door off the - GE PCR06WATSS | Use and Care Manual - Page 12
Installation Instructions 3 LEVEL • Use an door protrudes 1″ beyond the surrounding cabinets. • Check again to be sure the unit is level. 6 SET TEMPERATURE CONTROLS • The temperature controls are preset. Refer to the Temperature Control section for more information. Allow 24 hours for temperature - GE PCR06WATSS | Use and Care Manual - Page 13
may hear the fans spinning at high speeds. This happens when the appliance is first plugged in, when the doors are opened frequently or when large amounts of beverages are added to the appliance. The fans help maintain desired temperatures. s If door is open for over 3 minutes, you may hear the fans - GE PCR06WATSS | Use and Care Manual - Page 14
. Door gasket is sticking or folding over. • Apply petroleum jelly or paraffin wax to the face of the gasket. The door is hitting an internal • Adjust internal components to prevent interference. component inside the appliance. Installation Instructions Troubleshooting Tips Consumer Support - GE PCR06WATSS | Use and Care Manual - Page 15
. Adaptive defrost keeps compressor running during door openings. • This is normal. The appliance will cycle off after the door remains closed for two hours. • Normal operation in extreme temperatures. Care and Cleaning Installation Instructions Troubleshooting Tips Consumer Support 15 - GE PCR06WATSS | Use and Care Manual - Page 16
Notes. 16 Consumer Support Troubleshooting Tips Installation Instructions Care and Cleaning Operating Instructions Safety Instructions - GE PCR06WATSS | Use and Care Manual - Page 17
repairs. Place your confidence in GE and call us in the U.S. toll-free at 800.626.2224 for more information. *All brands covered, up to 20 years old, in the continental U.S. ✁ Cut here Please place in envelope and mail to: General Electric Company Warranty Registration Department P.O. Box 32150 - GE PCR06WATSS | Use and Care Manual - Page 18
yt ! Model Number Serial Number First Name Mr. s Ms. s Mrs. s Miss s Street Address Last Name Apt. # City Date Placed In Use Month E-mail Address* State Zip Code Day Year Phone _ _ Number GE Consumer & Industrial Appliances General Electric Company Louisville, KY 40225 ge.com - GE PCR06WATSS | Use and Care Manual - Page 19
here. Proof of the original purchase date is needed to obtain service under the warranty. For The Period Of: GE Will Replace: GE and GE PROFILE MODELS: One Year From the date of the original purchase Any part of the beverage center or wine chiller which fails due to a defect in materials or - GE PCR06WATSS | Use and Care Manual - Page 20
Safety Instructions Operating Instructions Care and Cleaning Beverage Center or Wine Chiller Warranty. (for customers in Canada) All warranty service provided by our Factory Service Centers, or an authorized Customer Care® technician. To schedule service, on-line, 24 hours a day, visit us at - GE PCR06WATSS | Use and Care Manual - Page 21
verre 24 Commande de la température . . . . .24 Conseil d'approvisionnement et suggestions 24 totale 26 Entretien et nettoyage 27 Instructions d'installation 28-32 Emplacement 28, Carte d'enregistrement du produit 37, 38 Garantie (Canada 41 Garantie (États-Unis 40 Soutien au consommateur - GE PCR06WATSS | Use and Care Manual - Page 22
suivre les précautions de base, y compris ce qui suit : I Cet appareil doit être installé correctement et placé conformément aux instructions d'installation avant de l'utiliser. I Ne laissez pas les enfants grimper, s'asseoir ou se suspendre aux clayettes ou aux tiroirs à extension totale de - GE PCR06WATSS | Use and Care Manual - Page 23
, faites attention de ne pas rouler sur le cordon d'alimentation ni de l'endommager. LISEZ ATTENTIVEMENT ET SUIVEZ LES CONSIGNES DE SÉCURITÉ AVEC ATTENTION. CONSERVEZ CES INSTRUCTIONS Entretien et nettoyage Instructions d'installation Conseils de dépannage Soutien au consommateur 23 - GE PCR06WATSS | Use and Care Manual - Page 24
laissez l'appareil se stabiliser pendant 24 heures. Réglage de la support opposé. Vérifiez que les fixations arrières sont bien bloquées. Lorsque la clayette est installée correctement, elle ne glissera pas vers l'avant lorsque vous tirez légèrement dessus. Entretien et nettoyage Instructions - GE PCR06WATSS | Use and Care Manual - Page 25
que les bouteilles sont chargées, attendez 24 heures avant de changer le réglage d' deux mois, consultez le guide de conservation et de consommation ci-dessous. Vin rouge Entreposage 13 °C (55 °F) Service Température ambiante 18 . Entretien et nettoyage Instructions d'installation Conseils de - GE PCR06WATSS | Use and Care Manual - Page 26
celui de être retiré afin d'entreposer des produits plus la glissière du imposants. support du tiroir droit) Pour retirer : 1. Tirez le tiroir à extension totale jusqu'à la . Souvenez-vous d'éteindre la lumière. Instructions d'installation Conseils de dépannage Soutien au consommateur 26 - GE PCR06WATSS | Use and Care Manual - Page 27
www.electromenagersge.ca Mode d'emploi Entretien et nettoyage Instructions d'installation Orifice de vidange Nettoyage de l'exté disponible en magasin comme Stainless Steel Magic® afin de préserver et protéger le fini impeccable. Stainless Steel Magic® est aussi disponible au service des pièces - GE PCR06WATSS | Use and Care Manual - Page 28
DE COMMENCER Lisez attentivement et soigneusement ces instructions. • IMPORTANT - Conservez ces instructions pour l'utilisation de l'inspecteur local. • n'est pas couverte par la garantie des produits électroménagers de GE. AVERTISSEMENTS : • N'utilisez cet appareil qu'aux fins pour lesquelles - GE PCR06WATSS | Use and Care Manual - Page 29
Instructions d'installation ESPACE POUR INSTALLATION Le refroidisseur à boissons et vin peut être un modèle autonome ou encastré suivant les dimensions suivantes : RLeopcéarteez lOauptlreist e 26,8 cm (10-11/20-p1o/2) " 264"1 cm (24 po) 87,6 à348-81,9/2c"m-35" (34-1/2 à 35 po) 22,9 cm (99p"oM) - GE PCR06WATSS | Use and Care Manual - Page 30
Instructions d'installation OUTILS NÉCESSAIRES • Tournevis cruciforme n° 2 • Clé anglaise PIÈCES FOURNIES • Quincaillerie pour changer le battant de porte • Caches charnière gauche et droite • Capuchon de - GE PCR06WATSS | Use and Care Manual - Page 31
Instructions • Retirez les 2 vis et le protège-orteils. Mettez de côté les vis et le protège-orteils jusqu'à l'installation finale. • Utilisez l' • Soulevez la porte de la charnière inférieure. • Retirez l'axe et le support de charnière. Pour réinstaller la porte : 1. Retirez la butée et la saillie - GE PCR06WATSS | Use and Care Manual - Page 32
Instructions d'installation 3 MISE À NIVEAU • Utilisez une clé anglaise pour ajuster les pattes afin de monter ou abaisser le refroidisseur. • Ajustez-les soigneusement : l'appareil doit être à niveau et d'aplomb avec les meubles et doit être aligné à la hauteur du protège pendant 24 heures. 32 - GE PCR06WATSS | Use and Care Manual - Page 33
lorsque l'eau passe de l'évaporateur au conduit de vidange. I Fermer la porte peut provoquer un son de gargouille lorsque la pression s'égalise. Entretien et nettoyage Instructions d'installation Conseils de dépannage Soutien au consommateur 33 - GE PCR06WATSS | Use and Care Manual - Page 34
pages suivantes, cela vous évitera peut-être d'avoir à appeler le service de dépannage. Problèmes L'appareil ne fonctionne pas Vibrations ou ère. chapitre « Instructions d'installation ». Ceci est normal lorsque l'appareil est branché pour la première fois. • Attendez 24 heures pour que l' - GE PCR06WATSS | Use and Care Manual - Page 35
normal. L'appareil s'arrêtera une fois que la porte n'est plus ouverte après deux heures. • Fonctionnement normal dans des conditions de températures extrêmes. Instructions d'installation Conseils de dépannage Soutien au consommateur 35 - GE PCR06WATSS | Use and Care Manual - Page 36
Notes. 36 Soutien au consommateur Conseils de dépannage Instructions d'installation Entretien et nettoyage Mode d'emploi Consignes de sécurité - GE PCR06WATSS | Use and Care Manual - Page 37
Please place in envelope and mail to: Veuillez mettre dans une enveloppe et envoyez à : OWNERSHIP REGISTRATION P.O. BOX 1780 MISSISSAUGA, ONTARIO L4Y 4G1 (FOR CANADIAN CONSUMERS ONLY) 37 - GE PCR06WATSS | Use and Care Manual - Page 38
38 - GE PCR06WATSS | Use and Care Manual - Page 39
Notes. www.electromenagersge.ca Consignes de sécurité Mode d'emploi Entretien et nettoyage Instructions d'installation Conseils de dépannage Soutien au consommateur 39 - GE PCR06WATSS | Use and Care Manual - Page 40
service de réparations. Agrafez votre reçu ici. Une preuve de la date d'achat d'origine est nécessaire pour obtenir des réparations sous garantie. Pour la période de : GE remplacera : LES MODÈLES GE et GE PROFILE général de votre État. Garant : General Electric Company. Louisville, KY 40225 40 - GE PCR06WATSS | Use and Care Manual - Page 41
èle sous la main lorsque vous appelez notre service de réparations. Agrafez votre reçu ici. Une preuve de la date d'achat d'origine est nécessaire pour obtenir des réparations sous garantie. Pour la période de : Mabe remplacera : LES MODÈLES GE et GE PROFILE : Un an à partir de la date d'achat - GE PCR06WATSS | Use and Care Manual - Page 42
24 heures par jour, tous les jours de l'année. Service de réparations Service de réparations GE est tout près de vous. Pour faire réparer votre électroménager GE téléphone compris - au Directeur, Relations avec les consommateurs, Mabe Canada Inc. Bureau 310, 1 Factory Lane Moncton, N.B. E1C 9M3 - GE PCR06WATSS | Use and Care Manual - Page 43
51 Consejos para la solución de problemas 56, 57 Sonidos de funcionamiento normales . . . .55 Soporte al consumidor Soporte al consumidor 63 Garantía (Canada 62 Garantía (U.S 61 Anote aquí los números de serie y de modelo: Modelo n Serie n Busque estos números en la etiqueta que se encuentra - GE PCR06WATSS | Use and Care Manual - Page 44
ANTES DEL USO. ¡ADVERTENCIA! Use este aparato sólo para el propósito para el cual fue diseñado como se describe en este manual del propietario. ATENCIÓN CONSUMIDOR: Este aparato está diseñado para guardar y refrigerar bebidas. No guarde alimentos perecederos en esta unidad. Operación Cuidado - GE PCR06WATSS | Use and Care Manual - Page 45
Seguridad Operación ge.com CÓMO CONECTAR LA ELECTRICIDAD Bajo ninguna circunstancia corte o retire la tercera pata (conexión a tierra) del cable de alimentación. Por seguridad personal, este aparato debe - GE PCR06WATSS | Use and Care Manual - Page 46
diferentes ubicaciones dentro del refrigerador. El área más fría será la parte inferior del refrigerador. El área fría será la sección media. La parte superior del refrigerador es la sección menos fría. Al ajustar la temperatura, espere 24 horas para que la unidad se estabilice. Para configurar el - GE PCR06WATSS | Use and Care Manual - Page 47
y funciones: Refrigerador de vino. ge.com Control de temperatura Las temperaturas Una vez cargadas las botellas, espere al menos 24 horas para realizar cualquier ajuste sobre la configuración con los cuellos alternando entre la parte frontal y la parte posterior, o nueve botellas, alternando - GE PCR06WATSS | Use and Care Manual - Page 48
Seguridad Operación Controles y funciones: Centro de bebidas y Refrigerador de vino. Pestaña (pulse la pestaña hacia abajo en la guía derecha del cajón, tire de la pestaña hacia arriba de la guía izquierda del cajón) Quitar los cajones de extensión completa Todos los cajones de extensión - GE PCR06WATSS | Use and Care Manual - Page 49
de acero inoxidable comercialmente disponible como Stainless Steel Magic® para preservar el fino acabado. Stainless Steel Magic® está disponible a través del departamento de Partes y Accesorios de GE, en el 800.626.2002, o en ge.com. Ordene el número de parte WX10X15. No utilice cera o pomadas para - GE PCR06WATSS | Use and Care Manual - Page 50
no lo cubre la Garantía sobre aparatos GE. ADVERTENCIAS: • Utilice este aparato solo 21-5/8") 2630-5c/m8" (23-5/8") 90°° 110°º 10,24"cmMi(n4i"m) um como tmo íWniamllo hasta la pared ón: • Estos productos pueden permanecer cerrados por su parte superior y tres laterales siempre que el frente no - GE PCR06WATSS | Use and Care Manual - Page 51
extracción cuando se instala en un gabinete estándar de 61 cm (24″) de profundidad. • La puerta debe sobresalir 5,7 cm (2-1/4″) fuera de los un panel lateral o una franja de relleno de 1,3 cm (1/2″) de ancho en la parte de la bisagra. La franja de relleno actuará como espaciador entre la caja y el - GE PCR06WATSS | Use and Care Manual - Page 52
SUMINISTRADAS • Material para cambiar el recorrido de la puerta • Cubrebisagras para la parte izquierda y la parte derecha • Cubierta para el orificio de tornillos superior CONEXIÓN A TIERRA DEL CENTRO DE BEBIDAS Y DEL REFRIGERADOR DE VINO IMPORTANTE - Leer detenidamente. POR SEGURIDAD PERSONAL - GE PCR06WATSS | Use and Care Manual - Page 53
la instalación final. • Utilice la punta Torx® suministrada y el taladro eléctrico para quitar los tres tornillos que mantienen la bisagra de la parte superior. Eleve la bisagra (se utilizarán tornillos para instalar la nueva bisagra). • Eleve la puerta para sacarla de la bisagra inferior. • Quite - GE PCR06WATSS | Use and Care Manual - Page 54
que la unidad esté nivelada. 6 DEFINIR CONTROLES DE TEMPERATURA • Los controles de temperatura están predefinidos. Consulte la sección Control de temperatura para obtener más información. Espere 24 horas hasta que la temperatura se estabilice. 54 - GE PCR06WATSS | Use and Care Manual - Page 55
antiguos. Los aparatos modernos tienen más funciones y utilizan una tecnología más moderna. ¿Oye lo que yo oigo? Estos sonidos son normales. ge.com HUMMM... WHOOSH... I El nuevo compresor de alta eficacia puede funcionar a mayor velocidad y durante más tiempo que su antiguo aparato, y podr - GE PCR06WATSS | Use and Care Manual - Page 56
tal y como se muestra en la sección Instrucciones de instalación. Es normal cuando la unidad se conecta por primera vez. • Espere 24 horas hasta que la unidad se refrigere por completo. Se produce a menudo cuando • Esto es normal. se colocan grandes cantidades de vino o bebidas en el aparato. Se - GE PCR06WATSS | Use and Care Manual - Page 57
Seguridad Operación Cuidado y limpieza ge.com Problema Se crea humedad en el exterior del aparato Se crea escarcha o humedad en el interior La luz interior no funciona Aire caliente desde la parte inferior de la unidad La unidad nunca se apaga, pero las temperaturas son correctas Causas - GE PCR06WATSS | Use and Care Manual - Page 58
Notas. 58 Soporte al consumidor Solucionar problemas Instalación Cuidado y limpieza Operación Seguridad - GE PCR06WATSS | Use and Care Manual - Page 59
Notas. ge.com Seguridad Operación Cuidado y limpieza Instalación Solucionar problemas Soporte al consumidor 59 - GE PCR06WATSS | Use and Care Manual - Page 60
Notas. 60 Soporte al consumidor Solucionar problemas Instalación Cuidado y limpieza Operación Seguridad - GE PCR06WATSS | Use and Care Manual - Page 61
período de: GE reemplazará: MODELOS GE y GE PROFILE: Un año A partir de la fecha de la compra original Cualquier parte del centro de cuáles son sus derechos legales, consulte a la oficina de asuntos del consumidor local o la oficina del Attorney General en su localidad. Garante: General Electric - GE PCR06WATSS | Use and Care Manual - Page 62
. Para concertar una cita de reparación, en línea, 24 horas al día, visíte nos al geappliances.ca, o reemplazará: MODELOS GE y GE PROFILE: Un año A partir de la fecha de la compra original Cualquier parte del centro de CANADA INC. Instalación Solucionar problemas Soporte al consumidor 62 - GE PCR06WATSS | Use and Care Manual - Page 63
venga bien 24 horas al día cualquier día del año! O llame al 800.GE.CARES (800 de oficina. GE Consumer Home Services estará aún General Manager, Customer Relations GE Appliances, Appliance Park Louisville, KY 40225 En Canadá: geappliances.ca, o escriba a: Director, Consumer Relations, Mabe Canada - GE PCR06WATSS | Use and Care Manual - Page 64
after your warranty expires. In Canada, call 1.888.261.2133 Parts and Accessories In the U.S.: ge.com Individuals qualified to service their own appliances can have parts or accessories sent directly to their homes (VISA, MasterCard and Discover cards are accepted). Order on-line today, 24 hours
-
 1
1 -
 2
2 -
 3
3 -
 4
4 -
 5
5 -
 6
6 -
 7
7 -
8
-
9
-
10
-
11
-
12
-
13
-
14
-
15
-
16
-
17
-
18
-
19
-
20
-
21
-
22
-
23
-
24
-
25
-
26
-
27
-
28
-
29
-
30
-
31
-
32
-
33
-
34
-
35
-
36
-
37
-
38
-
39
-
40
-
41
-
42
-
43
-
44
-
45
-
46
-
47
-
48
-
49
-
50
-
51
-
52
-
53
-
54
-
55
-
56
-
57
-
58
-
59
-
60
-
61
-
62
-
63
-
64
 |
 |

ge.com
Beverage Center
and Wine Chiller
Profile
197D7188P001
49-60466
05-06 JR
Safety Instructions
. . . . . . . . . . .2, 3
Operating Instructions
Beverage Center
Glass Shelves . . . . . . . . . . . . . . . . . . . . . .4
Loading Tips and Suggestions . . . . . . .4
Temperature Control . . . . . . . . . . . . . . .4
Wine Chiller
Inserting Wine Bottles . . . . . . . . . . . . . .5
Loading Tips and Suggestions . . . . . . .5
Temperature Control . . . . . . . . . . . . . . .5
Beverage Center and Wine Chiller
Interior Light and Switch . . . . . . . . . . . .6
Removing Full
Extension Drawers . . . . . . . . . . . . . . . . .6
Wood Drawer Fronts . . . . . . . . . . . . . . .6
Care and Cleaning
. . . . . . . . . . . . .7
Installation Instructions
. . . .8–12
Leveling . . . . . . . . . . . . . . . . . . . . . . . . . .12
Location . . . . . . . . . . . . . . . . . . . . . . . .8, 9
Reversing Door Swing . . . . . . . . . . . . .11
Troubleshooting Tips
. . . . . .14, 15
Normal Operating Sounds . . . . . . . . .13
Consumer Support
Consumer Support . . . . . . . .Back Cover
Product Registration . . . . . . . . . . .17, 18
Warranty (Canada) . . . . . . . . . . . . . . . .20
Warranty (U.S.)
. . . . . . . . . . . . . . . . . . .19
Write the model and serial
numbers here:
Model #
__________________
Serial # ____________________
Find these numbers on a label on
the ceiling inside the beverage
center and wine chiller.
Owner’s Manual
and Installation
Instructions
PCR06BATSS
PCR06WATSS
Manuel d’utilisation
et d’installation
Manual del
propietario y
instalación
La section française commence à la page 21
Refroidisseur
à boissons et vin
La sección en español empieza en la página 43
Centro de bebidas
y Refrigerador de vino