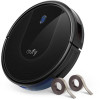
Eufy RoboVac 30 RoboVac 30_EN_Manual
Eufy RoboVac 30 Manual
 |
View all Eufy RoboVac 30 manuals
Add to My Manuals
Save this manual to your list of manuals |
Eufy RoboVac 30 manual content summary:
- Eufy RoboVac 30 | RoboVac 30_EN_Manual - Page 1
T2116 51005001032 V01 Owner's Manual RoboVac 30 (T2116) - Eufy RoboVac 30 | RoboVac 30_EN_Manual - Page 2
Clean the Side Brushes Replace the Side Brushes Clean the Sensors and Charging Pins Clean the Swivel Wheel 25 Troubleshooting 27 Specifications 27 Customer Service Thank you for purchasing RoboVac 30. Read all instructions before using this product, and keep it properly for future reference. 01 - Eufy RoboVac 30 | RoboVac 30_EN_Manual - Page 3
of experience and knowledge if they have been given supervision or instruction concerning use of this device in a safe way and understand Do not expose the electronics of this device, its battery, or the integrated Charging Base. There are no user-serviceable parts inside. • Do not use this device - Eufy RoboVac 30 | RoboVac 30_EN_Manual - Page 4
exposées sur le sol. • Ne pas exposer les composants électroniques de cet appareil, de sa batterie, ou de la station de recharge intégrée. Il n'y a pas de pièces réparables par de ce produit, contactez votre mairie, votre service de ramassage des ordures ou le magasin où vous avez acheté ce produit. - Eufy RoboVac 30 | RoboVac 30_EN_Manual - Page 5
RoboVac What's in the Box RoboVac 30 Charging Base Remote Control (AAA Battery x2) Power Adapter Cleaning Tool Side Brushes (x4) Additional High-Performance Filter Additional Foam Filter Cable Ties (x5) Boundary Strips 6.6 ft/2 m length (x2) 06 Owner's Manual & Other Documents RoboVac - Eufy RoboVac 30 | RoboVac 30_EN_Manual - Page 6
Single Room Cleaning mode Control cleaning direction manually Adjust the hour and minute Start Single Room cleaning Return RoboVac to Charging Base Schedule Auto cleaning Max suction power enabled Scheduled cleaning time Install 2 AAA batteries before using the remote control for the first time. - Eufy RoboVac 30 | RoboVac 30_EN_Manual - Page 7
to the Charging Base and has been inactive for 1 minute. RoboVac has an error. Flashing / Solid red + Beeping Refer to the "Troubleshooting>Error Tone" section in this manual for solutions. 10 Using Your RoboVac Important Tips Before Use a b c d e f a Remove power cords and small objects - Eufy RoboVac 30 | RoboVac 30_EN_Manual - Page 8
thaann oonn rruuggssoorrccaarrppeettss.. - Always keep the ChaarrggiinnggBBaasseepplluuggggeeddinin,,ootthheerrwwisisee RoboVac will nnoott aauuttoommaattiiccaalllyyrreettuurrnnttooitit.. Charge Your RoboVac • RoboVac has a pre-installed rechargeable battery that has to be fully charged before use - Eufy RoboVac 30 | RoboVac 30_EN_Manual - Page 9
or / on the remote control to start cleaning in Auto Mode. - RoboVac will return to the Charging Base automatically when the battery level becomes low or when RoboVac finishes cleaning. - By default, RoboVac starts in Auto cleaning mode when it is turned on. BoostIQ™ Feature When the BoostIQ - Eufy RoboVac 30 | RoboVac 30_EN_Manual - Page 10
RoboVac intensively cleans one single room and stops after 30 minutes. Select this mode only when one specific room needs to be cleaned. Make sure to confine RoboVac to start cleaning in Edge mode. 16 5. Manual cleaning You can direct RoboVac to clean a particular area by using the directional - Eufy RoboVac 30 | RoboVac 30_EN_Manual - Page 11
. - Make sure the Boundary Strip is placed on the same surface plane RoboVac is used on. - Be careful not to damage the floor when using adhesive setting a scheduled cleaning. Make sure the main power switch on the bottom of RoboVac is turned on. Press on the remote control. The time will blink on - Eufy RoboVac 30 | RoboVac 30_EN_Manual - Page 12
and Maintenance For optimal performance, follow the instructions below to clean and maintain RoboVac regularly. The cleaning/replacement frequency will depend on your usage habits of RoboVac. Recommended cleaning/replacement frequency: RoboVac Part Dust Collector Filters Rolling Brush Side - Eufy RoboVac 30 | RoboVac 30_EN_Manual - Page 13
they are completely dry. Replace the Side Brushes The side brushes may become bent or damaged after being used for a period of time. Follow the instructions below to replace them. Pull off the old side brushes and snap the new ones into place. 22 23 - Eufy RoboVac 30 | RoboVac 30_EN_Manual - Page 14
24 Troubleshooting Frequently asked questions Problems RoboVac cannot be activated. The remote control does not work. RoboVac stops working if the indicator on the Charging Base lights up. If not, contact the eufy service center to repair or replace the Charging Base. • Dust off the charging contact - Eufy RoboVac 30 | RoboVac 30_EN_Manual - Page 15
debris that may be trapped underneath. • Clean the drop sensors gently with a dry cloth. • Place RoboVac in a new location. • Use a physical barrier to block off the problem area. Manually charge RoboVac for at least 5 hours. Solid red indicator light Error Tone Cause Solution One beep Two beeps - Eufy RoboVac 30 | RoboVac 30_EN_Manual - Page 16

T2116
51005001032
V01
Owner’s Manual
RoboVac 30
(T2116)


