Epson r-d1 User Manual
Epson r-d1 - Rangefinder Digital Camera Manual
 |
View all Epson r-d1 manuals
Add to My Manuals
Save this manual to your list of manuals |
Epson r-d1 manual content summary:
- Epson r-d1 | User Manual - Page 1
® User's Guide - Epson r-d1 | User Manual - Page 2
unauthorized modifications, repairs, or alterations to this product, or (excluding the U.S.) failure to strictly comply with Seiko Epson Corporation's operating and maintenance instructions. Seiko Epson Corporation shall not be liable for any damages or problems arising from the use of any options - Epson r-d1 | User Manual - Page 3
Notes 1 IMPORTANT SAFETY INSTRUCTIONS 3 FCC Compliance Statement for United States Users 7 WARNING 7 Chapter 1 Getting Started Unpacking Your Camera 9 Camera Parts 10 Attaching the Strap to Your Camera 12 Using the Battery 12 Charging the battery 12 Inserting the battery 13 Installing and - Epson r-d1 | User Manual - Page 4
44 EPSON PhotoRAW 44 EPSON RAW Plug-In 44 Starting the Software 45 EPSON PhotoRAW 45 EPSON RAW Plug-In 45 Finding More Information 45 Chapter 6 Maintenance and Troubleshooting Cleaning the Camera 46 Storing the Camera 46 Troubleshooting 46 Contacting Customer Support 47 For users in - Epson r-d1 | User Manual - Page 5
Viewfinder indicators 51 Internal clock 51 Power supply 51 Battery charger 51 Performance 52 File size of photos 52 About Optional Accessories 52 Index v - Epson r-d1 | User Manual - Page 6
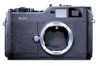
first rangefinder digital camera. ❏ Capable of mounting existing lenses. The EM mount allows you to use most standard lenses such as Leica M/L mount lenses. ❏ Provides accurate framing using parallax auto compensation. ❏ Provides constantly stable focus with a bright rangefinder. ❏ Supports CCD-RAW - Epson r-d1 | User Manual - Page 7
the affected area thoroughly with water and seek medical treatment. If a battery is swallowed, seek medical treatment immediately. ❏ Use only an Epson Li-ion battery for this camera, as specified in this manual. ❏ Do not use the battery that comes with this product for other devices. ❏ To protect - Epson r-d1 | User Manual - Page 8
inleveren als KCA. For German users: Do not dispose of the battery with ordinary refuse. Instead, dispose instructions should be kept for future reference. ❏ Use only the Epson battery charger provided to charge the Epson Li-ion battery Model EU-85. Never attempt to charge other types of batteries - Epson r-d1 | User Manual - Page 9
repair the battery charger by yourself except as specifically explained in this guide. ❏ Do not use power outlets controlled by wall switches or automatic timers. ❏ Do not use the power outlet, contact an electrician. For US and Canadian users: Use the power cord provided or a 6 to 10 foot UL- - Epson r-d1 | User Manual - Page 10
5 Introduction - Epson r-d1 | User Manual - Page 11
immediately with water. If discomfort or vision problems remain after a thorough flushing, see a doctor immediately. ❏ Only use a soft, dry cloth to clean the display. Do not use liquid or chemical cleaners. When storing, maintaining, or transporting the camera ❏ Do not store this product outdoors - Epson r-d1 | User Manual - Page 12
for a Class B digital device, pursuant to uses, and can radiate radio frequency energy and, if not installed and used in accordance with the instructions responsibility of the user to obtain and use a shielded equipment Supplies used with Class B Personal Computers: We: Located at: EPSON AMERICA, - Epson r-d1 | User Manual - Page 13
herein, complies with 47CFR Part 2 and 15 of the FCC rules as a Class B digital device. Each product marketed, is identical to the representative unit tested and found to be that may cause undesired operation. Trade Name: Type of Product: Model: EPSON Digital Still Camera G911A Introduction 8 - Epson r-d1 | User Manual - Page 14
Chapter 1 Getting Started Unpacking Your Camera Make sure that your camera box contains all of the items shown below. Battery charger Power cord (for battery charger) Camera body Li-ion battery Lens cap Strap User's guide CD-ROM (EPSON PhotoRAW/EPSON RAW Plug-In, Adobe Photoshop Elements 2.0*) - Epson r-d1 | User Manual - Page 15
view AE-lock button Photo quality/WB lever JOG dial Frame selector Power switch 1 lever Shutter speed Lock-release button /ISO speed dial 1 SD card access LED LCD button Shutter charge lever 1 1 MENU button ENTER button 1 LCD display CANCEL button USER button 1 Getting Started - Epson r-d1 | User Manual - Page 16
/WB lever SD card access LED LCD button MENU button ENTER button CANCEL button USER button LCD display Shutter button Used to mount an optional flash. Used to mount or remove lenses. Locks exposure. Sets photo quality or white balance. Indicates the following statuses of the SD card. On: accessing - Epson r-d1 | User Manual - Page 17
the metal ring. 4. Repeat steps 1 to 3 for the other end of the strap. 1 Using the Battery 1 Charging the battery Your camera comes with a lithium-ion battery (EU-85). Be sure to 1 charge the battery before using the camera for the first time or after long periods of disuse. It takes about - Epson r-d1 | User Manual - Page 18
charging, the red lamp indicates the following status: On: Indicates the battery is charging. Off: Indicates charging is complete or the battery is not fully seated in the battery charger. Inserting the battery Your camera uses the lithium-ion battery (EU-85) provided. Only use an Epson Li-ion EU-85 - Epson r-d1 | User Manual - Page 19
battery's service life has ended. In that case, replace it with a new battery. 1 Installing and Removing a Memory Card You cannot take photos unless an SD memory card is installed in your camera the card to be lost or 1 damaged. ❏ Avoid using or storing the card in direct sunlight, or in places - Epson r-d1 | User Manual - Page 20
the data on the card or when you see a message on the LCD display instructing you to do so. c Caution: ❏ The SD memory card must be formatted by your camera. Using an SD memory card formatted by a different camera may cause read or write errors. For details, see "Formatting a memory card" on page - Epson r-d1 | User Manual - Page 21
F2.5 1 - ELMAR 50 mm F3.5 ❏ Even with the same lens, the image quality using this camera may differ from that of an image taken with an analog camera. 1 Mounting M (Bayonet) mount lenses 1. Match the red mark on the camera body with the red mark on the lens-barrel. 1 1 1 1 c Caution: Do - Epson r-d1 | User Manual - Page 22
lenses Note: ❏ When you install an L mount lens, you need an optional M-Bayonet adapter ring. ❏ There are three sizes of M-Bayonet adapter rings, and any one of them can be used. ❏ For more information on mounting an M-Bayonet adapter ring on the camera body, see the M-Bayonet adapter ring manual - Epson r-d1 | User Manual - Page 23
ring clockwise, then remove the cover. Removing L mount lenses 1. Turn the lens all the way counterclockwise and pull the 2. Remove the M-Bayonet adapter ring from the camera. 1 Note: For details about removing M-Bayonet adapter rings, see the manual provided with the M-Bayonet adapter ring. 1 - Epson r-d1 | User Manual - Page 24
switch to the on position. When you turn your camera on, information about current settings (number of remaining photos, photo quality, remaining battery power, and white balance settings) is indicated on the status gauge on the top of the camera. For details, see "About the Status Gauge" on page - Epson r-d1 | User Manual - Page 25
the ENTER button. The Date Format screen appears. For details on using the menu, see "Basic Setup menu" on page 42. 2. Select your desired display format for the year, month, and date using the JOG dial. 1 YYYY/MM/DD (default setting) Year/Month/Day DD/MM/YYYY MM/DD/YYYY Day/Month/Year - Epson r-d1 | User Manual - Page 26
: Delete, Lock, Magnify, Print, Settings (current settings), and Film. Delete is the default setting. 1. Use the JOG dial to select Assign User Button in the Camera Settings menu, and press the ENTER button. For details on using the menu, see "Camera Settings menu" on page 41. 2. Use the JOG dial to - Epson r-d1 | User Manual - Page 27
Save Timer mode returns the camera to Full-release: picture-taking mode. Press the shutter button all the way down to take a 1 photo. Focusing 1 To focus on a subject such as a group of people, rotate the focus ring on the lens. Note: 1 Center your eye in the viewfinder to help you focus - Epson r-d1 | User Manual - Page 28
Chapter 2 Taking Pictures About the Status Gauge You can use the status gauge on top of the camera to check the following: the number of remaining photos, photo quality, remaining battery power, and white balance. Each needle indicates the status of one of these items. Note: When the status gauge - Epson r-d1 | User Manual - Page 29
Setting Photo Quality Before taking photos using the camera, photo quality (image format, size, and compression ratio) must be specified. Set photo quality according to how you plan to use your image data. Photo quality setting When taking photos using the camera, images are saved in JPEG or RAW - Epson r-d1 | User Manual - Page 30
the Status Gauge" on page 23. 3. Return the Photo quality/WB lever to the center position. 2. Rotate the ISO speed dial. You can select ISO sensitivity from 200, 400, 800, or 1600. Setting ISO Sensitivity Sensitivity is a measure of how quickly the camera reacts to light. You can change the light - Epson r-d1 | User Manual - Page 31
value manually. For details, see 2 "Manually Locking the Aperture Setting" on page 29. Exposure compensation 2 Exposure compensation is used to alter the exposure suggested by the camera. Exposure can be set between AE -2.0 EV (underexposure) and AE +2.0 EV (overexposure). 2 Taking Pictures - Epson r-d1 | User Manual - Page 32
subject in the viewfinder without affecting the exposure setting.) A picture is taken with the exposure set when you pressed the AE-lock button. Note: Exposure is not locked even if you press the shutter button halfway. Setting Manual Exposure (Shutter Speed) You can manually select a shutter speed - Epson r-d1 | User Manual - Page 33
value (1 to 2000). Note: To switch the shutter speed setting from auto to manual, rotate the shutter speed dial while pressing the lock-release button the image is saved without noise 2 reduction. ❏ When taking photos in B shooting mode, use a tripod or cable release to prevent the picture from - Epson r-d1 | User Manual - Page 34
in the viewfinder. Selecting Color or Monochrome Photos You can specify color or monochrome photos. The default setting is Color. When you select Monochrome, you can add a color filter effect in the Monochrome Filter screen. 1. Use the JOG dial to select Color setting in the Camera Settings menu - Epson r-d1 | User Manual - Page 35
is saved and the screen returns to the Camera Settings menu. Note: When you select a monochrome filter, you can take monochrome photos with a color filter effect. Selecting Image Settings You can select settings for the following image types: Standard, Film1, Film2, or Film3. Standard Values - Epson r-d1 | User Manual - Page 36
photos, photo quality, remaining battery power, and white balance using the status gauge on the top of the camera. There are 4 needles on the gauge. If any of these needles becomes inaccurate, follow the steps below to adjust it. 1. Use the JOG dial to select Calibrate Needles in the Camera Settings - Epson r-d1 | User Manual - Page 37
on the right-side of Photo quality the gauge) E (short needle at the bottom of the Remaining battery power gauge) A (short needle on the left-side of the White balance gauge) Note: For details, see "About the Status Gauge" on page 23. 3. Move the left or right arrow using the JOG dial and press - Epson r-d1 | User Manual - Page 38
dial and rotate it clockwise or counterclockwise. - Standard display (default setting) - General information display - Histogram display - Highlight display - Framing guide display - Detailed information display - 4-photo display Note: When viewing a photo in playback mode for the first time, the - Epson r-d1 | User Manual - Page 39
Standard display 3 3 3 3 ❏ Number of current photo/total number of images (9999 maximum) General information display 3 3 3 3 ❏ Number of current photo/total number of images (9999 maximum) ❏ Date and time of photo ❏ File number 3 ❏ Photo quality ❏ Lock ( ) icon (displayed only when the - Epson r-d1 | User Manual - Page 40
of prints (displayed only when DPOF settings have been made) Histogram display Framing guide display ❏ Number of current photo/total number of images (9999 maximum) ❏ Histogram Highlight display ❏ Framing guide ❏ Number of current photo/total number of images (9999 maximum) Detailed information - Epson r-d1 | User Manual - Page 41
❏ Photo quality ❏ Shutter speed (when the picture is taken with auto exposure, "AE" and the exposure compensation value are displayed. e.g., AE+1.3) ❏ ISO sensitivity ❏ White balance ❏ Film setting ❏ Lock ( ) icon (displayed only when the image is locked) ❏ Print ( ) icon with number of prints ( - Epson r-d1 | User Manual - Page 42
the JOG dial. Use it to select Delete all images and press the ENTER a locked images (displayed with the lock ( ) icon). For details, see "Locking Images" on instructs you to do so. To format a memory card, follow the steps below. 1. Use the JOG dial to select Format SD Card in the Camera Settings - Epson r-d1 | User Manual - Page 43
the ENTER button. The lock ( ) icon no longer appears on unlocked images. 3 Magnifying Images You can zoom in on an image displayed in the LCD display. 3 1. Press the MENU button in playback mode. The Main menu is displayed. 2. Use the JOG dial to select Magnify, then press the ENTER button - Epson r-d1 | User Manual - Page 44
Order Format (DPOF) file on the camera's memory card. You can print with DPOF settings when using a printer and application that support the DPOF standard. Also, in some countries you will find digital photo labs that support DPOF and can print using the settings in your DPOF file. 1. Press the - Epson r-d1 | User Manual - Page 45
playback mode, you can use several menus to specify camera 4 settings. To navigate through the menus or functions, use the JOG dial and buttons next to the LCD monitor. 4 LCD MENU 4 ENTER CANCEL USER 4 LCD button: MENU button: ENTER button: 4 Switches from picture-taking mode to playback - Epson r-d1 | User Manual - Page 46
2 times (for RAW images) Display position can be moved (vertical/horizontal). Lock Lock/Unlock 1 image, Lock all images or Unlock all images Function Print Order Slide Show Camera Settings Description Set DPOF for one, Set DPOF for all (0 - 99), or View current DPOF. Play photo images in a slide - Epson r-d1 | User Manual - Page 47
photos), R (photo quality), E (remaining battery power), and A (white balance). These settings are indicated on the status gauge. Resets the current settings (except date and time settings . 2. Use the JOG dial to select Camera Settings, then press the ENTER button. The Camera Settings menu is - Epson r-d1 | User Manual - Page 48
you take photos with CCD-RAW specified for photo quality, you can process these photos using the RAW data processing software. The following software is available: EPSON PhotoRAW EPSON RAW Plug-In Process ERF (EPSON RAW File) files provided from DSC (Digital Still Camera) in a batch using optional - Epson r-d1 | User Manual - Page 49
. EXE. For Macintosh users: Double-click Ins EPSON RAW Plug-In icon inside the EPSON folder. 5 Note: When the authentication dialog box for assigning administrator privileges appears, enter the user name and password, and then click OK. 5 2. Follow the on-screen instructions until all of the - Epson r-d1 | User Manual - Page 50
EPSON PhotoRAW, and then click EPSON PhotoRAW. EPSON EPSON RAW Plug-In is displayed as shown below. Note: ❏ When the EPSON RAW Plug-In does not start automatically even if you select an ERF file, select Open from the File menu, and select EPSON RAW EPSON RAW EPSON RAW Plug-In does EPSON RAW - Epson r-d1 | User Manual - Page 51
keep your camera operating at its best, you should clean it thoroughly several times a year. Before you perform any maintenance on the camera, be sure to read the "Safety Instructions" on page 1. Then follow these guidelines: ❏ Be sure to turn the camera off before cleaning. ❏ Use a clean, dry cloth - Epson r-d1 | User Manual - Page 52
-8911 Fax: (852) 2827-4383 For users in North America If you need help with your digital camera, see the contact information below. Epson provides technical assistance 24 hours a day through the electronic support services and automated telephone services listed in the following table: World - Epson r-d1 | User Manual - Page 53
manuals and accessories from Epson at (800) 873-7766, or visit www.epsonstore.com (U.S. sales only). In Canada, please call (800) 463-7766 for dealer referral. For users in Korea If you need help with your digital camera, contact the shop where you purchased it. Maintenance and Troubleshooting - Epson r-d1 | User Manual - Page 54
EMC Directive 89/336/EEC EN55022 Class B EN55024 Battery charger Low Voltage Directive 73/23/EEC EMC Directive 89/336/EEC EN60950 EN55022 Class B EN55024 49 Appendix Specifications Camera Epson Rangefinder Digital Camera R-D1 General Dimensions and weight: Temperature: Humidity: (without - Epson r-d1 | User Manual - Page 55
photos, photo quality, remaining battery A power, and white balance SD card access On/Off/flashing red LED: A Interface (external connector) Memory card I/F: SD card I/F A X contact: For external flash (synchronizes at shutter speed downward then 1/125 sec) Camera settings A Image size - Epson r-d1 | User Manual - Page 56
to 200, image size is set to N (JPEG; 2240 × 1488 pixels) and WB is set to Sunny. ** Shooting conditions 2: Turning on the camera and waiting 30 seconds before taking the first picture, then taking 9 more pictures at 30 second intervals before turning off the camera and removing the battery for 10 - Epson r-d1 | User Manual - Page 57
size of photos Photo quality: 2240 × 1488 (JPEG): 3008 × 2000 (JPEG): CCD-RAW: Compression ratio Locked at 1/4 Locked at 1/4 Non-compressive Average file size about 1.5MB about 3MB about 10MB About Optional Accessories The following options are available for the camera. ❏ Lithium-ion battery - Epson r-d1 | User Manual - Page 58
24 Contacting EPSON, 47 Current settings, 21 Customer support, 47 D Date and time settings, 19 Date format, 20 Default settings, 22 Delete deleting all images, 37 deleting an image, 37 Display icons, 33 Display style, 33 4-photo display, 35 detailed information display, 35 Framing guide display, 35 - Epson r-d1 | User Manual - Page 59
26 Slide show, 36 Software installing, 44 system requirements, 43 Status gauge, 10, 11 number of remaining photos, 23 photo quality, 23 T Technical support, 47 U USER button, 10, 21 W WB lever, 10 WB settings lever, 11 White balance, 23 Write protect switch, 15 X X contact, 10, 11 Z Zoom in/out, 38
-
 1
1 -
 2
2 -
 3
3 -
 4
4 -
 5
5 -
 6
6 -
 7
7 -
8
-
9
-
10
-
11
-
12
-
13
-
14
-
15
-
16
-
17
-
18
-
19
-
20
-
21
-
22
-
23
-
24
-
25
-
26
-
27
-
28
-
29
-
30
-
31
-
32
-
33
-
34
-
35
-
36
-
37
-
38
-
39
-
40
-
41
-
42
-
43
-
44
-
45
-
46
-
47
-
48
-
49
-
50
-
51
-
52
-
53
-
54
-
55
-
56
-
57
-
58
-
59
 |
 |

®
User’s Guide