Epson TM-T88V ePOS-Print SDK Setup Guide for Android Application Development
Epson TM-T88V Manual
 |
View all Epson TM-T88V manuals
Add to My Manuals
Save this manual to your list of manuals |
Epson TM-T88V manual content summary:
- Epson TM-T88V | ePOS-Print SDK Setup Guide for Android Application Development - Page 1
ePOS-Print SDK for Android Application Development Setup Guide M00048500 Rev. A Cautions • No part of this document may information contained herein. Trademarks EPSON is registered trademarks of Seiko Epson Corporation in the U.S. and other countries. Windows is registered trademarks or trademarks - Epson TM-T88V | ePOS-Print SDK Setup Guide for Android Application Development - Page 2
Android device using Eclipse. Set up the environment to run the sample program supplied with EPSON ePOS-Print SDK for Android. Environment for This Document This document applies to the environment as described below. Information such as the Web page URLs and the download file versions are as of - Epson TM-T88V | ePOS-Print SDK Setup Guide for Android Application Development - Page 3
Kit" on page 4 Download and install JDK. 2. "Setting Up Eclipse" on page 6 Download Eclipse and configure the initial settings. 3. "Setting Up Android SDK Manager" on page 9 Download and install Android SDK Manager. Configure the settings required for development. 4. "Downloading and Installing ADT - Epson TM-T88V | ePOS-Print SDK Setup Guide for Android Application Development - Page 4
Java SE 6 JDK. http://www.oracle.com/technetwork/java/javase/downloads/index.html 2 The Java SE Downloads window appears. Select [Accept License Agreement] and select the file to be installed. Save the file to a desired location. (In this manual, download Windows x86 to construct the environment.) 4 - Epson TM-T88V | ePOS-Print SDK Setup Guide for Android Application Development - Page 5
Installing JDK 1 Start the downloaded file. The following window appears. Click the [Next] button. 2 Select the function to install and click the [Next] button. To change the installation destination, click the [Change] button and change the destination. (In this manual, the default destination is - Epson TM-T88V | ePOS-Print SDK Setup Guide for Android Application Development - Page 6
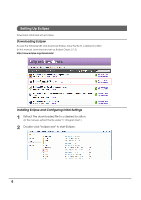
the file to a desired location. (In this manual, download and set up Eclipse Classic 3.7.2) http://www.eclipse.org/downloads/ Installing Eclipse and Configuring Initial Settings 1 Extract the downloaded file to a desired location. (In this manual, extract the file under "C:\Program Files".) 2 Double - Epson TM-T88V | ePOS-Print SDK Setup Guide for Android Application Development - Page 7
3 Set up the work folder during Eclipse startup process. Click the [OK] button. (In this manual, the default settings are used.) Setting Proxy for Eclipse Use this operation when proxy setting is required for Internet connection. If not required, this operation is unnecessary. 1 Select [Window] - [ - Epson TM-T88V | ePOS-Print SDK Setup Guide for Android Application Development - Page 8
2 Select [General]-[Network Connections] from the left column. Set the proxy and click the [OK] button. 8 - Epson TM-T88V | ePOS-Print SDK Setup Guide for Android Application Development - Page 9
Setting Up Android SDK Manager Download and install Android SDK Manager. Create Android Virtual Device. Downloading Android SDK Manager Access the following URL and download Android SDK Manager. (In this manual, download the installer for Windows.) http://developer.android.com/sdk/index.html - Epson TM-T88V | ePOS-Print SDK Setup Guide for Android Application Development - Page 10
2 Click the [Next] button. If JDK is not installed, it is notified at this point. 3 Specify the installation destination. Click the [Next] button. (In this manual, the default settings are used.) 4 Specify the name to be registered to Start Menu. Click the [Install] button. 10 - Epson TM-T88V | ePOS-Print SDK Setup Guide for Android Application Development - Page 11
5 When installation completes, click the [Next] button. 6 Clear the [Start SDK Manager] checkbox. Click the [Finish] button. 11 - Epson TM-T88V | ePOS-Print SDK Setup Guide for Android Application Development - Page 12
, right‐click Android SDK Manager and select [Run as administrator]. If Android SDK Manager is not run as the administrator, package download will fail. 2 When the proxy setting is required, select [Tools]-[Options]. 3 The proxy setting window appears. Set the proxy and click the [Close] button. 12 - Epson TM-T88V | ePOS-Print SDK Setup Guide for Android Application Development - Page 13
4 Among the Android versions supported by ePOS-Print SDK for Android, select the version of the device to be developed, and click the [Install XX packages...] button. 5 Select [Accept All] and click the [Install] button. Installation of Virtual Device starts. 13 - Epson TM-T88V | ePOS-Print SDK Setup Guide for Android Application Development - Page 14
and Installing ADT Plugin Download and install ADT (Android Development Tools) Plugin. To execute this operation, the computer must be connected to the Internet. If the proxy setting is required for Internet connection, refer to ʺSetting Proxy for Eclipseʺ on page 7. 1 Start Eclipse. Select - Epson TM-T88V | ePOS-Print SDK Setup Guide for Android Application Development - Page 15
4 Select the [Developer Tools] checkbox and click the [Next] button. 5 Confirm the plugin to be installed, and click the [Next] button. 6 After confirming the terms of the license agreement, select the [I accept...] checkbox and click the [Finish] button. 15 - Epson TM-T88V | ePOS-Print SDK Setup Guide for Android Application Development - Page 16
OK] button. 8 Click the [Restart Now] button to restart Eclipse. 9 Select [Window] - [Preferences]. 10Select [Android] from the left column. Click the [Browse...] button to display the Android folder where SDK Manager is installed. (In this manual, display "C:\Program Files\Android\android-sdk".) 16 - Epson TM-T88V | ePOS-Print SDK Setup Guide for Android Application Development - Page 17
11Click the [Apply] button. Confirm that the installed package is displayed. 17 - Epson TM-T88V | ePOS-Print SDK Setup Guide for Android Application Development - Page 18
into Eclipse, create a virtual device, and check operation using the emulator. Importing Application Import the sample application to Eclipse. 1 Extract ePOS-Print SDK for Android and save it to a desired location. 2 Start Eclipse. Select [File]-[Import]. 3 Select [General]-[Existing Projects into - Epson TM-T88V | ePOS-Print SDK Setup Guide for Android Application Development - Page 19
4 Click the [Browse...] button to display the saved ePOS-Print SDK for Android. Select the [Copy projects into workspace] checkbox and click the [Finish] button. 5 Confirm that the application has been properly imported. 19 - Epson TM-T88V | ePOS-Print SDK Setup Guide for Android Application Development - Page 20
below. 1 Select the created project and select [Project]-[Properties]. 2 Select [Java Compiler] from the left column. Change [Compiler compliance level:] to [1.6]. Settings for Using the Wi-Fi / Bluetooth function To use the Wi-Fi / Bluetooth function, it is required to specify "Permission" in - Epson TM-T88V | ePOS-Print SDK Setup Guide for Android Application Development - Page 21
2 Select the [Permissions] tag. Click the [Add] button. 3 Select [Uses Permission] and click the [OK] button. 4 [Uses Permission] is added. Click the " " mark next to [Name] and select the necessary Permissions from the list. 21 - Epson TM-T88V | ePOS-Print SDK Setup Guide for Android Application Development - Page 22
5 Repeat Step 2 to 4 to specify the required Permissions. 22 - Epson TM-T88V | ePOS-Print SDK Setup Guide for Android Application Development - Page 23
Executing Sample Application (Emulator) 1 Start Android Virtual Device Manager. After it starts, click the [New...] button. [Start]-[All Programs]-[Android SDK Tools]-[AVD Manager] 2 Select the virtual device name to be created and the OS version. Specify [Name] (any name) and select [Target]. Click - Epson TM-T88V | ePOS-Print SDK Setup Guide for Android Application Development - Page 24
3 The created virtual device is displayed. 4 Click the button to run Eclipse. 5 For the initial startup, the window to confirm the execution type appears. Select [Android Application] and click the [OK] button. 24 - Epson TM-T88V | ePOS-Print SDK Setup Guide for Android Application Development - Page 25
6 The emulator starts and the application is executed. 25 - Epson TM-T88V | ePOS-Print SDK Setup Guide for Android Application Development - Page 26
Executing Sample Application (Android Device) To run the application using an actual Android device, set up the device according to the procedures described in the following URL: http://developer.android.com/guide/developing/device.html 26
-
 1
1 -
 2
2 -
 3
3 -
 4
4 -
 5
5 -
 6
6 -
 7
7 -
8
-
9
-
10
-
11
-
12
-
13
-
14
-
15
-
16
-
17
-
18
-
19
-
20
-
21
-
22
-
23
-
24
-
25
-
26
 |
 |

1
M00048500
Rev. A
Cautions
•
No part of this document may be reproduced, stored in a retrieval system, or transmitted in any form or
by any means, electronic, mechanical, photocopying, recording, or otherwise, without the prior written
permission of Seiko Epson Corporation.
•
The contents of this document are subject to change without notice. Please contact us for the latest
information.
•
While every precaution has taken in the preparation of this document, Seiko Epson Corporation assumes
no responsibility for errors or omissions.
•
Neither is any liability assumed for damages resulting from the use of the information contained herein.
Trademarks
EPSON
is registered trademarks of Seiko Epson Corporation in the U.S. and other countries.
Windows
is registered trademarks or trademarks of Microsoft Corporation in the United States and other
countries.
Android
TM
is registered trademarks or trademarks of Google Inc. in the United States and other countries.
Java
TM
is a registered trademark of Oracle Corporation, its subsidiaries, and affiliates in the U.S. and other
countries.
Wi-Fi
is a registered trademark of the Wi-Fi Alliance
.
Bluetooth
is a registered trademark of Bluetooth SIG, Inc.
Eclipse
is a trademark or registered trademark of Eclipse Foundation, Inc.
Copyright © 2012 Seiko Epson Corporation. All rights reserved.
ePOS-Print SDK for Android
Application Development Setup Guide