Epson R800 Product Information Guide
Epson R800 - Stylus Photo Color Inkjet Printer Manual
 |
UPC - 010343848849
View all Epson R800 manuals
Add to My Manuals
Save this manual to your list of manuals |
Epson R800 manual content summary:
- Epson R800 | Product Information Guide - Page 1
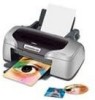
Epson Stylus Photo R800 Printer Parts Paper support and extension Left edge guide Output tray extensions Sheet feeder Printer cover Output tray (in lower position) CD position check disc CD adapter ring Output tray (in upper position) CD/DVD tray Ink cartridge holder (in home position) User - Epson R800 | Product Information Guide - Page 2
not listed as a setting in your printer software, you may see smears, roller marks, misting, or other problems. Printer Specifications Printing Printing method Nozzle configuration Advanced Micro Piezo pigment ink technology, optimized for photo printing 1440 nozzles (180 × 8) Electrical Input - Epson R800 | Product Information Guide - Page 3
stored under the following conditions: Temperature: 59 to 86 °F (15 to 30 °C) Humidity: 20 to 60% RH Paper sizes which can be used with this printer range from 3.5 × 5" (89 × 127 mm) up to A4 (210 × 297 mm) or Legal (8.5 × 14" [216 × 356 mm]) size. 1/04 Epson Stylus Photo R800 - 3 - Epson R800 | Product Information Guide - Page 4
pages, or send print jobs continuously, there will be no margin between the printouts. CD/DVD 12-cm CD/DVD 8-cm CD/DVD Caution: Do not set the inner diameter at 21 mm, although Epson Print CD allows you to. Printing inside of 43 mm may damage your CD/DVD drive. 4 - Epson Stylus Photo R800 1/04 - Epson R800 | Product Information Guide - Page 5
Epson Stylus Photo R800 Control Panel To diagnose printer problems, check the printer's lights (see below) or run a printer check (see below). Lights Explanation Green P power light flashes The printer is receiving a print job, printing, replacing an ink cartridge, charging ink, or cleaning - Epson R800 | Product Information Guide - Page 6
Epson Stylus Photo R800 Installing the First Ink Cartridges 1. Open the output tray, pull out its extensions, and open the printer cover. 5. Slide each cartridge individually into its slot with the green part facing the front. Make sure the colors on the cartridges match the labels inside the - Epson R800 | Product Information Guide - Page 7
side face up. It's usually whiter or brighter than the other side. ❏ Load letterhead or preprinted paper into the printer top edge first. ❏ Don't load paper above the arrow on the left edge guide. Check the paper package for additional handling instructions. 1/04 Epson Stylus Photo R800 - 7 - Epson R800 | Product Information Guide - Page 8
Epson Stylus Photo R800 Loading Envelopes You can load up to 10 envelopes at a time, as described below. For best results, press each envelope flat before loading it, or load one envelope at a time. 1. Open the paper support and slide out the support extension 2. Open the output tray and its - Epson R800 | Product Information Guide - Page 9
the paper into the feeder as far as it will go; the printer feeds the paper automatically. 2. Pull out the output tray extensions. 3. Open the paper support and slide up the support extension. 4. Turn on the printer and load several sheets of letter-size paper. 1/04 Epson Stylus Photo R800 - 9 - Epson R800 | Product Information Guide - Page 10
the arrows are next to each other 7. Press the ) paper button to load the CD or DVD into printing position. It is loaded when the P power button stops flashing. 8. Follow the instructions in the User's Guide to design and print the CD or DVD using Epson Print CD. 10 - Epson Stylus Photo R800 1/04 - Epson R800 | Product Information Guide - Page 11
Cleaning. Mac OS X: Open the Applications folder and select EPSON Printer Utility. Select SP R800, click OK, and select Auto Nozzle Check and Cleaning. Mac OS 8.6 to 9.x: Choose File > Page Setup or Print. Click the utility icon, then click Auto Nozzle Check and Cleaning. 1/04 Epson Stylus Photo - Epson R800 | Product Information Guide - Page 12
to clean the print head again. If you don't see any improvement after cleaning three or four times, check the solutions in the User's Guide. You can also turn the printer off and wait overnight-this allows any dried ink to soften-and then clean the print head again. 12 - Epson Stylus Photo R800 - Epson R800 | Product Information Guide - Page 13
, an ink cartridge is low on ink. When the red H ink light stays on, you need to replace a cartridge. Epson Stylus Photo R800 ❏ Macintosh: OS X: Choose Applications > EPSON Printer Utility > SP R800 > EPSON StatusMonitor. OS 8.6 to 9.x: Choose File > Print, then click the ink icon. You see a window - Epson R800 | Product Information Guide - Page 14
Epson Stylus Photo R800 Removing and Installing Ink Cartridges Be sure you have a new ink cartridge before you begin. Once you start replacing a cartridge, you must complete all the steps in one session. You can replace a cartridge whether the red H ink light is off, flashing, or on. 1. Make sure - Epson R800 | Product Information Guide - Page 15
Epson Stylus Photo R800 13. Press the H ink button. The printer begins charging the ink delivery system. The green P power light and red H ink lights flash and the printer makes noise. Charging takes about 90 seconds. When it's finished, the green P power light stops flashing and stays on, and the - Epson R800 | Product Information Guide - Page 16
printer. If you notice a decline in print quality, clean the print head (see page 11); if output is misaligned, align the print head (see page 15). Related Documentation Epson Stylus Photo R800 Start Here sheet Epson Stylus Photo R800 User's Guide Epson Stylus Photo R800 CD-ROM Epson Stylus Photo
-
 1
1 -
 2
2 -
 3
3 -
 4
4 -
 5
5 -
 6
6 -
 7
7 -
8
-
9
-
10
-
11
-
12
-
13
-
14
-
15
-
16
 |
 |

Epson Stylus Photo R800
1/04
Epson Stylus Photo R800
- 1
Printer Parts
User Replaceable Parts
Accessories
Ink Cartridges
Caution:
To ensure good results, use genuine Epson ink cartridges
and do not refill them. Other products may cause damage to your
printer not covered by Epson’s warranty.
Paper support
and extension
Sheet feeder
Left edge
guide
Printer
cover
Output tray
extensions
Output tray
(in lower
position)
Output tray
(in upper position)
CD/DVD tray
Ink cartridge
holder (in home
position)
Control panel
Roll paper
edge guide
Roll paper holder
IEEE 1394
(FireWire) port
USB
port
Paper support
(closed)
CD position
check disc
CD adapter ring
User replaceable part
Reference number
Part number
CD tray
12
1262744
CD adapter ring
8
1264619
CD dummy sheet
13
1236444
Roll paper holder (R)
11
1274012
Roll paper holder (L)
10
1274011
Cartridge
Part number
Yellow
T054420
Magenta
T054320
Cyan
T054220
Matte Black
T054820
Photo Black
T054120
Red
T054720
Blue
T054920
Gloss Optimizer
T054020