Epson R380 Product Information Guide
Epson R380 - Stylus Photo Color Inkjet Printer Manual
 |
UPC - 010343859074
View all Epson R380 manuals
Add to My Manuals
Save this manual to your list of manuals |
Epson R380 manual content summary:
- Epson R380 | Product Information Guide - Page 1
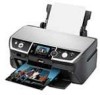
Epson Stylus Photo R380 Printer Parts Paper support Edge guide External interface (PictBridge port) Infrared port Sheet feeder Printer cover Control panel Memory card slots (under cover) Front cover Tray lever Front tray Front tray extensions AC inlet USB port Ink cartridge holder Memory - Epson R380 | Product Information Guide - Page 2
Printing Printing method On-demand ink jet Ink configuration Six individual ink cartridges in black, cyan, (-20 to 40 °C) 1 month at 104 °F (40 °C) Freezing temperature* 3.2 °F (-16 °C) * Ink thaws and is usable after approximately 3 hours at 77 °F (25 °C) 2 - Epson Stylus Photo R380 10/06 - Epson R380 | Product Information Guide - Page 3
Epson Stylus Photo R380 * CompactFlash® Microdrive™ * Adapter required. The printer supports image files that meet the following requirements: Media 2.0 Hi-Speed (Mass Storage Class for external storage devices) Bluetooth® Ver. 2.0+EDR (option) IrDA Ver. 1.3 Environmental Temperature Operation - Epson R380 | Product Information Guide - Page 4
Paper Epson Presentation Paper Matte Presentation Paper Matte Epson Photo Quality Ink Jet Paper Epson Photo Quality Self Adhesive Sheets Epson Ultra Premium Photo Paper Luster Ultra Premium Photo Paper Epson Premium Luster Photo Paper Luster Envelopes Envelope 4 - Epson Stylus Photo R380 - Epson R380 | Product Information Guide - Page 5
try again. Print head cleaning failed. Try cleaning the print head again. If the error message reoccurs, contact Epson. Backup Error Error code XXXXXXXX A problem occurred and the backup procedure was cancelled. Make a note of the error code and contact Epson. 10/06 Epson Stylus Photo R380 - 5 - Epson R380 | Product Information Guide - Page 6
Epson Stylus Photo R380 Printing on CDs and DVDs Your printer includes a special tray that lets you print customized text, graphics, and photos directly on any ink jetprintable CD or DVD. The Epson Print CD software makes it easy to import your own photos, add text, and modify your designs with a - Epson R380 | Product Information Guide - Page 7
. See your Printer Basics manual or on-screen User's Guide for instructions. Printing Your Design After you have created your design and loaded a CD or DVD, follow these steps to print: 1. Open the File menu and select Print. 2. Make sure EPSON Stylus Photo R380 Series (Windows) or Stylus Photo R380 - Epson R380 | Product Information Guide - Page 8
Epson Stylus Photo R380 Note: Do not open ink cartridge packages until you are ready to install the ink. Cartridges are vacuum packed to maintain reliability. 1. Make sure the printer is turned on, the CD tray is not inserted, and the front tray is in the paper (lower) position. 2. If an ink - Epson R380 | Product Information Guide - Page 9
Epson Stylus Photo R380 9. Close the cartridge cover, then close the printer cover. . 10. Press OK. The printer begins charging the ink delivery system and the message "Charging Ink. Please Wait" appears on the LCD screen. After about one minute, the message "Ink cartridge replacement is complete" - Epson R380 | Product Information Guide - Page 10
Epson Stylus Photo R380 6. Press Start. The printer runs a head cleaning cycle and a message appears on the LCD screen. Cleaning takes approximately 30 seconds. Caution: Never turn off the printer while the message "Print head cleaning in progress. Please wait." appears on the LCD screen. You may - Epson R380 | Product Information Guide - Page 11
Epson Stylus Photo R380 Cleaning the Printer To keep your printer working at its best, you should clean it several times a year. 1. Turn off the printer, unplug the power cord, and disconnect the USB cable. 2. Remove all the paper, then use a soft brush to clean the sheet feeder. 3. If the outer - Epson R380 | Product Information Guide - Page 12
Epson Stylus Photo R380 8. Close the paper support. Related Documentation CPD-22276 CPD-22278 CPD-22277 Epson Stylus Photo R380 Start Here Epson Stylus Photo R380 Printer Basics Epson Stylus Photo R380 CD-ROM with on-screen User's Guide 9. Repack the printer in the box, using the protective
-
 1
1 -
 2
2 -
 3
3 -
 4
4 -
 5
5 -
 6
6 -
 7
7 -
8
-
9
-
10
-
11
-
12
 |
 |

Epson Stylus Photo R380
10/06
Epson Stylus Photo R380
- 1
Printer Parts
Accessories
Ink Cartridges
Epson
®
offers standard and high-capacity ink cartridge sizes
for each color, and you can use both sizes at once in your
Epson Stylus Photo R380, if desired. For example, you can
install a standard size magenta cartridge (part number 78) and
a high-capacity black cartridge (part number 77). The high-
capacity cartridges are available at
www.epson.com/
highcapacity
(U.S. sales) or
www.epson.ca
(Canadian sales).
Caution:
To ensure good results, use genuine Epson cartridges
and do not refill them. Other products may cause damage to your
printer not covered by Epson’s warranties.
Don’t use an ink cartridge beyond the expiration date on the
package.
Sheet feeder
Edge
guide
Paper support
Control panel
Printer cover
External
interface
(PictBridge
port)
Front tray
Front cover
Front tray extensions
Tray lever
Infrared
port
Memory card
slots (under
cover)
USB port
AC inlet
Ink
cartridge
holder
Cartridge
Part number
Black
78 (T078120)
Cyan
78 (T078220)
Magenta
78 (T078320)
Yellow
78 (T078420)
Light Cyan
78 (T078520)
Light Magenta
78 (T078620)
High-Capacity Black
77 (T077120)
High-Capacity Cyan
77 (T077220)
High-Capacity Magenta
77 (T077320)
High-Capacity Yellow
77 (T077420)
High-Capacity Light Cyan
77 (T077520)
High-Capacity Light Magenta
77 (T077620)
Start
button
Memory
Card button
On button
Display/ Crop
button
Print Settings button
OK button
Copies buttons
Stop/Clear
Settings button
Navigation buttons
Back button
LCD screen
Setup
button
Print CD/DVD
button