Epson PhotoPC L-410 Camera Basics
Epson PhotoPC L-410 Manual
 |
View all Epson PhotoPC L-410 manuals
Add to My Manuals
Save this manual to your list of manuals |
Epson PhotoPC L-410 manual content summary:
- Epson PhotoPC L-410 | Camera Basics - Page 1
Camera Basics - Epson PhotoPC L-410 | Camera Basics - Page 2
are service marks of Epson America, Inc. General notice: Other product names used herein are for identification purposes only and may be trademarks of their respective owners. Epson disclaims any and all rights in those marks. RESPONSIBLE USE OF COPYRIGHTED MATERIALS Digital cameras, like - Epson PhotoPC L-410 | Camera Basics - Page 3
Your Camera 9 Installing the Battery 10 Turning Your Camera On and Off 11 Setting the Language, Date, and Time 11 Using Memory Cards 12 Installing the Software 14 Taking and Viewing Photos 17 Taking Photos in Automatic Mode 18 Taking Photos in Manual Mode 19 Camera Settings - Epson PhotoPC L-410 | Camera Basics - Page 4
38 Solving Problems 39 Camera Problems 39 Image Problems 41 Miscellaneous Problems 42 List of Error Messages 43 Where To Get Help 45 Appendix 47 Specifications 47 Important Safety Instructions 49 FCC Compliance Statement 53 Declaration of Conformity 54 Epson America, Inc - Epson PhotoPC L-410 | Camera Basics - Page 5
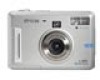
Your new Epson® PhotoPC® L-410 is a compact digital camera that lets you capture all the special moments in your life and print high-quality photos without a computer. Its features include: ◗ 4.0 megapixel resolution, for clear, beautiful photos ◗ 3x optical zoom and 3x digital zoom ◗ Continuous - Epson PhotoPC L-410 | Camera Basics - Page 6
Tool for transferring frames from your computer to the camera ◗ Your Epson PhotoPC L-410 Camera User's Guide, which includes information and instructions for all the features of your camera ◗ A USB driver that lets you transfer photos to your computer in Windows 98SE. (If you have a newer version of - Epson PhotoPC L-410 | Camera Basics - Page 7
is particularly useful when you are printing from the camera. You can purchase the adapter from the Epson StoreSM at (800) 873-7766 or visit www. : ◗ SD™ card (Secure Digital) up to 512MB ◗ MM card (Multimedia, MMC V 2.1 or later) up to 512MB Epson recommends SD cards manufactured by Panasonic - Epson PhotoPC L-410 | Camera Basics - Page 8
take pictures and print them right from your camera. For more information, check the following: ◗ The Epson PhotoPC L-410 Camera User's Guide provides information and instructions for all the camera's features, including troubleshooting tips. To open the guide, double-click the icon on your desktop - Epson PhotoPC L-410 | Camera Basics - Page 9
is install the batteries, turn on the camera, and set the current date. You should also install the software on your computer. Follow the instructions in this section to get started. Unpacking Your Camera Make sure you have all the items shown below: Camera CR-V3 battery Software CD-ROM PC USB - Epson PhotoPC L-410 | Camera Basics - Page 10
it pops up as shown: 3 Insert the battery into the compartment, positioning the + and - ends as shown: CR-V3 battery AA batteries Note: You can use either a CR-V3 battery, like the one included with the camera, or two AA batteries. 4 Press down on the battery cover and slide it back into place - Epson PhotoPC L-410 | Camera Basics - Page 11
the POWER button. The lens retracts and the lens cover closes. POWER button Setting the Language, Date, and Time When you turn on the camera for the first time, you need to set the language, date, and time. 1 Press the OK button to select English. You see the Date/Time - Epson PhotoPC L-410 | Camera Basics - Page 12
you use a memory card. You can use either of the following types of cards: ◗ SD card (Secure Digital) up to 512MB ◗ MM card (Multimedia, MMC V 2.1 or later) up to 512MB Caution: Make sure the camera is turned off before installing or removing a memory card. Make sure you insert the card in the - Epson PhotoPC L-410 | Camera Basics - Page 13
card as shown and slide it all the way into the slot: 4 Press down on the battery cover and slide it back into place. Removing a Memory Card 1 Make sure the camera is turned off. 2 Slide the battery cover until it pops up. 3 Push in the memory card to release it. The card pops - Epson PhotoPC L-410 | Camera Basics - Page 14
CD-ROM that came with the camera. Windows 1 Insert the software CD-ROM in your computer's CD-ROM or DVD drive. The Installer starts automatically. If it doesn't start, do the following: ◗ Windows XP: Click Start, click My Computer, then double-click Epson. ◗ Windows 98SE, Me, and 2000: Double-click - Epson PhotoPC L-410 | Camera Basics - Page 15
you want to install and click Install. Then follow the on-screen instructions. If you see a message asking you to restart, select No, registration screen, register your camera as instructed. At the last screen, click Done or close your browser. Macintosh 1 Insert the software CD-ROM in your Macintosh - Epson PhotoPC L-410 | Camera Basics - Page 16
You see the Software Installation screen: 4 Click Install. If you don't have Adobe Acrobat on and password if necessary. You may have to do this more than once. 6 Follow the on-screen instructions to install each program. Click Quit to continue, as needed. 7 When installation is complete, click Exit - Epson PhotoPC L-410 | Camera Basics - Page 17
Use automatically adjusted settings for great snapshots. All you have to do is point and shoot. ◗ Manual photos: Fine-tune your shots by adjusting a variety of camera settings, including resolution, exposure compensation, sensitivity, white balance, and more. ◗ Continuous photos: Capture a series of - Epson PhotoPC L-410 | Camera Basics - Page 18
/or self-timer features in automatic mode. For instructions, see the Camera User's Guide on your computer. See page 14 for instructions on installing the Camera User's Guide and software. Before you start, make sure the batteries are installed and the camera is turned on as described on pages 10 and - Epson PhotoPC L-410 | Camera Basics - Page 19
The camera beeps as it captures the image. Note: The LCD screen may turn off to save battery power after you take a picture. Press any button or turn the Mode dial to turn the screen back on. Taking Photos in Manual Mode If you are an advanced photographer, you may want to use manual - Epson PhotoPC L-410 | Camera Basics - Page 20
batteries are installed and the camera is turned on, as described on pages 10 and 11. 1 Turn the Mode dial to manual. If you want to turn the LCD screen off to save battery a list of available settings. For more information, see the Camera User's Guide on your computer. 3 Make sure you are at least - Epson PhotoPC L-410 | Camera Basics - Page 21
the photo you want appears on the screen. 6 Press the shutter button all the way down. The camera beeps as it captures the image. Note: The LCD screen may turn off to save battery power after you take a picture. Press any button or turn the Mode dial to turn the screen back - Epson PhotoPC L-410 | Camera Basics - Page 22
Battery life (2 seconds), (10 seconds) Place your subject within the focus frame. When you press the shutter button halfway, the focus frame turns green. Zoom bar The digital zoom indicator appears when digital shooting mode, Video mode Photos left 125 (for example) Warning Camera shake 22 - Epson PhotoPC L-410 | Camera Basics - Page 23
to adjust the quality (resolution) or other settings, press the MENU button. See page 21 for a list of available settings. For more information, see the Camera User's Guide on your computer. 3 Make sure you are at least 20 inches (50 cm) away from your subject. ◗ To zoom in on your subject, press - Epson PhotoPC L-410 | Camera Basics - Page 24
The length of the video is limited only by the amount of storage available in your camera or memory card. 1 Turn the Mode dial to video. The number in the lower left longer videos, but they will play in a smaller window if you view them on your computer. 5 Press the MENU button to exit the menu. 24 - Epson PhotoPC L-410 | Camera Basics - Page 25
Framer) to take pictures with a variety of frames for holidays and special occasions. Frames are already stored in your camera, and additional frames are copied to your computer when you install the camera software. You can use the PRINT Image Framer Tool to copy the frames from your computer to the - Epson PhotoPC L-410 | Camera Basics - Page 26
original frames using PIF Designer. See pages 14 to 15 for instructions on installing the software. To take a picture with a frame: 1 Turn the Mode dial to automatic or manual. 2 Press the P.I.F. button. The first frame stored in the camera is displayed. If you want to select a frame stored on the - Epson PhotoPC L-410 | Camera Basics - Page 27
can now print your framed picture directly from the camera on supported Epson printers. For instructions on printing from the camera, see page 31. Note: You can also add or change a frame on an existing picture in your camera. See page 29 for instructions. Playing Back Photos and Videos You can play - Epson PhotoPC L-410 | Camera Basics - Page 28
screen, press the T or OK button. Deleting Photos You can easily delete the currently displayed image, a series of images, or all images in the camera. 1 Turn the Mode dial to playback. 2 To delete the currently displayed photo, press the d button. Select OK by using the u d buttons, then press the - Epson PhotoPC L-410 | Camera Basics - Page 29
change a P.I.F. frame on an existing photo, using any of the frames stored in your camera or on your memory card. See page 25 for more information about P.I.F. To add or picture directly from the camera on supported Epson printers. For instructions on printing from the camera, see page 31. 29 - Epson PhotoPC L-410 | Camera Basics - Page 30
30 - Epson PhotoPC L-410 | Camera Basics - Page 31
× 6-inch sheet of paper. You can also print photos with P.I.F. frames to create greeting cards, keepsakes, and more. The camera supports the printers listed below. ◗ To connect to the Epson Stylus Photo R200, use the printer cable labeled with the letter A on the small end. ◗ To connect to any of - Epson PhotoPC L-410 | Camera Basics - Page 32
instructions on installing the guide and software. Note: Future products may be added to the list of supported printers. Check the Epson web site at www.epson.com for more information. Connecting the Camera to Your Printer Make sure the camera is turned off before you begin. You can conserve battery - Epson PhotoPC L-410 | Camera Basics - Page 33
R200, shown below, the port is labeled USB. Epson Stylus Photo R200 ◗ On the other supported printers listed on page 31, the port is labeled EXT I/F. 3 Open the connector cover on the side of the camera and plug the small end of the cable into the camera's USB port as shown. Connection for the - Epson PhotoPC L-410 | Camera Basics - Page 34
want to print. Images with P.I.F. frames must be printed directly from the camera. Before you start, make sure your printer is set up and has ink installed. Load 4 × 6 inch Epson Premium Glossy Paper, following the instructions that came with your printer. Printing the Photo Displayed on the Screen - Epson PhotoPC L-410 | Camera Basics - Page 35
cancel printing, press the MENU button. Printing All Your Saved Photos You can print all photos stored in the camera. 1 Connect the camera to the printer as described on page 32 and turn on the camera. 2 Turn the Mode dial to playback, then press the button. 3 Select Print All Images by using the - Epson PhotoPC L-410 | Camera Basics - Page 36
is complete, press the OK button. Printing Selected Photos You can select individual photos to print. 1 Connect the camera to the printer as described on page 32 and turn on the camera. 2 Turn the Mode dial to playback, then press the button. 3 Choose Select Images by using the u d buttons, then - Epson PhotoPC L-410 | Camera Basics - Page 37
several photos on one sheet of 4 × 6-inch paper (up to 4 photos on the Epson Stylus Photo R200 or up to 3 on other supported printers). 1 Connect the camera to the printer as described on page 32 and turn on the camera. 2 Turn the Mode dial to playback, then press the button. The Print menu is - Epson PhotoPC L-410 | Camera Basics - Page 38
can make the following settings when printing images directly from the camera: ◗ Printing with or without white borders ◗ Printing the date paper. Make sure you change this setting to 4 × 6in. Once you change it, the camera will retain this setting. 10 ×15 cm paper is not available in the U.S. 1 On - Epson PhotoPC L-410 | Camera Basics - Page 39
solutions. For more troubleshooting tips, check the Camera User's Guide on your computer. Camera Problems The camera has no power. ◗ The camera may have shut off automatically to save power. Press the POWER button to turn on the camera. ◗ Make sure the battery or batteries have power and are - Epson PhotoPC L-410 | Camera Basics - Page 40
and then on again. ◗ If the power does not turn off, remove the battery, reinstall it, and turn the power on. If the lights are still flashing, contact Epson as described on page 45. The camera takes too long to take a photo. If you press the shutter button all the way down, the - Epson PhotoPC L-410 | Camera Basics - Page 41
any button or turn the Mode dial. ◗ Press the DISP button to change the LCD screen setting. ◗ When the camera is connected to a printer or computer, the LCD screen is disabled. Image Problems Images are out of focus. ◗ Make sure you place your subject in the center of the focus frame and - Epson PhotoPC L-410 | Camera Basics - Page 42
-up in macro mode, try the (flash off ) setting. ◗ If you are using manual mode, you can adjust the exposure compensation or light sensitivity settings. See the Camera User's Guide for instructions. Miscellaneous Problems The color is incorrect or lines appear on the printed picture. ◗ Make sure you - Epson PhotoPC L-410 | Camera Basics - Page 43
page 11 for more information. You see an error message when you try to open the Camera User's Guide. Install Adobe Acrobat Reader from the CD-ROM that came with the camera. See pages 14 to 15 for instructions. List of Error Messages The following list includes the most common error messages. For - Epson PhotoPC L-410 | Camera Basics - Page 44
for instructions. This frame cannot be used with this camera. The file size of the frame exceeds the camera's limit. Use the PIF Designer software the Camera User's Guide on your computer. This image cannot Images from another camera or other be displayed. source may not display on your camera. - Epson PhotoPC L-410 | Camera Basics - Page 45
support services and automated telephone services listed below. Service Access World Wide Web From the Internet, you can reach Epson Support at http://support.epson.com. At this site, you can download drivers and other files, look at product documentation, access troubleshooting information - Epson PhotoPC L-410 | Camera Basics - Page 46
Product name (Epson PhotoPC L-410) ◗ Product serial number (located on the bottom of the camera) ◗ Proof of purchase (such as a store receipt) and date of purchase ◗ Computer configuration and operating system version ◗ Description of the problem You can purchase ink cartridges, paper, manuals, and - Epson PhotoPC L-410 | Camera Basics - Page 47
SanDisk® recommended) Lens Focal length: f=5.6 to 16.8 mm (equivalent to a 34 to 102 mm lens on a 35 mm camera) Aperture: F2.8/F4.9 Zoom: Collapsible mount 3× zoom Digital zoom 2× or 3× zoom (maximum 9× zoom with simultaneous use of the optical zoom) Focus mode Auto focus Auto-focus range - Epson PhotoPC L-410 | Camera Basics - Page 48
TFT color LCD monitor Full-speed USB 2.0/serial dual interface (Mass Storage Class) One CR-V3 battery included Also accepts AA alkaline, NiCad, or NiMH batteries, including rechargeables Optional AC adapter (B867062) 2.4 × 3.6 × 1.2 inches (62 × 92.5 × 31.5 mm) Approx. 0.3 lb (152 g) Operating: 41 - Epson PhotoPC L-410 | Camera Basics - Page 49
Instructions Using the camera ◗ Do not expose the camera to severe impact. Doing so may cause malfunctions, especially while the camera is operating. ◗ Follow all warnings and instructions operation and turn it off immediately. Remove the batteries and disconnect the AC adapter from the product, - Epson PhotoPC L-410 | Camera Basics - Page 50
your skin, immediately rinse the affected area thoroughly with water and seek medical treatment. If a battery is swallowed, seek medical treatment immediately. ◗ Use only AA-size batteries or a CR-V3 type battery for the camera according to the directions in the user documentation. ◗ Do not use the - Epson PhotoPC L-410 | Camera Basics - Page 51
it completely. WARNING: ◗ Be sure to completely cover the ends of the battery with tape to prevent combustion or explosion when disposing of it. ◗ Dispose of used batteries according to the manufacturer's instructions and in compliance with all applicable laws. Contact your local government agency - Epson PhotoPC L-410 | Camera Basics - Page 52
them immediately with water. If discomfort or vision problems remain after a thorough flushing, see a doctor cleaners. Storing, maintaining, or transporting the camera ◗ Do not store this product outdoors, the batteries from and unplug this product and refer servicing to qualified service personnel - Epson PhotoPC L-410 | Camera Basics - Page 53
United States Users This equipment has been tested and found to comply with the limits for a class B digital device, pursuant to Part 15 of energy and, if not installed and used in accordance with the instructions, may cause harmful interference to radio and television reception. However, there - Epson PhotoPC L-410 | Camera Basics - Page 54
expected to be within the variation accepted, due to quantity production and testing on a statistical basis as required by 47CFR §2.909. Operation is subject may cause undesired operation. Trade Name: Epson Type of Product: Digital Still Camera Model: G921A Product: Epson PhotoPC L-410 54 - Epson PhotoPC L-410 | Camera Basics - Page 55
. What EPSON Will Do To Correct Problems: Should your EPSON Digital Camera Product prove defective during the warranty period, please call the EPSON Connection at (562) 276-4303 (U.S.) or (905) 709-3839 (Canada) for warranty repair instructions and return authorization. An EPSON service technician - Epson PhotoPC L-410 | Camera Basics - Page 56
refurbished or reconditioned products. This warranty is not transferable. This warranty does not cover damage to the EPSON software problems, interaction with non-EPSON products, or service other than by an EPSON Authorized Servicer. If a claimed defect cannot be identified or reproduced in service - Epson PhotoPC L-410 | Camera Basics - Page 57
SPECIAL, INCIDENTAL OR CONSEQUENTIAL DAMAGES, RESULTING FROM THE USE OR INABILITY TO USE THE EPSON PRODUCT, OR FOR LOST DATA OR LOST SOFTWARE, WHETHER RESULTING FROM BREACH OF WARRANTY OR ANY OTHER LEGAL THEORY. In Canada, warranties include both warranties and conditions. Some jurisdictions do not - Epson PhotoPC L-410 | Camera Basics - Page 58
58 - Epson PhotoPC L-410 | Camera Basics - Page 59
mode, 18 B Battery icon, 22 installing, 10 safety instructions, 50 to 51 C Cables, 9, 31 Camera connecting to printer, 32 modes, 17 printing from, 31 to 38 problems, 39 safety instructions, 49 settings, 21 to 22 specifications, 47 turning on/off, 11 warranty, 55 Camera User's Guide, 43 D Date - Epson PhotoPC L-410 | Camera Basics - Page 60
31, 32 Printing from camera, 31 to 38 problems, 42 Problems, solving, 39 to 43 60 R Resolution, 18, 20, 22, 24 S Safety, 49 to 52 Software description, 6 installing, 14 to 16 Specifications, 47 T Technical support, 45 Time and date setting, 11 Troubleshooting, 39 to 43 Turning the camera on/off, 11 - Epson PhotoPC L-410 | Camera Basics - Page 61
Mode dial Automatic mode Manual mode Continuous shooting mode Video mode Setup mode Playback mode Shutter button Microphone Speaker Flash Self-timer light USB light Strap holder - Epson PhotoPC L-410 | Camera Basics - Page 62
USB connector Indicator lights Print button P.I.F. button Self-timer button OK button Macro button Battery/memory card cover Tripod mount AC adapter connector POWER button Zoom buttons MENU button Memory access light Display button Flash button Delete button
-
 1
1 -
 2
2 -
 3
3 -
 4
4 -
 5
5 -
 6
6 -
 7
7 -
8
-
9
-
10
-
11
-
12
-
13
-
14
-
15
-
16
-
17
-
18
-
19
-
20
-
21
-
22
-
23
-
24
-
25
-
26
-
27
-
28
-
29
-
30
-
31
-
32
-
33
-
34
-
35
-
36
-
37
-
38
-
39
-
40
-
41
-
42
-
43
-
44
-
45
-
46
-
47
-
48
-
49
-
50
-
51
-
52
-
53
-
54
-
55
-
56
-
57
-
58
-
59
-
60
-
61
-
62
 |
 |

Camera Basics