Epson PhotoPC 850Z Product Information Guide
Epson PhotoPC 850Z Manual
 |
View all Epson PhotoPC 850Z manuals
Add to My Manuals
Save this manual to your list of manuals |
Epson PhotoPC 850Z manual content summary:
- Epson PhotoPC 850Z | Product Information Guide - Page 1
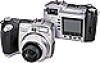
EPSON PhotoPC 850Z camera dial shutter button zoom control timer light flash neck strap holder video out connector viewfinder lens front view AC adapter connector interface connector tripod socket battery cover battery cover lock bottom view image quality button flash button zoom control - Epson PhotoPC 850Z | Product Information Guide - Page 2
EPSON PhotoPC 850Z Technical Product type Zoom CCD Image resolution File format Bit depth Serial communication speed Serial interface USB cable USB communication speed Video out Internal ROM External memory Self-timer Tripod screw 2.1 megapixel CCD (charged coupled device) still frame auto/manual - Epson PhotoPC 850Z | Product Information Guide - Page 3
) Box Contents t PhotoPC 850Z camera and neck strap t Quick Reference Guide and User's Guide t 4 AA NiMH rechargeable batteries and battery charger with AC power cord t Serial cable for PC t Serial cable for Macintosh® and Direct Print t USB cable t Video cable t 8MB EPSON CompactFlash card t Lens - Epson PhotoPC 850Z | Product Information Guide - Page 4
with Mac® OS Version 8.51, or later t Power Macintosh® G3 with System Software Version 8.51 or later t Built-in USB port Using Batteries Your EPSON PhotoPC 850Z comes with a charger (Model EU-38) and four rechargeable NiMH batteries (Model EU24) that can be recharged hundreds of times. Note New - Epson PhotoPC 850Z | Product Information Guide - Page 5
battery charger (Model EU-38) to charge the batteries that came with your camera. t Use the batteries that came with your camera only in EPSON digital cameras. t Do not use manganese batteries. t Do not mix different types of batteries; this can cause fire or explosion. 8/99 EPSON PhotoPC 850Z - Epson PhotoPC 850Z | Product Information Guide - Page 6
button up and close the memory card cover. eject button 4. Turn the camera dial to . 5. If you haven't set the clock yet, you see the clock setting screen with the year highlighted in red. 6. Press the +, −, ISO, and W.B. buttons to change the date and time settings. 6 - EPSON PhotoPC 850Z 8/99 - Epson PhotoPC 850Z | Product Information Guide - Page 7
EPSON PhotoPC 850Z 7. When you're finished, press the bottom left button (next to SET). You see the SETUP menu. 8. Press the bottom right button (below Memory SETUP). The Memory Card Format menu appears: 9. Press the top left button (next to MEMORY CARD FORMAT). You see a warning message. Press the - Epson PhotoPC 850Z | Product Information Guide - Page 8
only in the Program or Manual user modes. See page 9 to change the user mode. After you take a flash picture, the icon blinks until the flash is fully recharged. Your flash setting remains in effect even after you turn off the camera. Setting Image Quality EPSON PhotoPC 850Z has four image quality - Epson PhotoPC 850Z | Product Information Guide - Page 9
memory card, and make other camera settings. Choosing the User Mode The EPSON PhotoPC 850Z has three user modes to give you different levels of control over the camera settings. To use the more advanced features, such as white balance and exposure adjustment, you must be in Program mode or Manual - Epson PhotoPC 850Z | Product Information Guide - Page 10
EPSON PhotoPC 850Z shutter speed and aperture, choose a spot or matrix metering system, and focus the camera to three feet, eight feet, or infinity. Follow these steps to choose the camera mode: 1. Push the camera dial lock in and turn the dial to . You see the SETUP menu: user mode 2. Press the + - Epson PhotoPC 850Z | Product Information Guide - Page 11
using it when you connect the camera to your computer. Connecting to a Windows PC You can connect the camera to your PC with either the Windows serial cable or the USB cable that came with the camera. You must have a USB-enabled Windows 98 system to use the USB cable. 8/99 EPSON PhotoPC 850Z - 11 - Epson PhotoPC 850Z | Product Information Guide - Page 12
camera. If you have an iMac or PowerMac G3, you can use the USB cable that came with your camera. For instructions on using the USB cable, see "Using the USB Cable" on page 12. Follow these steps to use the Macintosh serial cable: 1. Turn off the camera and your Macintosh. 12 - EPSON PhotoPC 850Z - Epson PhotoPC 850Z | Product Information Guide - Page 13
a soft, lint-free cloth or lens cleaning tissue. To avoid scratching the lens, don't press too hard. t If necessary, clean the battery contacts with a dry cloth. t If the LCD screen gets fingerprints or smudges on it, use a soft, damp cloth to lightly wipe the screen. 8/99 EPSON PhotoPC 850Z - 13 - Epson PhotoPC 850Z | Product Information Guide - Page 14
Camera: 1 year limited Batteries and charger: 90 days limited Related Documentation and Accessories CPD 9248 CPD 9249 EPSON PhotoPC 850Z User's Guide EPSON PhotoPC 850Z Quick Reference Guide Accessories for the PhotoPC 850Z EPSON PhotoPC 850Z Universal AC Adapter NiMH Battery Pak (4 batteries
-
 1
1 -
 2
2 -
 3
3 -
 4
4 -
 5
5 -
 6
6 -
 7
7 -
8
-
9
-
10
-
11
-
12
-
13
-
14
 |
 |

EPSON PhotoPC 850Z
8/99
EPSON PhotoPC 850Z
- 1
Camera Specifications
Physical Dimensions
Power
flash
viewfinder
timer light
front view
shutter button
lens
AC adapter
connector
camera dial
interface
connector
video out
connector
zoom
control
neck strap
holder
bottom view
battery
cover lock
tripod
socket
battery cover
top view
camera dial
dial lock
shutter button
image quality button
flash button
self timer button
zoom
control
Width
4.9 in (125 mm)
Height
3.1 in (80 mm)
Depth
2.8 in (70 mm)
Weight
14.1 oz (400 g)
without batteries, strap, and
CompactFlash card
Sources
Includes 4 AA rechargeable NiMH
batteries and charger (Model EU-38). Also
accepts 4 AA batteries (single-use lithium
or rechargeable NiCad)
Optional universal AC adapter (B867081)
Battery Life
Over 2000 pictures using the viewfinder
Over 1000 pictures using the LCD menus
Approximately 2 hours playback
viewfinder and
photo capture lights
LCD screen
back view
MENU
button
neck strap
holder
+ button
microphone
-
button
ISO button
W.B. button
camera status light
top left button
(unlabeled)
bottom left button
(unlabeled)
status display panel
diopter
speaker
bottom right
button (unlabled)