Epson P6000 Basics
Epson P6000 - Multimedia Photo Viewer Manual
 |
UPC - 010343866812
View all Epson P6000 manuals
Add to My Manuals
Save this manual to your list of manuals |
Epson P6000 manual content summary:
- Epson P6000 | Basics - Page 1
P-6000/P-7000 Basics - Epson P6000 | Basics - Page 2
Epson Products or Epson Approved Products by Seiko Epson Corporation. Trademarks Epson and Photo Fine are registered trademarks, Multimedia Storage Viewer is a trademark, and Epson Exceed Your Vision is a registered logomark of Seiko Epson Corporation. Epson Connection is a service mark of Epson - Epson P6000 | Basics - Page 3
the Viewer On and Off 10 Setting the Language, Date, and Time 11 Installing Your Software and User's Guide 13 Using Memory Cards 17 Inserting and Removing Memory Cards 17 Copying Files from a Memory Card 21 Supported File Formats 26 Viewing Photos and Videos 27 Viewing Photos 27 - Epson P6000 | Basics - Page 4
or Folders 53 Backing Up Files to Your Computer 54 Solving Problems 56 Operating Problems 56 Viewing Problems 57 Replacing the Battery 58 Where To Get Help 58 Appendix 60 Important Safety Instructions 60 Responsible Use of Copyrighted Materials 62 Epson America, Inc. Limited - Epson P6000 | Basics - Page 5
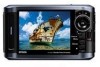
Introduction Your Epson P-6000/P-7000 Multimedia Storage Viewer™ lets you enjoy photos, videos, and music wherever you go. Its features include: ◗ Large, high-quality 4-inch LCD with Photo Fine® Premia technology and true Adobe® RGB ◗ Support for JPEG files and RAW files from select digital SLR - Epson P6000 | Basics - Page 6
About Your Software and User's Guide The following software is included on your P-6000/ P-7000 Multimedia Storage Viewer: ◗ Epson Link2 software to transfer photos, videos, and music back and forth between your computer and viewer ◗ Epson USB Display plug-in to display images from Adobe Photoshop® - Epson P6000 | Basics - Page 7
Getting Started Follow the instructions in this section to set up your P-6000/P-7000. Unpacking Your P-6000/P-7000 Epson P-6000/P-7000 Carrying case Strap Lithium-ion battery Power cord AC adapter USB cable 7 - Epson P6000 | Basics - Page 8
Installing the Battery 1 Open the battery cover. 2 Insert the battery. 3 Close the battery cover. Battery release lever Note: If you need to remove the battery, open the battery cover, and slide the battery release lever to the left. 8 - Epson P6000 | Basics - Page 9
light The Charge light turns on. It takes about 3.5 hours to charge the battery when the viewer is not in use. Caution: Do not use the viewer without the battery installed. Turn off the viewer before disconnecting the adapter. The battery status is displayed in the upper-right corner of the screen - Epson P6000 | Basics - Page 10
the message Shutting Down. Note: If the viewer is in sleep mode, press any button to wake it. Then turn it off as described above. If the viewer is idle for 10 minutes, it shuts off automatically to save battery power. See the on-screen User's Guide if you want to change this setting - Epson P6000 | Basics - Page 11
Setting the Language, Date, and Time When you turn on the viewer the first time, you see the Language setting screen: 1 Press OK to select English. You see a message about setting the date. 2 Press OK. You see the Date and Time screen: 11 - Epson P6000 | Basics - Page 12
: Note: If you remove the battery, the date and time settings will be erased after about one day. The next time you turn on the viewer, the Date and Time screen will be displayed. If you want to change the settings at any time, select Settings on the Home screen, then - Epson P6000 | Basics - Page 13
video and audio files, and create music playlists, you need to install the Epson Link2 software. To use the viewer to display images from Adobe Photoshop applications to maintain color accuracy when editing your images, you need to install the USB Monitor Plug-In. The P-6000/P-7000 User's Guide - Epson P6000 | Basics - Page 14
is on the Home screen, then press the button to connect to your computer. The viewer LCD screen turns off and your computer recognizes the viewer as a removable drive. 5 Open the P-6000 or P-7000 drive on your computer: ◗ Windows: Click or Start, click Computer or My Computer, then double-click - Epson P6000 | Basics - Page 15
the drive: ◗ Windows: P_6000_WIN_SOFTWARE or P_7000_WIN_SOFTWARE In Windows Vista®, if you see the User Account Control the instructions on your computer screen to install the Epson Link2 software, USB Display Plug-In, Apple QuickTime (Windows only), and the P-6000/P-7000 on-screen User's Guide. - Epson P6000 | Basics - Page 16
view the User's Guide, double-click its icon on your desktop. You need to have Adobe Reader® or Acrobat® installed on your system to view the guide. You can download Adobe Reader at www.adobe.com. Do not remove the software from the viewer after installing it on your computer, in case you need to - Epson P6000 | Basics - Page 17
Cards Follow the instructions in this section to insert a memory card and copy files to your P-6000/P-7000. Inserting and Removing Memory Cards The P-6000/P-7000 supports the following types of memory cards: ◗ CompactFlash (CF) memory card (Type2) and MicroDrive™ (3.3V) ◗ SD (Secure Digital) and SD - Epson P6000 | Basics - Page 18
light is flashing, or files may be lost or damaged. Make sure you insert memory cards in the correct orientation, or the card and viewer may be damaged. Do may peel off, preventing the card from being ejected and damaging the viewer. Using the CF Card Slot Insert the memory card into the slot with - Epson P6000 | Basics - Page 19
once to pop it out, then press it again to eject the card. Note: If you are using a CompactFlash adapter, remove the adapter from the viewer; do not remove only the memory card. 19 - Epson P6000 | Basics - Page 20
Using the SD Card Slot Insert an SD, SD HC, MultiMediaCard, or MMCplus card into the slot as shown below. Insert it fully into the viewer. Memory card access light To remove a card from the SD Card slot, first make sure the memory card access light is off. Then press in - Epson P6000 | Basics - Page 21
you insert a memory card (as described on page 18 or 20), you can copy all of the files on the card to Backup Files or copy selected files to the My Photos or My Videos folder on the viewer. Copying All files 1 If the Memory Card menu doesn't open automatically, use the 4-way ring or jog dial to - Epson P6000 | Basics - Page 22
Time on the Home screen (see page 11). Folders are numbered in the order they are copied. When the backup is complete, you see thumbnail images of the copied photos. Copying Selected Files 1 If the Memory Card menu doesn't open automatically, use the 4-way ring or jog dial to highlight Memory Card - Epson P6000 | Basics - Page 23
2 Select Browse CF Memory Card or Browse SD Memory Card, then press OK. You see your photos displayed. 3 Press the Menu button to display the pop-up menu. 4 Select Copy/Move, then press OK. 5 Select Select and Copy Files, then press OK. Your photos are displayed with white checkboxes: checkbox 23 - Epson P6000 | Basics - Page 24
it. The selected items are displayed with red check marks. Tip: To select all files and folders, press Menu and choose Select All. 7 When you are finished selecting photos, press OK. 8 Use the 4-way ring to select My Photos or My Videos, then press right on the 4-way ring. 9 Do one of the following - Epson P6000 | Basics - Page 25
or jog dial to select Settings and press OK. 2 Select Backup Settings and press OK. 3 Select Process After Backup and press OK. 4 Choose one of the following settings: ◗ Verify backed up data if you want the viewer to verify that the files were copied successfully. ◗ Verify & del. orig. data if you - Epson P6000 | Basics - Page 26
Non-progressive JPEG files only JPEG data stored in the header of RAW files is displayed. The P-6000/P-7000 supports .avi, .mov, .mp4, and .m4v format video files. For more details about the supported file formats, see the on-screen User's Guide. You can also check epson.com/support for the latest - Epson P6000 | Basics - Page 27
and Videos Follow the instructions in this section to view photos, create slide shows, and play videos on your P-6000/ P-7000. To share your images, slide shows, and videos with a larger audience, you can connect the viewer to a TV or projector (see page 34). Viewing Photos You can display images at - Epson P6000 | Basics - Page 28
You see a screen like this: 2 Select the image you want to view, then press OK. The selected image is enlarged to fill the screen. Zooming an Image When viewing an image at full-screen, you can zoom in or pan around to see details. ◗ To zoom in, press the + (plus) button. Keep pressing it to - Epson P6000 | Basics - Page 29
Changing How Files Are Displayed You can change your view of the files by pressing the Display button while in a folder: Thumbnails (12 per screen) Mini-thumbnails (64 per screen) Details (file name, backup/copy date, files size) 29 - Epson P6000 | Basics - Page 30
areas at both ends of the brightness range. See the on-screen User's Guide for more information. Rating Photos You can use the button to rate your photos from 1 to 5, and then view just the photos you've rated. 1 Highlight a photo you want to rate. 2 Press the button up to 5 times to change - Epson P6000 | Basics - Page 31
3 To view rated photos, select Backup Files or My Photos on the Home screen and press OK. 4 Press Menu, select Rating Filter Display, and press OK. 5 Select the rating level you want to view, and press OK. The rated photos appear on the screen. Use the Epson Link2 software to move images and their - Epson P6000 | Basics - Page 32
one of four slide transition effects, Enhanced Photo Display, or None. ◗ Duration: Choose Videos 1 Use the 4-way ring or jog dial to select the folder that contains your videos, then press OK. Note: If you've copied videos from a memory card or USB device, they're automatically stored in Backup Files - Epson P6000 | Basics - Page 33
2 Highlight the video file you want to play, then press OK. The video starts playing. Note: To set the video screen size, press Menu and select Play at Full Screen or Play at Original Size from Play Settings in the pop-up menu. Setting Play at Full Screen displays the image by adjusting the longest - Epson P6000 | Basics - Page 34
The viewer remembers where you stopped. When you resume, playback starts 3 seconds before the stop point (for videos longer than 1 rate, and video and audio codecs: Showing Photos and Videos on a TV You can connect the P-6000/P-7000 to a TV or projector and view your images, videos, and slide - Epson P6000 | Basics - Page 35
's LCD screen turns off. 3 Set the TV or projector to display video input from the viewer. Now you can use all of the viewer's controls to show photos, videos, and slide shows on your TV or projector. Note: Some TVs may crop your images at the top and bottom, or you may notice some flickering, for - Epson P6000 | Basics - Page 36
to your P-6000/P-7000 and copy files to or from the device. The viewer supports devices that are compatible with the USB Mass Storage specification, including: ◗ Digital cameras ◗ Flash memory drives ◗ Memory card readers ◗ External hard drives ◗ Epson Multimedia Storage Viewers Note: USB hubs - Epson P6000 | Basics - Page 37
device has an AC adapter, use it to prevent the possible loss of files during transfer. 1 Open the connector cover on the side of the viewer. 2 Plug the device into the Host USB connector on the side of the viewer. If the device has a USB cable, connect one end of the cable to - Epson P6000 | Basics - Page 38
menu: 3 Do one of the following: ◗ If you connected a device that contains a DCIM folder, such as a digital camera, you can copy all of the files on the device to the viewer. Select Backup USB device to Viewer, then press OK. The files are copied to a folder that is automatically created in the - Epson P6000 | Basics - Page 39
press OK. You see your photos displayed. Then follow steps 3 through 8 on page 23. 4 Wait until all the files are copied, then disconnect the USB device. Copying Files to a USB Device After you connect a USB device, you can copy all the files or selected files from the viewer to the USB device. If - Epson P6000 | Basics - Page 40
data in the viewer. 1 Follow the instructions on page 37 to connect the USB device. 2 On the Home screen, use the 4-way ring or jog dial to highlight USB Device, then press OK. 3 In the USB Device menu, select Connect to USB Device, then press OK. 4 Select Copy all Backup Files, then press OK - Epson P6000 | Basics - Page 41
or folders to copy. 1 Follow the instructions on page 37 to connect the USB device. 2 Highlight the file or folder you want to copy. 3 Press the Menu button. 4 Select Copy/Move, then press OK. 5 Select Select and Copy Files, then press OK. Your photos are displayed with white checkboxes: checkbox 41 - Epson P6000 | Basics - Page 42
copy, then press to select it. The selected items are displayed with red check marks. Tip: To select all files and folders, press Menu and choose Select All. 7 When you are finished selecting photos, press OK. 8 Select USB Device, then press right on the 4-way ring to select it. 9 Do one of - Epson P6000 | Basics - Page 43
your computer and the Epson Link2 software, or using the viewer itself. See your on-screen User's Guide for instructions on creating a playlist and adjusting audio equalizer settings. Copying Music Files from Your Computer The viewer can store up to 10,000 audio files. It supports MP3 and M4A/AAC - Epson P6000 | Basics - Page 44
LCD screen turns off. 5 Double-click the Epson Link2 icon on your desktop to open the program. 6 Click My Music, then locate the audio files you want to copy from your computer. Caution: The viewer will rename the audio files to make them playable. Always keep backup copies of your songs, and never - Epson P6000 | Basics - Page 45
cable. 9 If you see a message on the viewer asking you to update the music list, click OK. Note: Only audio files transferred from a computer can be displayed in My Music. If you want to play a music file copied from a memory card, select it in Backup Files, then press OK to play it. Playing Audio - Epson P6000 | Basics - Page 46
4-way ring or jog dial, then press OK. 2 Select Music List, then press OK. If you don't see the songs you transferred to the viewer, select Update Music List and press OK. Note: To continue playing from a previously played track, select Resume, then press OK. 3 Select a category to start playback - Epson P6000 | Basics - Page 47
Genre - Genre name - Artist name - Album name - Track name ◗ All - Track name ◗ Playlist - Playlist name - Track name ◗ Update Music List (to update audio files after transferring them from your computer) 4 Select the track you want using the 4-way ring, then press OK. Controlling Audio Playback You - Epson P6000 | Basics - Page 48
(without stopping the audio), press Back. (If you return to the main My Music screen, audio playback stops.) ◗ To display information about the audio file such as code, bit rate, and sampling rate, press Display. Setting Repeat and Shuffle Options In My Music, press the Menu button and select Play - Epson P6000 | Basics - Page 49
up from memory cards or USB drives to your own folders for special purposes, such as portfolios. You can also back up files from the viewer to your computer. Copying and Moving Files to a Folder 1 Open a folder to a thumbnail view, as shown below, and highlight the file or folder you want to copy - Epson P6000 | Basics - Page 50
Do one of the following: ◗ To copy files to another folder, select Select and Copy Files, then press OK. ◗ To move files to another folder, select Select and Move Files, then press OK. Note: To copy or move a single file, select Copy this File or Move this File, then continue with step 5. 4 Use the - Epson P6000 | Basics - Page 51
OK. Then see the next section to enter a name for the new folder and copy or move the items. Tip: It's easier to manage your files if you copy or move them into a folder you've named, instead of placing them in the root of a main folder (such as My - Epson P6000 | Basics - Page 52
. 2 To keep the current name, use the 4-way ring or jog dial to highlight Done and press OK. Your files are copied to the new folder. 3 To enter a new name, use the Back (backspace) button to clear the current it). 4 After entering the name, highlight Done and press OK. Your files are copied. 52 - Epson P6000 | Basics - Page 53
be viewing them on the thumbnail, minithumbnail, or detailed list screen (see page 29). 4 At the confirmation screen, select Yes and press OK. Your files are deleted. Note: You can lock files and folders to prevent them from being accidentally deleted. See the on-screen User's Guide for details. 53 - Epson P6000 | Basics - Page 54
Your Computer You can automatically copy all the files from the viewer's Backup Files folder to your computer. 1 Connect the AC adapter to your viewer (see page 9). 2 Turn on the viewer and your computer. 3 Use the included USB cable to connect the viewer to your computer. Larger end Smaller end - Epson P6000 | Basics - Page 55
computer may recognize the viewer as a removable drive, it is best to transfer files using the Epson Link2 software. 5 Double-click the Epson Link2 icon on your desktop to open the program. 6 If you see a message that Epson Link2 has found files in your viewer's Backup Files folder, click Yes to - Epson P6000 | Basics - Page 56
the guide.) Operating Problems The power doesn't turn on. ◗ The battery may need recharging. Connect the AC adapter as shown on page 9. ◗ The battery may need to be replaced. See page 58. You can't copy files to or from the viewer. ◗ Make sure you have sufficient space on the viewer's hard drive. To - Epson P6000 | Basics - Page 57
, or sound doesn't play correctly. ◗ If an image doesn't appear or appears as ?, it may not be in a supported file format. See page 26 for supported formats. For audio and video, make sure the bit rate and audio codec of your file are supported. See the on-screen User's Guide for details. 57 - Epson P6000 | Basics - Page 58
.ca (Canadian sales). Where To Get Help Epson provides these technical support services: Internet Support Visit Epson's support website at epson.com/support and select your product for solutions to common problems. You can download software and documentation, get FAQs and troubleshooting advice, or - Epson P6000 | Basics - Page 59
you call Epson for support, please have the following information ready: ◗ Product name (Epson P-6000 or P-7000) ◗ Product serial number (located on the bottom of the viewer) ◗ Proof of purchase (such as a store receipt) and date of purchase ◗ Computer configuration ◗ Description of the problem Then - Epson P6000 | Basics - Page 60
Additional safety information for the P-6000/P-7000 can be found in the on-screen User's Guide. See page 13 for instructions on installing and viewing the guide. Battery Safety Instructions Warning: There is a risk of explosion if the battery is replaced by the incorrect type. Use a new battery - Epson P6000 | Basics - Page 61
. ◗ Do not connect the AC adapter when the battery is not installed. Otherwise, the P-6000/P-7000 may be damaged. ◗ Remove the battery and unplug this product and refer servicing to qualified service personnel under the following conditions: The power cord or plug is damaged; liquid has entered this - Epson P6000 | Basics - Page 62
65 in Cal. Health & Safety Code § 25249.5 and following) Responsible Use of Copyrighted Materials Epson encourages each user to be responsible and respectful of the copyright laws when using any Epson product. While some countries' laws permit limited copying or reuse of copyrighted material in - Epson P6000 | Basics - Page 63
Compliance Statement For United States Users This equipment has been tested and found to comply with the limits for a class B digital device, pursuant energy and, if not installed and used in accordance with the instructions, may cause harmful interference to radio and television reception. However, - Epson P6000 | Basics - Page 64
For Canadian Users This Class B digital apparatus complies FCC rules as a Class B digital device. Each product marketed is identical to the representative unit tested and found to be compliant : Model: Product: Epson Multimedia Storage Viewer G971A (P-6000) or G971B (P-7000) Epson P-6000/P-7000 64 - Epson P6000 | Basics - Page 65
. What Epson Will Do To Correct Problems: If your Epson product requires service during the limited warranty period, please call the Epson ConnectionSM at (562) 276-4365 in the United States or (905) 708-3839 in Canada for warranty instructions and return authorization. An Epson service technician - Epson P6000 | Basics - Page 66
United States and Canada. This warranty is not transferable. This warranty does not cover damage to the Epson product caused by parts or supplies not manufactured, distributed or certified by Epson problems, interaction with nonEpson products, or service other than by an Epson Authorized Servicer. - Epson P6000 | Basics - Page 67
rights which vary from jurisdiction to jurisdiction. To find the Epson Authorized Reseller nearest you, visit our website at: www.epson.com. To find the Epson Customer Care Center nearest you, visit www.epson.com/support or write to: Epson America, Inc., P. O. Box 93012, Long Beach, CA 90809-3012 67 - Epson P6000 | Basics - Page 68
68 - Epson P6000 | Basics - Page 69
copying files to viewer, 43 to 45 file formats, 43 playing, 45 to 48 problems, 57 B Backing up memory card, 21 to 24 USB device, 38 viewer, 40, 54 to 55 Backup Files folder copying files from, 49 to 53 copying files to, 21, 38 Battery charging, 9 installing, 8 recycling, 62 replacing, 58 safety - Epson P6000 | Basics - Page 70
, 29 Folders creating, 51 to 52 renaming, 53 viewing contents, 29 H Hard drive space, 56 Headphones, 45 Hold button, 56 I Images copying to folder, 49 to 52 displaying as slide show, 31 to 32 displaying information, 30 file formats, 26 problems, 35, 57 rating, 30 to 31 viewing, 27 to 30 viewing on - Epson P6000 | Basics - Page 71
P P-6000/P-7000, see Viewer Photos, see Images Playing music, 45 to 48 videos, 32 to 34 Problems, solving, 56 to 57 Protecting files, 53 Q QuickTime, installing, 15 R Rating images, 30 to 31 RAW files, 26 Renaming folder, 53 Resetting viewer, 57 S Safety instructions, 60 to 62 Screen problems, 57 - Epson P6000 | Basics - Page 72
view, 29 Troubleshooting, 56 to 57 Turning viewer on and off, 10 TV connecting to, 34 displaying on, 34 to 35 U Unpacking, 7 USB devices connecting, 37 copying files, 38 to 42 types, 36 User's Guide about, 6 installing, 13 to 16 V Video file formats, 26 playing, 32 to 34 problems, 57 screen
-
 1
1 -
 2
2 -
 3
3 -
 4
4 -
 5
5 -
 6
6 -
 7
7 -
8
-
9
-
10
-
11
-
12
-
13
-
14
-
15
-
16
-
17
-
18
-
19
-
20
-
21
-
22
-
23
-
24
-
25
-
26
-
27
-
28
-
29
-
30
-
31
-
32
-
33
-
34
-
35
-
36
-
37
-
38
-
39
-
40
-
41
-
42
-
43
-
44
-
45
-
46
-
47
-
48
-
49
-
50
-
51
-
52
-
53
-
54
-
55
-
56
-
57
-
58
-
59
-
60
-
61
-
62
-
63
-
64
-
65
-
66
-
67
-
68
-
69
-
70
-
71
-
72
 |
 |

P-6000/P-7000
Basics