Epson P5000 User's Guide
Epson P5000 - Digital AV Player Manual
 |
UPC - 010343860483
View all Epson P5000 manuals
Add to My Manuals
Save this manual to your list of manuals |
Epson P5000 manual content summary:
- Epson P5000 | User's Guide - Page 1
P-5000 User's Guide - Epson P5000 | User's Guide - Page 2
or alterations to this product, or (excluding the U.S.) failure to strictly comply with Seiko Epson Corporation's operating and maintenance instructions. Seiko Epson Corporation shall not be liable for any damages or problems arising from the use of any options or any consumable products other than - Epson P5000 | User's Guide - Page 3
. and are used under license. General Notice: Other product names used herein are for identification purposes only and may be trademarks of their respective owners. Epson disclaims any and all rights in those marks. Patents: 5,809,336 5,784,584 6,598,148 © 2007 - Epson P5000 | User's Guide - Page 4
and Buttons 9 Installing the Battery 10 Charging the Battery 10 Removing the Battery 11 Turning On the Power 12 Setting the Language, Date 22 Chapter 3 Viewing Photos and Videos Using the Viewer Screen 23 Changing the Display 24 Using the Pop-up Menu 24 Supported Image Formats 25 Viewing - Epson P5000 | User's Guide - Page 5
34 Supported Audio Formats 36 Playing Audio Files 36 Setting Repeat and Shuffle Options 38 Creating a Playlist 38 Creating a Playlist on the Viewer 54 Rating Photos 54 Selecting a Screen Saver 55 Chapter 6 Printing Connecting the Viewer to a Printer 56 Printing Your Photos 57 Printing - Epson P5000 | User's Guide - Page 6
Solutions 64 Power Problems 64 File Viewing Problems 65 File Operation Problems 66 Printing Problems 67 Updating the Firmware and Printer Driver 67 Uninstalling Software 67 Windows 67 Macintosh 68 Resetting the Viewer 68 Replacing the Battery 69 Where To Get Help 69 Internet Support 69 - Epson P5000 | User's Guide - Page 7
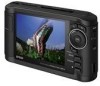
Introduction With the Epson® P-5000 multimedia viewer, you can enjoy photos, videos, and music wherever you go. Your images are displayed on Epson's exclusive 4-inch Photo Fine™ Ultra LCD in brilliant color and detail. Features ❍ Large 4-inch LCD with true Adobe® RGB color gamut ❍ Support for JPEG - Epson P5000 | User's Guide - Page 8
slot eject button Headphone connector Power switch with Hold function Liquid Crystal Display (LCD) Strap hook Host USB connector (for camera, flash drive, etc.) Device USB connector A/V Out connector (for computer) Rubber cover BATT. Battery cover Speaker AC adapter connector Reset - Epson P5000 | User's Guide - Page 9
Lights and Buttons Activity light Flashes blue during power on, printing, file transfer, and computer connection 4-way ring Press to select a photo or navigate the menus Charge light Green for battery charging; orange for problems Zoom buttons Press to zoom in or out, or adjust the volume for - Epson P5000 | User's Guide - Page 10
compartment in the direction of the arrow on the battery. Charging the Battery After installing the battery, you need to charge it using the AC adapter. It takes about 3.5 hours to fully charge the battery when the viewer is off, and longer when the viewer is on. The Charge light is green while the - Epson P5000 | User's Guide - Page 11
the LCD screen when the viewer is on. Battery is fully charged. Battery power is about half full. Battery power is low. Battery power is running out. Charge the battery using the AC adapter. Battery is charging. Note: The battery may become hot when the viewer is operated during charging. Charging - Epson P5000 | User's Guide - Page 12
battery. Then close the battery cover. Setting the Language, Date, and Time The first time you turn on the viewer, you see the Language setting screen: Turning On the Power Slide the power select Settings on the Home screen. Then follow the instructions in "Date and Time" or "Language" on page 62 - Epson P5000 | User's Guide - Page 13
14 for details. Note: If you remove the battery, the date and time settings will be erased after about one day. The next time you turn on the viewer, the date and time setting screen will be displayed. To unlock the buttons, slide the power switch back to the middle position. Getting Started - Epson P5000 | User's Guide - Page 14
the Home Screen Whenever you turn on the viewer, the Home screen appears. All operations can be started from this screen. Hold icon SD icon CF icon Home My Music View Rated Files My Videos My Photos Backup Files Memory Card USB Device Settings Battery icon 20122006.001 19122006.002 19122006.001 - Epson P5000 | User's Guide - Page 15
below, and hold it down for a few seconds until the activity light flashes and the viewer turns off. Memory card access light Hold Activity light Saving Power When you are not using the viewer, it goes into one of the power-saving modes listed below. You can adjust the timing for all of the - Epson P5000 | User's Guide - Page 16
viewer supports the following types of memory cards: Memory card type CompactFlash Card (Type I and Type II) Microdrive™ SD (Secure Digital) and SD High Capacity Card MultiMedia Card and Multimedia instructions included with your memory card. Never remove a memory card, or shake or drop the viewer - Epson P5000 | User's Guide - Page 17
once to pop it out, then press it again to eject the card. Note: If you are using a CompactFlash adapter, remove the adapter from the viewer; do not remove only the memory card. Caution: Make sure you insert memory cards in the correct orientation. Otherwise, the card and - Epson P5000 | User's Guide - Page 18
Using the SD Card Slot You can use Secure Digital or MultiMedia cards in the SD Card slot. Insert the memory card into the sure you insert memory cards in the correct orientation. Otherwise, the card and viewer may be damaged. When the card pops up, pull it out of the slot. Using Memory Cards 18 - Epson P5000 | User's Guide - Page 19
, or simply copy all the files on the card to the viewer. Note: If the battery power is low, copying may not be completed. Use the AC adapter 22. When the backup is complete, you see thumbnail images of the copied photos. Note: The files on the memory card can be automatically deleted after copying - Epson P5000 | User's Guide - Page 20
it. The selected items are displayed with red check marks. 7 When you are finished selecting photos, press OK. The files are copied to a folder that is automatically created in the Backup Files folder on the viewer. The folder is named according to the date and the date format you selected, for - Epson P5000 | User's Guide - Page 21
from a memory card to a new or existing folder in My Videos or My Photos. 1 Insert a memory card. If the Memory Card Menu doesn't open automatically, appear on each thumbnail image. 6 Use the 4-way ring to highlight each photo you want to copy, then press the button to select it. The selected items - Epson P5000 | User's Guide - Page 22
Creating a New Folder and Copying Files You can create a folder and copy files to it from a memory card, USB device, or from Backup Files. 1 To copy items to a new folder, follow the steps in the previous section. When you select Create New Folder and press OK, the on-screen keyboard appears with - Epson P5000 | User's Guide - Page 23
files from a memory card, you can view or play them in various ways. This chapter explains how to view photos and video files on your viewer and on a TV or projector. Using the Viewer Screen The following illustrations identify the icons that appear on the screen: Rated file Private folder My - Epson P5000 | User's Guide - Page 24
options currently available. These options vary, depending on what you are doing with the viewer. The following table summarizes the menu functions: Audio Track Setting Copy/Move Delete Display mode Display photo enhance Selects the audio track for DivX videos that have multiple tracks. Copies or - Epson P5000 | User's Guide - Page 25
renames folders, (page 51), or rotates photos (page 29). Rates files from one to 5 stars. See page 54. Prints photo images. See page 57. Sets the display : TIFF files and progressive JPEG files are not supported. For DNG files, the viewer supports only the JPEG preview embedded in files saved with - Epson P5000 | User's Guide - Page 26
full screen, zoom in, or show several types of photographic information. 1 Use the 4-way ring to select My Photos or Backup Files. Home My Music View Rated Files My Videos My Photos Backup Files Memory Card USB Device Settings 2006.1205 sample 2 Press OK. 3 Select the folder containing the images - Epson P5000 | User's Guide - Page 27
OK. Displaying Information You can view metadata and Exif information, a histogram, and a visual alert indicating poorly exposed highlight and shadow areas of your photos. 1 To view the file name and date for a full-screen image, press the Display button. 2 To view metadata, Exif information, and - Epson P5000 | User's Guide - Page 28
3 To view the over- and under-exposure preview, press Display a third time: Note: Display Photo Enhance affects only the image shown on the viewer, and does not change the file itself. The Menu, Display, , , and buttons are not available in this mode. 1 When you are viewing a full-screen image, - Epson P5000 | User's Guide - Page 29
See "Slide Show" on page 61 for details. Rotating an Image Images that contain rotation information are automatically rotated on the viewer. You can also rotate an image manually in My Photos. 1 Select the image in thumbnail view, then press the Menu button to display the pop-up menu. 2 Select Edit - Epson P5000 | User's Guide - Page 30
ranging from 320 × 240 pixels to 720 × 576 pixels, with file sizes up to 2GB. Supported Video Formats File format .avi Video codec MPEG-4 (Advanced Simple Profile) Motion JPEG .avi .divx DivX (avg.) 30 fps: 720 × 480 25 fps: 720 × 576 8 Mbps (peak) 4 Mbps (avg.) Viewing Photos and Videos 30 - Epson P5000 | User's Guide - Page 31
Note: DVD-Video, DivX menu, and WMV DRM are not supported. To display your viewer's DivX VOD registration code, see "Movie Setting" on page 61. Playing Videos You can transfer video files including frame rate, bit rate, and video and audio codecs: :15/12/2006 12:24 Viewing Photos and Videos 31 - Epson P5000 | User's Guide - Page 32
a wider color space than sRGB ❍ Power saving: to lower the backlight and save battery life ❍ Original: to display video viewer. The viewer's LCD screen turns off. 3 Set the TV or projector to display video input from the viewer. You can use all of the viewer's controls to play slide shows, photos - Epson P5000 | User's Guide - Page 33
on the top and bottom, or you may notice some flickering, for example, near the edges of the screen. This is a normal result of your viewer's high image resolution. Viewing Photos and Videos 33 - Epson P5000 | User's Guide - Page 34
how to transfer and play music, and how to manage your audio files on the viewer. Copying Music From Your Computer First, make sure you have installed the Epson Link2 software, following the instructions in your P-3000/P-5000 Basics guide. If you want to copy files from a music CD, you first need to - Epson P5000 | User's Guide - Page 35
a message on the viewer asking you to update the music list, click OK. Note: Only audio files transferred from a computer can be displayed in My Music. If you want to play a music file copied from a memory card, select it in Backup Files, then press OK to play it. Caution: Epson Link2 uses ID3 - Epson P5000 | User's Guide - Page 36
-compliant M4A and WMA files. Some files may not be played, even if the formats are supported. Playing Audio Files You can connect headphones to the jack on top of the viewer, or listen through the viewer's built-in speaker. 1 Select My Music on the Home screen using the 4-way ring, then press - Epson P5000 | User's Guide - Page 37
Album name Track name ❍ All - Track name ❍ Playlist - Playlist name - Track name (for details, see "Creating a Playlist" on page 38) ❍ Update Music List (to update audio data after transferring from your computer.) 4 Select the desired track using the 4-way ring, then press OK. 00001/00568 You can - Epson P5000 | User's Guide - Page 38
Order Creating a Playlist You can create playlists using the Epson Link2 software, or on the viewer itself. Follow the steps below to create a playlist using Epson Link2, or see "Creating a Playlist on the Viewer" on page 39. 1 Connect the viewer to your computer as described on page 34. 2 Double - Epson P5000 | User's Guide - Page 39
buttons in the lower right corner of the screen to rearrange the songs and edit the lists. Creating a Playlist on the Viewer You can also create and edit playlists on the viewer. 1 In My Music, press the Menu button to display the pop-up menu. 2 Select Add to Playlist, then press OK - Epson P5000 | User's Guide - Page 40
want to remove using the 4-way ring and the button, then press OK. The tracks are removed from the playlist, but not deleted from the viewer. Changing the Order of a Playlist 1 Select a playlist in My Music, then select a track you want to move. 2 Press Menu, then select Change Song Order. 3 Press - Epson P5000 | User's Guide - Page 41
ring, then press OK. Note: You may need to listen with headphones to hear the effects of the various settings. Deleting Audio Files From the Viewer 1 In My Music, press the Menu button to display the pop-up menu. 2 Select Delete. 3 Select audio files to delete using the 4-way ring and - Epson P5000 | User's Guide - Page 42
You can use the Epson Link2 software to back up files from the viewer to your computer and copy files from your computer to the viewer. Make sure you have installed the software, following the instructions in your P-3000/P-5000 Basics guide. 1 Connect the AC adapter to the viewer and plug it in - Epson P5000 | User's Guide - Page 43
box is displayed, select whether to delete or keep the transferred files in the viewer. Note: You can also select individual video or photo files to transfer from the viewer to your computer. For instructions, click the ? in the upper right corner of the Epson Link2 screen. Managing Files 43 - Epson P5000 | User's Guide - Page 44
Your Computer to the Viewer You can copy photos, videos, and music from your computer to the viewer. For instructions on copying music, see Connect the viewer to your computer as described on page 42. 2 Double-click the Epson Link2 icon on your desktop to open the program. 3 Select Photos, Videos, - Epson P5000 | User's Guide - Page 45
computer. You can also change the conversion settings for video files transferred from your computer to the viewer. In Windows, you can also change the conversion settings for audio files. 1 Double-click the Epson Link2 icon on your desktop to open the program. 2 Click the settings icon in the upper - Epson P5000 | User's Guide - Page 46
device to your viewer and copy files to or from the device. The viewer supports devices that are compatible with the USB Mass Storage specification, including: ❍ Digital cameras ❍ Flash memory drives ❍ Memory card readers ❍ External hard drives ❍ Epson multimedia storage viewers Managing Files 46 - Epson P5000 | User's Guide - Page 47
Note: USB hubs are not supported, and some USB devices may not work without a power connection. Epson cannot guarantee the compatibility of any device. Connecting a USB Device Before you connect a USB device, connect the AC adapter to the viewer and plug it in if possible. If your USB device has an - Epson P5000 | User's Guide - Page 48
in before starting. Backing Up All Files to a USB Device This process may take some time, depending on the volume of data in the viewer. 1 Follow the instructions on page 47 to connect the USB device. 2 On the Home screen, use the 4-way ring to highlight USB Device, then press OK. 3 In - Epson P5000 | User's Guide - Page 49
the instructions on page 47 to connect the USB device. 2 Select the file or folder you want to copy. 3 Press the Menu button. My Photos/2006. view the files. Note: Even if folders are set as private folders on the viewer, they may still be viewed on a computer, depending on the computer setting. - Epson P5000 | User's Guide - Page 50
1201 4 If you have already set a password for your viewer, enter the 4-digit password number using the 4-way ring, then press OK. If you have not set a password, leave the password at the default setting, 0000, and press OK. For instructions - Epson P5000 | User's Guide - Page 51
the name, select Done, then press OK. Deleting Files and Folders You can delete files and folders from the viewer using the menu and buttons as described below. To use the Link2 software for deletion, click the ? in the upper right corner of the Link2 screen. 1 Select a folder or file to delete - Epson P5000 | User's Guide - Page 52
all, or Apply. If you are viewing a full-screen photo, press Menu and select Delete to enter deletion mode. Select Delete again, then press OK. You can display additional photos to delete by pressing right or left on the 4-way ring. To cancel - Epson P5000 | User's Guide - Page 53
OK to lock the files or folders. If you are viewing a full-screen photo, press Menu, select Edit, then select Lock/Unlock to enter lock mode. Check , or Apply. Select Lock or Unlock then press OK. You can display additional photos to lock by pressing right or left on the 4-way ring. To cancel, - Epson P5000 | User's Guide - Page 54
. When you copy a rated file to your computer, you must use the Epson Link2 software to copy the rating information. You can then move your rated files into Adobe Bridge. To rate a single photo, select it in My Photos or Backup Files, then press the button to rate it. Continue pressing the button - Epson P5000 | User's Guide - Page 55
to be used as a screen saver. The photos in the folder will be displayed as a slide show when the viewer is plugged in using the AC adapter and is inactive for 3 minutes. If you want to change the timing for the screen saver, see "Power Save" - Epson P5000 | User's Guide - Page 56
Paper Glossy 4 × 6 in., Letter Epson Premium Photo Paper Glossy 4 × 6 in., 5 × 7 in., 8 × 10 in., Letter Epson Premium Photo Paper Semigloss 4 × 6 in., Letter Epson Photo Paper Glossy 4 × 6 in., Letter, A4 Connecting the Viewer to a Printer Refer to your printer manual to locate the external - Epson P5000 | User's Guide - Page 57
01 01 00 EPSN0001.JPG EPSN0002.JPG EPSN0003.JPG EPSN0004.JPG 00 EPSN0005.JPG Note: Disconnect the USB cable from the viewer when not operating with a computer or printer. Printing Your Photos Make sure the printer is turned on and has paper and ink. Make sure the AC adapter is connected to - Epson P5000 | User's Guide - Page 58
preview of the color when you print with PhotoEnhance™ on an Epson printer, press Display. 6 In the Print Settings screen, specify display. 5 Once you have selected all of the photos and set the number of prints for each, press OK. The viewer checks the printer connection, and you see the Print - Epson P5000 | User's Guide - Page 59
per sheet on 4 × 6-inch paper only. Make sure the printer is connected and has paper and ink, and the AC adapter is connected to the viewer. 1 Start playing the video. 2 When you see the frame you want to print, press OK to pause the video. You can press left or right - Epson P5000 | User's Guide - Page 60
Use this option to check the available space on the viewer's hard drive and also on any memory cards that are loaded in the viewer. The total file size is also given for all files in the Backup, My Photos, My Videos, and My Music folders. Power Save Use the following options to adjust how the - Epson P5000 | User's Guide - Page 61
the file by the camera that took the photo. ❍ Unsupported Files to set whether unsupported files are displayed on the viewer. If you select viewer: ❍ DivX Reg. Code to display the DivX registration code. This code is required when you buy copyright-protected DivX VOD video content for downloading. - Epson P5000 | User's Guide - Page 62
in the image is unspecified. Select sRGB or AdobeRGB. Date and Time If you remove the battery, the date and time settings will be erased after about one day. Use this screen to re Lets you choose one of ten languages. Firmware Version Displays the viewer's firmware version. Customizing Settings 62 - Epson P5000 | User's Guide - Page 63
to be copied. Check the files and try again. Cannot access the hard drive. There may be a problem with the hard drive, or it may not be formatted as FAT32. Backup all the data to the computer and contact Epson as described in "Where To Get Help" on page 69. Maintenance and Troubleshooting 63 - Epson P5000 | User's Guide - Page 64
the printer's manual to make sure it's PictBridge-compatible. Turn off the viewer and wait until it cools down. The battery power is running out. Charge the battery. For details, see "Charging the Battery" on page 10. Press the reset button. See "Resetting the Viewer" on page 68. Problems and - Epson P5000 | User's Guide - Page 65
" on page 30 or "Supported Audio Formats" on page 36. The LCD is too dark. Adjust the LCD brightness. See "View Mode" on page 62. The screen may have turned off automatically to save power. Press any button to turn the screen on. If you've connected the viewer to your TV or - Epson P5000 | User's Guide - Page 66
Video Formats" on page 30 or "Supported Audio Formats" on page 36 for details. File Operation Problems You cannot copy a file or files. Cause What to do There is not enough space Check the hard drive space. See available on the hard drive "Hard Drive Capacity" on page 60. to copy all - Epson P5000 | User's Guide - Page 67
an image to print. Updating the Firmware and Printer Driver Epson will occasionally update the viewer firmware. You can download the latest firmware for the viewer from Epson's support website. Instructions for updating the firmware are provided online. Uninstalling Software If you need to - Epson P5000 | User's Guide - Page 68
to restart, click Restart Now. Macintosh 1 Connect the viewer to your Macintosh. 2 Double-click the P-5000 drive on your desktop. 3 Double-click the installation software. 4 Select Custom Install. 5 Select Epson Link2. 6 On the software installation screen, select Uninstall. 7 When you see a message - Epson P5000 | User's Guide - Page 69
com (U.S. sales) or www.epson.ca (Canadian sales). Where To Get Help Epson provides these technical support services: Internet Support Visit Epson's support website for solutions to common problems with your viewer. You can download software and documentation, get FAQs and troubleshooting advice, or - Epson P5000 | User's Guide - Page 70
, or Windows Vista. ❍ At least 256MB RAM ❍ 100MB free hard disk space for installation, 2GB required for operation ❍ SVGA monitor (800 × 600), 16-bit color or higher ❍ USB type A connector Macintosh System Requirements To use your viewer software, your system should have: ❍ 700 MHz G4 processor or - Epson P5000 | User's Guide - Page 71
unusual noises, odors, or smoke, cancel the current operation and turn it off immediately. Remove the battery and disconnect the AC adapter from the viewer, then unplug the AC adapter from the power outlet. Contact Epson. ❍ Do not use your headphones for long periods at high volume as this can cause - Epson P5000 | User's Guide - Page 72
treatment immediately. ❍ Use only an Epson lithium-ion battery for the viewer according to the instructions in this manual. ❍ Use only AC adapter model A351H and the viewer (Model G961A/G961B) to charge batteries. ❍ Do not use the battery that comes with the viewer for other devices. ❍ To protect - Epson P5000 | User's Guide - Page 73
you are ready to dispose of the battery, contact the RBRC at (800) 822-8837. Using the AC Adapter ❍ Use only the type of power source indicated on the AC adapter's label, and always supply power directly from a standard, domestic power outlet with a power cord that meets the relevant local safety - Epson P5000 | User's Guide - Page 74
Do not connect the AC adapter when the battery is not installed. Otherwise, the viewer may be damaged. ❍ Use only the power source that meets the power requirements indicated on the label attached to the product. If you are not sure of the power supply specifications in your area, contact your local - Epson P5000 | User's Guide - Page 75
is damaged, contact Epson. ❍ If the liquid crystal solution contained in the LCD panel on the viewer leaks out and gets onto your hands, wash them thoroughly with soap and water. If it gets into your eyes, flush them immediately with water. If discomfort or vision problems remain after a thorough - Epson P5000 | User's Guide - Page 76
battery and unplug the viewer and refer servicing to qualified service personnel under the following conditions: The power cord or plug is damaged; liquid has entered the viewer or its options; the viewer or its options have been dropped or the case is damaged; the viewer Approvals Epson P-5000 EMC - Epson P5000 | User's Guide - Page 77
or less Non-operating: 12000 m or less Memory card: Power sources: Battery life (when fully charged)*: CompactFlash memory card (Type I/ Type II, including Microdrive); SD memory card, SD High-Capacity Card, MultiMedia Card, MultiMedia Card Plus Note: A commercially available CF adapter is needed - Epson P5000 | User's Guide - Page 78
Power consumption: DC 5.0 V Maximum 2.3 A 6.3 W (when using the battery) 7.9 W (when using the AC adapter) Interface USB connector: Two USB 2.0 (Mass Storage memory card or MultiMedia card Battery Type: Model: Size: (H × W × D) Ratings: Temperature: Rechargeable lithium-ion battery D111A 0.88 - Epson P5000 | User's Guide - Page 79
Activity light, 12 Adobe Bridge, 55 AdobeRGB, 28, 62 Audio conversion, 46 copying files to viewer, 34 to 35 creating playlist, 38 to 40 deleting files, 41 equalizer, 41 file formats, 36 playing, 36 to 41 problems, 65 to 66 repeat and shuffle, 38 B Backing up from memory cards, 19 to 21 - Epson P5000 | User's Guide - Page 80
, 10 Charging the battery, 10 to 11 Cleaning the viewer, 63 Codec, 30 devices, 47 to 49 problems, 66 Customizing settings, 60 Photo Enhance, 28 DivX, 30, 61 DNG files, 25 E Eject button, 8 Electrical specifications, 78 Epson Link2, 35, 38, 42 to 46 printers, 56 purchasing battery, 69 technical support - Epson P5000 | User's Guide - Page 81
copying, 66 problems viewing, 65 rating, 54 to 55 Firmware, updating, 67 Firmware version, 62 Folders changing display, 24 copying files to, 21 creating, 22 deleting, 51 locking, 53 renaming, 51 setting as private, 49 to 51 setting as screen saver, 55 setting icon, 54 H Hard drive capacity, 60 - Epson P5000 | User's Guide - Page 82
problems, 65 file formats, 25 printing, 56 to 59 rating, 54 to 55 rotating, 29, 61 viewing, 26 to 29 zooming, 27 Installing battery, 10 Interface specifications, 78 J JPEG files, 25 L Language setting, 12, 62 LCD, 8, 65, 75 Lights, 9 Link2 software 19 to 21 safety instructions, 75 types, 16 Memory Card - Epson P5000 | User's Guide - Page 83
, 59 Private folders, 49 Problems audio and video, 65 to 66 copying and deleting files, 66 power, 64 printing, 67 solving, 63 to 67 viewing files, 65 Projector, connecting to, 32 Protecting files, 53 R Rating photos, 54 to 55 RAW files, 25 Reset button, 8, 68 Resetting the viewer, 68 Rotating images - Epson P5000 | User's Guide - Page 84
, 12 to 13 Troubleshooting audio and video problems, 65 to 66 error messages, 63 to 64 file operation problems, 66 file viewing problems, 65 power problems, 64 printing problems, 67 Turning off power, 15 Turning on power, 12 TV, connecting to, 32 U Underexposure preview, 27 Updating firmware, 67 USB - Epson P5000 | User's Guide - Page 85
V Video codec, 30 conversion, 46 display modes, 32 DivX registration code, 61 file formats, 30 playing, 30 to 31 printing, 59 problems, 65 to 66 screen size, 31 selecting NTSC or PAL, 62 settings, 61 View Rated Files, 14 W Wallpaper, 54 Windows disconnecting from, 44 system requirements,
-
 1
1 -
 2
2 -
 3
3 -
 4
4 -
 5
5 -
 6
6 -
 7
7 -
8
-
9
-
10
-
11
-
12
-
13
-
14
-
15
-
16
-
17
-
18
-
19
-
20
-
21
-
22
-
23
-
24
-
25
-
26
-
27
-
28
-
29
-
30
-
31
-
32
-
33
-
34
-
35
-
36
-
37
-
38
-
39
-
40
-
41
-
42
-
43
-
44
-
45
-
46
-
47
-
48
-
49
-
50
-
51
-
52
-
53
-
54
-
55
-
56
-
57
-
58
-
59
-
60
-
61
-
62
-
63
-
64
-
65
-
66
-
67
-
68
-
69
-
70
-
71
-
72
-
73
-
74
-
75
-
76
-
77
-
78
-
79
-
80
-
81
-
82
-
83
-
84
-
85
 |
 |

User’s Guide
P-5000