Epson L500V Camera Basics
Epson L500V - PhotoPC Digital Camera Manual
 |
UPC - 010343851726
View all Epson L500V manuals
Add to My Manuals
Save this manual to your list of manuals |
Epson L500V manual content summary:
- Epson L500V | Camera Basics - Page 1
Camera Basics - Epson L500V | Camera Basics - Page 2
are service marks of Epson America, Inc. General notice: Other product names used herein are for identification purposes only and may be trademarks of their respective owners. Epson disclaims any and all rights in those marks. Responsible Use Of Copyrighted Materials Digital cameras, like - Epson L500V | Camera Basics - Page 3
Memory Card 11 Installing the Battery 12 Turning Your Camera On and Off 13 Setting the Language, Date, and Time 14 Installing the Software 15 Taking and Viewing Photos 17 Taking Photos in Automatic Mode 18 Taking Photos in Manual Mode 20 Camera Settings 22 Continuous Shooting 23 - Epson L500V | Camera Basics - Page 4
40 Solving Problems 41 Camera Problems 41 Image Problems 43 Miscellaneous Problems 44 List of Error Messages 45 Where To Get Help 47 Appendix 49 Specifications 49 Important Safety Instructions 50 FCC Compliance Statement 56 Declaration of Conformity 57 Epson America, Inc - Epson L500V | Camera Basics - Page 5
and playback ◗ 16MB Secure Digital (SD™) memory card ◗ Rechargeable lithium ion battery and charger ◗ Continuous shooting mode that lets you take up to three photos per second ◗ Direct printing to supported Epson Stylus® Photo and PictureMate™ printers ◗ Epson PRINT Image Framer® (P.I.F.™) for - Epson L500V | Camera Basics - Page 6
the included frames ◗ P.I.F. Tool for transferring frames from your computer to the camera ◗ Your Epson L-500V Reference Guide, which includes information and instructions for all the features of your camera ◗ A USB driver that lets you transfer photos to your computer in Windows 98SE. (If you - Epson L500V | Camera Basics - Page 7
Optional Accessories Epson offers an AC adapter (B867062) for use with any standard electrical outlet. This is particularly useful when you are printing from the camera. See your on-screen Reference Guide for instructions on using it. Epson also offers a lithium ion battery (B32B818242) that you can - Epson L500V | Camera Basics - Page 8
the camera's features, including troubleshooting tips. To open the guide, double-click the icon on your computer desktop. See page 15 for instructions on installing the Reference Guide. ◗ For instructions on using the P.I.F. software, open the Help menu and select User's Guide. ◗ If you still have - Epson L500V | Camera Basics - Page 9
13) ◗ Set the current date and time (page 14) ◗ Install the software on your computer (page 15). Make sure you have all the items shown below: Camera Lithium ion battery Battery charger Charger power cable SD memory card Software CD-ROM USB cable (for connecting to a printer or computer) 9 - Epson L500V | Camera Basics - Page 10
. 1 Connect the small end of the battery charger power cable to the charger, then plug the power cable into an electrical outlet. 2 Place the battery into the charger. The charge light comes on red. If it doesn't come on, reinstall the battery in the charger. 3 When the charge light turns green - Epson L500V | Camera Basics - Page 11
memory card. Make sure you insert the card in the correct orientation, or you may damage the camera and card. 1 Make sure the camera is turned off. 2 Turn the camera on its left side. 3 Slide the battery cover until it pops up. 4 Position the card as shown Notch and slide it all the way - Epson L500V | Camera Basics - Page 12
out. 3 Pull out the memory card, then press down on the battery cover and slide it back into place. Installing the Battery 1 Turn the camera on its left side. 2 Slide the battery cover until it pops up as shown: 3 Insert the battery into the compartment, positioning it as shown with the arrow facing - Epson L500V | Camera Basics - Page 13
cover and slide it back into place. To remove the battery, open the battery cover as described in step 2, then release the white battery catch and take out the battery. Turning Your Camera On and Off Before turning on your camera, remove the protective film sheet covering the LCD screen. ◗ To - Epson L500V | Camera Basics - Page 14
the first time, you need to set the language, date, and time. 1 Turn on the camera. 2 If you see the language screen, move the joystick to r to select English, then press the OK button. Move the joystick to u and press the - Epson L500V | Camera Basics - Page 15
To use all of your camera's special features, install the software on your computer from the camera's CD-ROM. Windows 1 Insert the CD-ROM in your CD-ROM or DVD drive. The Installer starts automatically. If it doesn't start, select My Computer and double-click Epson. 2 Read the license agreement - Epson L500V | Camera Basics - Page 16
your CD-ROM or DVD drive. 2 Double-click the Epson CD-ROM icon if necessary, then double-click the Epson icon. 3 Read the license agreement, then click Agree. You do this more than once. 6 Follow the on-screen instructions to install each program. Click Quit to continue, as needed. 7 When - Epson L500V | Camera Basics - Page 17
adjusted settings for great snapshots. All you have to do is point and shoot. See page 18. ◗ Manual photos: Fine-tune your shots by adjusting a variety of camera settings, including resolution, exposure compensation, sensitivity, white balance, and more. See page 20. ◗ Continuous photos: Capture - Epson L500V | Camera Basics - Page 18
your computer. See page 15 for instructions on installing the Reference Guide and software. 1 Turn the Mode dial to automatic. 2 Make sure you are at least 20 inches (50 cm) away from your subject. Note: To turn on digital zoom, see the Reference Guide on your computer. ◗ To zoom in on your subject - Epson L500V | Camera Basics - Page 19
the focus is set. If you want to reframe your picture, move the camera until the photo you want appears on the screen. Note: If the focus Press the shutter button all the way down. The camera beeps as it captures the image. Note: To turn off the camera's beep sound, turn the Mode dial to SETUP, - Epson L500V | Camera Basics - Page 20
you start, make sure the batteries are installed and the camera is turned on, as described on page 12. 1 Turn the Mode dial to manual. 2 If you want to inches (50 cm) away from your subject. Note: To turn on digital zoom, see the Reference Guide. ◗ To zoom in on your subject, press the T (telephoto) - Epson L500V | Camera Basics - Page 21
the focus is set. If you want to reframe your picture, move the camera until the photo you want appears on the screen. Note: If the focus Press the shutter button all the way down. The camera beeps as it captures the image. Note: To turn off the camera's beep sound, turn the Mode dial to SETUP, - Epson L500V | Camera Basics - Page 22
Battery life Digital zoom indicator Note: You can turn off display of the settings or select the amount of information shown. See your Reference Guide for instructions. Settings and Icons Self-timer Outdoor mode Focus frame Battery life Zoom bar (2 seconds), (10 seconds) If you have trouble - Epson L500V | Camera Basics - Page 23
red-eye reduction, Fill-in flash, Slow synchro Shooting mode Continuous shooting mode, Video mode Photos left 125 (for example) Warning Camera shake (appears when camera shakes or shutter speed is 1/30 or slower; use a tripod) Continuous Shooting In Continuous Shooting mode, you can capture - Epson L500V | Camera Basics - Page 24
sure you are at least 20 inches (50 cm) away from your subject. Note: To turn on digital zoom, see the Reference Guide. ◗ To zoom in on your subject, press the T (telephoto) button. To zoom in more, release the button and press it again. ◗ To zoom out, press - Epson L500V | Camera Basics - Page 25
your subject, press the T (telephoto) button. To zoom out, press the W (wide-angle) button. (Once you start recording, you can only zoom if you have digital zoom turned on; see your Reference Guide for instructions.) 25 - Epson L500V | Camera Basics - Page 26
when you install the camera software. You can use the PRINT Image Framer Tool to copy the frames from your computer to your memory card. See the Reference Guide for details. You can also modify the frames or create original frames using PIF Designer. See page 15 for instructions on installing the - Epson L500V | Camera Basics - Page 27
To take a picture with a frame: 1 Turn the Mode dial to automatic, manual, or continuous. 2 Press the P.I.F. button. The first frame stored in the camera is displayed. 3 Select the frame you want by moving the joystick to u or d, then press the OK button. The selected frame is displayed on the - Epson L500V | Camera Basics - Page 28
photo directly from the camera on supported Epson printers; see page 33. Note: You can also add or change a frame on an existing photo. See page 32 for instructions. If you have the Epson Stylus Photo RX500, you can print photos with P.I.F. frames by removing the camera's memory card, inserting it - Epson L500V | Camera Basics - Page 29
2 To view up to 12 photos at once, press the W button (press it repeatedly if you've zoomed in). ◗ To select a photo, move the joystick to u, d, l, or r. ◗ To view the selected photo on the full screen, press the T or OK button. Viewing a Slide Show 1 Turn the Mode dial to playback. The last photo - Epson L500V | Camera Basics - Page 30
Deleting Photos You can easily delete photos one at a time, delete all the photos in the camera, or delete a group of continuous photos. Deleting Photos One at a Time 1 Turn the Mode dial to playback. 2 To delete the currently displayed photo, move the - Epson L500V | Camera Basics - Page 31
Deleting a Group of Continuous Photos 1 Turn the Mode dial to playback. 2 Move the joystick to l or r to display one of a group of continuous photos. 3 Press the MENU button. Playback Menu 1 is displayed. 4 Select Delete Group by moving the joystick to d, and then to r. The continuous photo deletion - Epson L500V | Camera Basics - Page 32
add, change, or remove a P.I.F. frame on an existing photo using the frames stored in your camera. (See page 26 for more information about P.I.F.) 1 Turn the Mode dial to playback. 2 print your framed picture directly from the camera on supported Epson printers. For instructions, see page 33. 32 - Epson L500V | Camera Basics - Page 33
. (You cannot print photos with P.I.F. frames from your computer.) These printers are supported for direct printing from the camera: ◗ Epson Stylus Photo R300 ◗ Epson Stylus Photo RX600 ◗ PictureMate If you have the Epson Stylus Photo RX500, you can print photos with P.I.F. frames by removing the - Epson L500V | Camera Basics - Page 34
printer. Make sure the camera is turned off before you begin. USB cable You can conserve battery power by using the optional AC adapter when you print from the camera. See the Reference Guide on your computer for instructions. 1 Connect the large end of the USB cable to the correct EXT I/F port - Epson L500V | Camera Basics - Page 35
Printing Photos You can print all the photos in the camera or select the ones you want to print. Images with P.I.F. frames must be printed directly from the camera on a supported Epson printer; see page 33 for a list of supported printers. Before you start, make sure your printer is set up and has - Epson L500V | Camera Basics - Page 36
button. Note: If you need to cancel printing, press the MENU button. Printing All Your Saved Photos 1 Connect the camera to the printer as described on page 34 and turn on the camera. 2 Turn the Mode dial to playback 3 Press the print button. You see the print menu. 4 Select All Images by - Epson L500V | Camera Basics - Page 37
the print button to start printing. When printing is complete, press the OK button. Printing Selected Photos 1 Connect the camera to the printer as described on page 34 and turn on the camera. 2 Turn the Mode dial to playback. 3 Press the print button. You see the print menu. 4 Choose Select Images - Epson L500V | Camera Basics - Page 38
on One Sheet You can print up to 13 photos on one sheet of paper so it looks like an photo album page. 1 Connect the camera to the printer as described on page 34 and turn on the - Epson L500V | Camera Basics - Page 39
3 Move the joystick to l or r to display the first photo you want to print. 4 Press the print button. You see the print menu. 5 Select Print an Album by moving the joystick to d. 6 Select the number of photos per page by moving the joystick to l or r, then press the OK button. The number of photos - Epson L500V | Camera Basics - Page 40
make the following settings when printing images directly from the camera: ◗ Paper size selection ◗ Printing with or without white Printing with normal or high quality Note: Once you change the paper size setting, the camera retains it. 10 × 15 cm paper is not available in the U.S. 1 After selecting - Epson L500V | Camera Basics - Page 41
and solutions and the Reference Guide. Camera Problems The camera has no power. ◗ The camera may have shut off automatically to save power. Press the POWER button to turn on the camera. Also make sure the Mode dial is turned completely to a mode. ◗ Make sure the battery has power and is correctly - Epson L500V | Camera Basics - Page 42
not react when you press the buttons. ◗ If the light on the front of the camera is flashing, try turning the camera off and then on again. ◗ If the power does not turn off, remove the battery, reinstall it, and turn the power on. Also make sure the memory card is installed correctly - Epson L500V | Camera Basics - Page 43
make sure the mode dial is turned completely to a mode. ◗ When the camera is connected to a computer, the LCD screen is disabled. When it is display the print progress screen. After a moment, it disappears again. Image Problems Images are out of focus. ◗ Place your subject in the center of - Epson L500V | Camera Basics - Page 44
you are using manual mode, you can adjust the exposure compensation or light sensitivity settings. See page 20 and the Reference Guide for instructions. Miscellaneous Problems Your photo won't print. Make sure you have room for one or two more photos on your memory card so the camera can temporarily - Epson L500V | Camera Basics - Page 45
to r to adjust the settings. You see an error message when you try to open the Reference Guide. Install Adobe Reader from the CD-ROM that came with the camera. See page 15 for instructions. List of Error Messages The following list includes the most common error messages you may see on the - Epson L500V | Camera Basics - Page 46
instructions. The file size of the frame exceeds the camera's limit. Use the PIF Designer software to simplify the frame. Images from another camera or other source may not display on your camera Either the cable has been disconnected or the power has been turned off. Check that the cable is connected, - Epson L500V | Camera Basics - Page 47
reach Epson Support at http://support.epson.com. At this site, you can download drivers and other files, look at product documentation, access troubleshooting information, and receive technical advice through e-mail. Automated Telephone Services A variety of automated help services are available - Epson L500V | Camera Basics - Page 48
name (Epson L-500V) ◗ Product serial number (located on the bottom of the camera) ◗ Proof of purchase (such as a store receipt) and date of purchase ◗ Computer configuration and operating system version ◗ Description of the problem You can purchase ink cartridges, paper, manuals, and accessories - Epson L500V | Camera Basics - Page 49
Still picture: 2560 × 1920 pixels capacity Video: 640 × 480 pixels Image file type JPEG (EXIF 2.2), PRINT Image Matching II, AVI Camera a 34 to 102 mm lens on a 35 mm camera) Aperture: F2.8 to F4.9 Zoom: Collapsible mount 3× zoom Digital zoom 4× zoom (maximum 12× zoom with simultaneous use - Epson L500V | Camera Basics - Page 50
battery and charger included Optional AC adapter (B867062) 2.5 × 3.6 × 1.3 inches (63 × 92 × 32 mm) (height × width × depth) Approx. 0.36 lb (165 g), excluding the battery and memory card Operating: 41 to 95 °F (5 to 35 °C) Storage: -4 to 140 °F (-20 to 60 °C) DC 3.4 V Important Safety Instructions - Epson L500V | Camera Basics - Page 51
Do not touch the components inside this product unless instructed to do so in the user documentation. Never force recommended AC adapter (B867062) for this product. ◗ Use only the specified battery (B32B818242) for this product. ◗ When connecting the camera to a computer or other device with a cable, - Epson L500V | Camera Basics - Page 52
sources such as a car cigarette lighter adapter. ◗ Do not charge the battery on a device other than the included battery charger. ◗ If charging hasn't finished after the normal charging time, stop charging. Storing the battery ◗ When not using the camera or charger for a long period, remove the - Epson L500V | Camera Basics - Page 53
instructions before using the battery charger, as misuse could result in personal injury from fire, explosion, leakage, overheating, or electric shock. ◗ Use only Epson battery charger model 2090821-00 provided to charge Epson Lithium ion battery the AC power cord to become damaged or frayed. 53 - Epson L500V | Camera Basics - Page 54
servicing ◗ Keep the charger out of reach of children. ◗ This product is designed for use with Epson products only. for details. ◗ Turn off the camera before installing/removing the memory card. them immediately with water. If discomfort or vision problems remain after a thorough flushing, see a - Epson L500V | Camera Basics - Page 55
Storing, maintaining, or transporting the camera ◗ Do not store this product outdoors, near water, or and do not use liquid or aerosol cleaners. ◗ Remove the battery, unplug this product, and refer servicing to qualified service personnel under the following conditions: The power cord or plug is - Epson L500V | Camera Basics - Page 56
comply with the limits for a class B digital device, pursuant to Part 15 of the FCC not installed and used in accordance with the instructions, may cause harmful interference to radio and TV technician for help. WARNING: The connection of a non-shielded equipment interface cable to this equipment - Epson L500V | Camera Basics - Page 57
with 47CFR Part 2 and 15 of the FCC rules as a Class B digital device. Each product marketed is identical to the representative unit tested and found interference that may cause undesired operation. Trade Name: Epson Type of Product: Digital Still Camera Model: G931A Product: Epson L-500V 57 - Epson L500V | Camera Basics - Page 58
. What Epson Will Do To Correct Problems: Should your Epson Digital Camera Product prove defective during the warranty period, please call the Epson Connection at (562) 276-4303 (U.S.) or (905) 709-3839 (Canada) for warranty repair instructions and return authorization. An Epson service technician - Epson L500V | Camera Basics - Page 59
lamps, prints, batteries, cables or storage media. Epson is not responsible for warranty service should the Epson label or software problems, interaction with non-Epson products, or service other than by an Epson Authorized Servicer. If a claimed defect cannot be identified or reproduced in service - Epson L500V | Camera Basics - Page 60
SPECIAL, INCIDENTAL OR CONSEQUENTIAL DAMAGES, RESULTING FROM THE USE OR INABILITY TO USE THE EPSON PRODUCT, OR FOR LOST DATA OR LOST SOFTWARE, WHETHER RESULTING FROM BREACH OF WARRANTY OR ANY OTHER LEGAL THEORY. In Canada, warranties include both warranties and conditions. Some jurisdictions do not - Epson L500V | Camera Basics - Page 61
Index A AC adapter, 7 Accessories, 7, 48 Adobe Reader, 6, 15, 16 Album printing, 38 to 39 Automatic mode, 18 to 19 B Battery charging, 10 icon, 22 installing, 12 safety instructions, 51 to 55 Beeps, 19, 21 C Cable, USB, 9, 34 Camera connecting to printer, 34 error messages, 45 to 46 modes, 17 - Epson L500V | Camera Basics - Page 62
Compliance, 56 Flash, 19, 21, 23 Frames, 26 to 28, 32 H Help, 47 to 48 I Icons, 22 to 23 Image problems, 43 to 44 L Language setting, 14 LCD screen icons, 22 to 23 safety instructions, 54 62 M Macro mode, 18, 23 Manual mode, 20 to 21 Memory cards installing, 11 removing, 12 requirements, 7, 49 - Epson L500V | Camera Basics - Page 63
to 23 print, 40 Slide show, 29 Software description, 6 installing, 15 to 16 Sound, 19, 21 Specifications, 49 to 50 T Technical support, 47 to 48 Time and date setting, 14 Transporting camera, 55 Troubleshooting, 41 to 48 Turning the camera on/off, 13 U USB cable, 9, 34 port on printer, 34 V Videos - Epson L500V | Camera Basics - Page 64
64 - Epson L500V | Camera Basics - Page 65
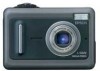
Mode dial Automatic mode Playback mode Manual mode Continuous shooting mode Video mode Setup mode Mode dial Shutter button USB/Self-timer light Strap holder Speaker Flash Microphone Lens Battery/memory card cover - Epson L500V | Camera Basics - Page 66
Connector cover Print button P.I.F. button LCD screen Joystick/OK button Macro/ Tripod mount USB connector AC adapter connector Zoom buttons MENU button Memory access light Outdoor mode/ Flash/ Delete/self-timer/
-
 1
1 -
 2
2 -
 3
3 -
 4
4 -
 5
5 -
 6
6 -
 7
7 -
8
-
9
-
10
-
11
-
12
-
13
-
14
-
15
-
16
-
17
-
18
-
19
-
20
-
21
-
22
-
23
-
24
-
25
-
26
-
27
-
28
-
29
-
30
-
31
-
32
-
33
-
34
-
35
-
36
-
37
-
38
-
39
-
40
-
41
-
42
-
43
-
44
-
45
-
46
-
47
-
48
-
49
-
50
-
51
-
52
-
53
-
54
-
55
-
56
-
57
-
58
-
59
-
60
-
61
-
62
-
63
-
64
-
65
-
66
 |
 |

Camera Basics