Epson DM-D70 Technical Reference Guide
Epson DM-D70 Manual
 |
View all Epson DM-D70 manuals
Add to My Manuals
Save this manual to your list of manuals |
Epson DM-D70 manual content summary:
- Epson DM-D70 | Technical Reference Guide - Page 1
Technical Reference Guide Product Overview Describes features of the product. Handling Describes basic procedure for handling the product. Installing the Product in Various Ways Describes how to install - Epson DM-D70 | Technical Reference Guide - Page 2
every precaution has been taken in the preparation of this manual, Seiko Epson Corporation assumes no responsibility for errors or omissions. • Seiko Epson Corporation's operating and maintenance instructions. • Seiko Epson Corporation shall not be liable against any damages or problems arising - Epson DM-D70 | Technical Reference Guide - Page 3
unplug the product when any one of the following problems occurs, and then contact qualified service personnel. Continued use may lead to fire or . ∗ Do not touch the inside of the product except where mentioned in the manual. ∗ Do not use the product with any power supply or voltage other than the - Epson DM-D70 | Technical Reference Guide - Page 4
Restriction of Use When this product is used for applications requiring high reliability/safety, such as transportation devices related to aviation, rail, marine, automotive, etc.; disaster prevention devices; various safety devices, etc.; or functional/precision devices, etc.; you should use this - Epson DM-D70 | Technical Reference Guide - Page 5
provides information for development engineers, which are necessary for developing, designing, and installing POS systems. Manual Contents The manual is made up of the following sections: Chapter 1 Product Overview Chapter 2 Handling Chapter 3 Installing the Product in Various Ways Chapter - Epson DM-D70 | Technical Reference Guide - Page 6
...3 ■ Restriction of Use ...4 ■ About this Manual ...5 Aim of the Manual ...5 Manual Contents ...5 ■ Contents...6 Product Overview 8 ■ ■ Adjusting the Display Brightness 15 ■ Cleaning the Outer Case ...16 ■ Troubleshooting...17 Nothing is Displayed on the Screen ...17 The Screen Looks Dark when - Epson DM-D70 | Technical Reference Guide - Page 7
Attaching the EXTENSION POLE UNIT FOR DM-D70 (DP-70 24 Attaching the CRANK POLE UNIT FOR TM-T88VI Installed in Landscape Orientation...46 When Installed in Portrait Orientation ...48 ■ Supported Printers ...50 ■ Product Specifications ...51 Environmental Specification...53 External Dimensions ... - Epson DM-D70 | Technical Reference Guide - Page 8
(75 x 75mm). A commercially available VESA mount such as a wall bracket or arm stand can be attached. • To meet various requirements, EXTENSION POLE UNIT FOR DM-D70 and CRANK POLE UNIT FOR TM-T88VI-DT2 are available as an option. Display • Easy-to-see large screen • Images can be displayed in - Epson DM-D70 | Technical Reference Guide - Page 9
. If any item is damaged or missing, contact qualified service personnel. • Customer display • Ferrite core (Use this when connecting the product to TM-m30II) • Manuals Optional Kits Model number DP-70 DP-71 OT-UL30 Description EXTENSION POLE UNIT FOR DM-D70 Extension pole (about 24 cm tall), USB - Epson DM-D70 | Technical Reference Guide - Page 10
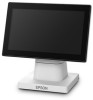
Screws (4 pieces) 6 Brightness up/down buttons Description A LCD screen. The display can be tilted forward or back, and to the left or right. Supports the display unit. Use to connect to the printer or a computer. Remove this cover when operating the brightness up/down buttons or when changing the - Epson DM-D70 | Technical Reference Guide - Page 11
on the printer. Supported printers are listed below. See the following link for more details. U"Supported Printers" on page 50 DM-D70 (DP-70), includes a USB extension cable. • You can mount this product to TM-m30II-S as a rear display. Refer to TM-m30II-S User's Manual for more details. U www.epson - Epson DM-D70 | Technical Reference Guide - Page 12
Chapter 2 Handling When Connecting to TM-m30II When connecting the product to TM-m30II, attach the included ferrite core to the DC cable of TM-m30II. Bring the ferrite core close to the body of TM-m30II as much as possible. 1 Turn off the TM-m30II printer, and disconnect the AC cable of the AC - Epson DM-D70 | Technical Reference Guide - Page 13
the computer. • If you want to extend the USB cable, use the optional USB extension cable (OT-UL30). • The optional kit, EXTENSION POLE UNIT FOR DM-D70 (DP-70), includes a USB extension cable. Routing the USB Cable The USB cable can be routed to one of the three directions. Put the USB - Epson DM-D70 | Technical Reference Guide - Page 14
is no power switch. The product takes its power from the printer or the computer through the USB cable. • When the product is powered, an EPSON logo is displayed. • Even when the power LED of the printer is off, the display may stay on if it is still powered through the - Epson DM-D70 | Technical Reference Guide - Page 15
Chapter 2 Handling Adjusting the Display Brightness The brightness of the display can be adjusted by pressing the brightness up/down buttons. It is set to the brightest setting by default. 1 Turn on the display by connecting it to the printer or a computer. 2 Remove the rear cover. 3 Press the - Epson DM-D70 | Technical Reference Guide - Page 16
Chapter 2 Handling Cleaning the Outer Case Be sure to disconnect the USB cable of the customer display from the printer or a computer, and then wipe the customer display with a dry cloth or a cloth dampened with a little water. CAUTION • Never clean the product with alcohol, benzine, thinner, or - Epson DM-D70 | Technical Reference Guide - Page 17
Troubleshooting Chapter 2 Handling Nothing is Displayed on the Screen • Check that the following utilities from the website. For customers in North America U www.epson.com/support/ For customers in other countries U www.epson-biz.com/ • DM-D70 Utility (For Windows) • TM Utility (For Android/iOS) 17 - Epson DM-D70 | Technical Reference Guide - Page 18
Chapter 2 Handling 4 Start the utility and change [Display Settings] - [Display direction] to [Upside down] to flip the screen vertically. 18 - Epson DM-D70 | Technical Reference Guide - Page 19
Display Orientation to Portrait Follow the procedure below to change the display orientation to portrait. Change the display orientation to portrait if your application software supports portrait display. 1 Place the product screen-side down on a soft cloth or the like. 19 - Epson DM-D70 | Technical Reference Guide - Page 20
2 Remove the rear cover. Chapter 3 Installing the Product in Various Ways 3 Remove the four screws. 4 Release the USB cable from the notch, and then remove the stand. 20 - Epson DM-D70 | Technical Reference Guide - Page 21
Chapter 3 Installing the Product in Various Ways 5 Change orientation of the stand referring to the mark on the rear of the display. 6 Secure the stand with the four screws. 7 Route the USB cable as shown below. 8 Attach the rear cover. 21 - Epson DM-D70 | Technical Reference Guide - Page 22
Chapter 3 Installing the Product in Various Ways Attaching the Display to a VESA Mount Follow the procedure below to attach the display to a mount such as a wall bracket or arm stand that complies with VESA standard (75 x 75 mm). 1 Place the product screen-side down on a soft cloth or the like. 2 - Epson DM-D70 | Technical Reference Guide - Page 23
the display to know which side is top or bottom. 5 Attach the display to a VESA mount such as a wall bracket or arm stand. Follow the instruction manual for the VESA mount to attach the mount. 23 - Epson DM-D70 | Technical Reference Guide - Page 24
in Various Ways Attaching the Display to the Optional Kit Attaching the EXTENSION POLE UNIT FOR DM-D70 (DP-70) Follow the procedure below to attach the optional kit, EXTENSION POLE UNIT FOR DM-D70 (DP-70). Contents of the DP-70 package 1. Extension pole 2. USB extension cable 3. Stickers for - Epson DM-D70 | Technical Reference Guide - Page 25
Chapter 3 Installing the Product in Various Ways 1 Place the product screen-side down on a soft cloth or the like. 2 Raise the stand. 3 Push the tabs inward and pull out the stand. 25 - Epson DM-D70 | Technical Reference Guide - Page 26
Chapter 3 Installing the Product in Various Ways 4 Pass the USB cable through the extension pole. 5 Attach the extension pole to the display. Insert the tab on the pole into the groove on the display. 6 Pass the USB cable through the stand. 26 - Epson DM-D70 | Technical Reference Guide - Page 27
Chapter 3 Installing the Product in Various Ways 7 Attach the stand to the extension pole. Insert the tab on the stand into the groove on the pole. 8 Secure the USB cable by fitting it into the groove, and then route the cable so that it passes through one of the three notches. Make sure to fit the - Epson DM-D70 | Technical Reference Guide - Page 28
Chapter 3 Installing the Product in Various Ways 10 Attach the four stickers to the bottom of the stand. To prevent the product from falling over, use the stickers to secure the product to a table, desk, or etc. To remove the extension pole from the display, pull the pole hard. 28 - Epson DM-D70 | Technical Reference Guide - Page 29
Chapter 3 Installing the Product in Various Ways Attaching the CRANK POLE UNIT FOR TM-T88VI-DT2 (DP-71) Follow the procedure below to attach the optional kit, CRANK POLE UNIT FOR TM-T88VI-DT2 (DP-71). Contents of the DP-71 package 1. Crank pole 2. Three screws 1 Remove the connector cover of - Epson DM-D70 | Technical Reference Guide - Page 30
Chapter 3 Installing the Product in Various Ways 2 Remove the U-shape part from the connector cover. 3 Place the product screen-side down on a soft cloth or the like. 4 Raise the stand. 30 - Epson DM-D70 | Technical Reference Guide - Page 31
Chapter 3 Installing the Product in Various Ways 5 Push the tabs inward and pull out the stand. 6 Pass the USB cable through the crank pole. 31 - Epson DM-D70 | Technical Reference Guide - Page 32
Chapter 3 Installing the Product in Various Ways 7 Attach the crank pole to the display as shown below. 8 Secure the USB cable to the crank pole. 9 Lay TM-T88VI-DT2 on its side. 10 Pass the USB cable through the TM-T88VI-DT2. 32 - Epson DM-D70 | Technical Reference Guide - Page 33
Chapter 3 Installing the Product in Various Ways 11 Secure the display and crank pole with the three screws. 12 Connect the USB cable to the connector on the TM-T88VI-DT2. 13 Attach the connector cover. 33 - Epson DM-D70 | Technical Reference Guide - Page 34
XML ePOS-Print XML is the Epson original control command system for POS printers and customer displays. This allows an application on a computer or tablet to send an XML-format request to a TM printer that supports the XML over an HTTP connection. ePOS-Print Service that is pre-installed on the - Epson DM-D70 | Technical Reference Guide - Page 35
Chapter 4 Application Development Information ESC/POS ESC/POS is the Epson original printer command system for POS printers and customer display. With ESC/POS commands, you , see "ESC/POS Command Reference for Customer Displays" by accessing the URL below. U www.epson-biz.com/pos/reference/ 35 - Epson DM-D70 | Technical Reference Guide - Page 36
with low quantity of codes using extensive APIs. You can easily develop an iOS/Android native application or Web application. for JavaScript EPSON OPOS ADK OCX driver that controls the POS peripheral devices using the OLE technologies*. Because controlling POS peripherals with original commands is - Epson DM-D70 | Technical Reference Guide - Page 37
Utilities Software DM-D70 Utility Epson TM Utility Deployment Tool DM-D70 Firmware Updater manual comes with sample programs. Download You can obtain software and manuals from one of the following URLs. For customers in North America, go to the following web site: U www.epson.com/support - Epson DM-D70 | Technical Reference Guide - Page 38
the display. For information necessary for developing application software, see the manual for the development kit and driver, and the ESC/POS Command the number of columns and rows to the same as those of DM-D30, DM-D110, DM-D210, or DM-D500. Both modes have two areas; text area and image area. - Epson DM-D70 | Technical Reference Guide - Page 39
Chapter 4 Application Development Information The following screen layouts are available in the standard mode. When Installed in Landscape Orientation [Full screen] [Vertical split] Text area and Image area Image area Text area Text area Image area [Horizontal split] Text area Image area - Epson DM-D70 | Technical Reference Guide - Page 40
Chapter 4 Application Development Information When Installed in Portrait Orientation [Full screen] Text area and Image area [Horizontal split] Text area Image area Image area Text area [Horizontal split 1:2] Text area Image area Image area Text area [Horizontal split 2:1] Text area - Epson DM-D70 | Technical Reference Guide - Page 41
of columns and rows of the text area are the same as those of DM-D30, DM-D110, DM-D210, or DM-D500. To use this mode, the display needs to be installed in landscape orientation When using this mode, use DM-D70 Utility to configure color of characters at power-on, background color, slide show - Epson DM-D70 | Technical Reference Guide - Page 42
Chapter 4 Application Development Information Displaying Character String Character string can be displayed in the text area. You can change the color of the characters and background. In the standard mode, the number of columns and rows in the text area can be changed from application software. The - Epson DM-D70 | Technical Reference Guide - Page 43
data in the memory is erased when the power is turned off. Download Graphics can store data up to 1.5 MB. It is recommended to use DM-D70 Utility or TM Utility to store data in the NV memory. Graphics data can be converted in appropriate format and then stored. It may take - Epson DM-D70 | Technical Reference Guide - Page 44
background color (full screen) ✔ - ✔ * - Displaying a QR code ✔ - - - Displaying an image - ✔ - - Displaying slide show - ✔ - ✔ * Displaying frame ✔ - ✔ * - ∗: Use DM-D70 Utility or TM Utility to change the settings. You cannot change them from your application software. 44 - Epson DM-D70 | Technical Reference Guide - Page 45
DM-D70 Utility or TM Utility to change the settings. Or you can change them from your application software by using the development kit and the driver. For more details, see the manual software that uses ePOS-Device XML functions. Default: DM-D70 U"Supported Printers" on page 50 Allows you to change - Epson DM-D70 | Technical Reference Guide - Page 46
Appendix Appendix Configurable Number of Columns and Rows When Installed in Landscape Orientation Full screen Column 1 2 3 4 5 6 7 8 9 10 11 12 13 14 15 16 17 18 19 20 21 22 Row 1 2 3 4 5 6 7 8 9 10 11 12 13 Column 23 24 25 26 27 - Epson DM-D70 | Technical Reference Guide - Page 47
Appendix Vertical split (screen divided into right and left) Column 1 2 3 4 5 6 7 8 9 10 11 12 13 14 15 16 17 18 19 20 21 22 Row 1 2 3 4 5 6 7 8 9 10 11 12 13 Horizontal split (screen divided into up and down) Column 1 2 3 4 5 6 7 - Epson DM-D70 | Technical Reference Guide - Page 48
Appendix When Installed in Portrait Orientation Full screen Column 1 2 3 4 5 6 7 8 9 10 11 12 13 14 15 16 17 18 19 20 21 22 Row 1 2 3 4 5 6 7 8 9 10 11 12 13 14 15 16 17 18 19 Horizontal split (screen - Epson DM-D70 | Technical Reference Guide - Page 49
Appendix Horizontal split 1:2 (screen divided into up and down at a ratio of 1:2) Column 1 2 3 4 5 6 7 8 9 10 11 12 13 14 15 16 17 18 19 20 21 22 Row 1 2 3 4 5 6 Horizontal split 2:1 (screen divided into up and down at a ratio of 2:1) Column 1 2 3 4 5 6 7 8 9 10 11 - Epson DM-D70 | Technical Reference Guide - Page 50
Printer Driver for DMD which is pre-installed in TM-T88VI-DT2 or TM-T70II-DT2 because the software does not support DMD70. Download and use EPSON Advanced Printer Driver 6 for DM-D70. • When developing application software that uses TM-DT software, you need to update the TM-DT software to Ver.5.10 - Epson DM-D70 | Technical Reference Guide - Page 51
Image file format Size (width) Bit depth Even-numbered pixels 8 bit PNG Color type True color, or true color + alpha channel Interlace Not supported Barcode 2D code (QR code) Interface USB 2.0 High/Full speed Power supply USB bus power (4.75 to 5.5 V DC) Consumption current Operating - Epson DM-D70 | Technical Reference Guide - Page 52
types installed on the product can be displayed. For instructions and more detailed information for displaying Unicode characters, see ESC/POS Command Reference Guide (see the explanation of commands that start from "US (N"), or software manuals. ("Application Development Information" on page 34) 52 - Epson DM-D70 | Technical Reference Guide - Page 53
10 minutes (one way) 1 hour XYZ Epson standard packaging for factory shipment 90 cm 1 corner, 3 ribs, 6 surfaces 5 cm 4 sides, Supporting only one side 5 years 43,800 hours defect on both the surface and inside, and have no problem for operation. ∗3: After the impact is applied while the product - Epson DM-D70 | Technical Reference Guide - Page 54
External Dimensions When Installed in Landscape Orientation 180 Appendix 116 165.2 109 109 When Installed in Portrait Orientation 116 [Unit: mm] 180 197.2 109 109 [Unit: mm] 54 - Epson DM-D70 | Technical Reference Guide - Page 55
Display Only 180 24.8 75 Appendix 75 116 When Attached to DP-70 180 [Unit: mm] 116 412 4.7 109 109 116 [Unit: mm] 180 444 4.7 109 109 [Unit: mm] 55 - Epson DM-D70 | Technical Reference Guide - Page 56
When Attached to DP-71 Appendix 180 353.4 116 245.8 334 [Unit: mm] 116 353.4 180 277.8 334 [Unit: mm] 56 - Epson DM-D70 | Technical Reference Guide - Page 57
Character Code Tables Refer to the following URL regarding the Character Code Tables for Customer Displays. U www.epson-biz.com/pos/reference/ Appendix 57 - Epson DM-D70 | Technical Reference Guide - Page 58
Appendix Open Source Software Licenses The product uses open source software in addition to software that Epson possesses. The following pieces of open source software are used for this product. Name of Software zlib libpng IJG JPEG newlib CMSIS-RTOS lwIP Renesas
-
 1
1 -
 2
2 -
 3
3 -
 4
4 -
 5
5 -
 6
6 -
 7
7 -
8
-
9
-
10
-
11
-
12
-
13
-
14
-
15
-
16
-
17
-
18
-
19
-
20
-
21
-
22
-
23
-
24
-
25
-
26
-
27
-
28
-
29
-
30
-
31
-
32
-
33
-
34
-
35
-
36
-
37
-
38
-
39
-
40
-
41
-
42
-
43
-
44
-
45
-
46
-
47
-
48
-
49
-
50
-
51
-
52
-
53
-
54
-
55
-
56
-
57
-
58
 |
 |

Technical Reference Guide
Describes features of the product.
Describes basic procedure for handling the product.
Provides information for controlling the product and for developing
application software.
Describes product specifications and character code tables.
Describes how to install the product in portrait orientation and
how to install with an optional or commercially-available product.
M00134201
Rev. B
Product Overview
Handling
Installing the Product in Various Ways
Application Development Information
Appendix