Epson CX5000 Product Information Guide
Epson CX5000 - Stylus Color Inkjet Manual
 |
UPC - 010343858985
View all Epson CX5000 manuals
Add to My Manuals
Save this manual to your list of manuals |
Epson CX5000 manual content summary:
- Epson CX5000 | Product Information Guide - Page 1
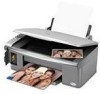
Epson Stylus CX5000 Parts Epson Stylus CX5000 Series Document cover Document table Memory card slots Left edge guide Output tray and extension Paper support extension Paper support Feeder guard Memory card cover USB external device connector (camera only) Scanner Ink cartridges Control panel - Epson CX5000 | Product Information Guide - Page 2
Epson Stylus CX5000 Series Paper name Epson Photo Paper Glossy Epson Glossy Photo Paper Epson Premium Presentation Paper Matte Epson Matte Paper Heavyweight Epson Premium Presentation Paper Matte Double-Sided Epson Double-Sided Matte Paper Epson Presentation Paper Matte Epson Photo Quality Ink Jet - Epson CX5000 | Product Information Guide - Page 3
Epson Stylus CX5000 Series Mechanical Paper path Sheet feeder, top entry Sheet feeder capacity About 100 sheets at 17 lb (64 g/m²) Dimensions Width: 16.9 inches (430 mm) Depth: 13.9 inches (354 mm) Height: 7.1 inches (181 mm) Weight 14.3 lb (6.5 kg) without the ink cartridges Electrical - Epson CX5000 | Product Information Guide - Page 4
Epson Stylus CX5000 Series Voltage requirements * Adapter required MagicGate Memory Stick Duo* Microdrive Memory Card Image File Requirements Media format DCF version 1.0 or 2.0 compliant* File format JPEG Supports Exif version 2.21 Image size 80 × 80 pixels to 9200 × 9200 pixels Number of - Epson CX5000 | Product Information Guide - Page 5
for the best results, you'll want to use one of Epson's special ink jet papers designed for your printer. For example, your photos will look great printed on Epson Ultra Premium Photo Paper Glossy (see page 1 for more information). 5. Slide the left edge guide against the left edge of the paper (but - Epson CX5000 | Product Information Guide - Page 6
Epson Stylus CX5000 Series 4. Load up to 10 envelopes at a time, flap edge left, printable side up, against the right edge guide. Load the flap edge left, printable side up Note: For best results, press each envelope flat before loading, or load one envelope at a time. 5. Slide the left edge guide - Epson CX5000 | Product Information Guide - Page 7
Epson Stylus CX5000 Series Placing Large or Thick Documents When you scan a large or thick document, you can remove the document cover. Just open it and pull it straight up. If you need to press the document flat while you copy or scan page 4 if you need instructions.) 4. Press the Copies button - Epson CX5000 | Product Information Guide - Page 8
Epson Stylus CX5000 Series To make a black and white copy, press the x Start B&W button. The On light flashes and after a moment the CX5000 Series starts printing. If you need to stop copying at any time, just press the y Stop button. Do not pull out paper that is being printed Insert just one card - Epson CX5000 | Product Information Guide - Page 9
so the CX5000 Series can scan it correctly. Now follow the instructions in the next section to select photos and print. Selecting Photos on the Index Sheet 1. Once you have printed the index sheet, use a dark pen or pencil to fill in one of the circles beneath each photo you want to print to - Epson CX5000 | Product Information Guide - Page 10
as explained in your camera manual. Note: If your camera is not supported, a flashing P appears in the Copies window, and the b Error light and the Print All/PictBridge flash. Epson cannot guarantee the compatibility of any camera. Depending on the CX5000 Series settings and your digital camera - Epson CX5000 | Product Information Guide - Page 11
Stylus CX5000 Series Scanning You can use your CX5000 Series to scan a photo or document and save it on your computer or other device, or to fax or email it to someone else. You can even automatically restore faded color photographs as you scan (see page 12 for details). The EPSON Scan software - Epson CX5000 | Product Information Guide - Page 12
on how you started EPSON Scan. See the on-screen User's Guide for details. Checking the Print Head Nozzles and Ink If your printouts are faint or have gaps in them, some of the nozzles in the print head may be clogged or ink may be running low in one or more of the ink cartridges. Follow the steps - Epson CX5000 | Product Information Guide - Page 13
: If you do not use your CX5000 Series often, it is a good idea to print a few pages at least once a month to maintain good print quality. Replacing Ink Cartridges ❏ When the red B ink light flashes, one or more ink cartridges are low on ink. ❏ When the red B ink light stays on, you need to replace - Epson CX5000 | Product Information Guide - Page 14
Epson Stylus CX5000 Series Caution: Do not open ink cartridge packages until you are ready to install the ink. Cartridges are vacuum packed to maintain reliability. Install a new ink cartridge immediately after removing an expended one. Leaving cartridges uninstalled can dehydrate the print head - Epson CX5000 | Product Information Guide - Page 15
out. Dispose of it carefully. Do not take the used cartridge apart or try to refill it. Epson Stylus CX5000 Series 9. Place the new ink cartridge into the cartridge holder and push it down until it clicks into place. Warning: If ink gets on your hands, wash them thoroughly with soap and water - Epson CX5000 | Product Information Guide - Page 16
folder and select EPSON Print Utility. Select your CX5000 Series in the printer list, click OK, and select Print Head Alignment. 4. Follow the instructions on the screen to print a vertical alignment sheet. You see a window like this one: 6. Click Print to print a black horizontal alignment - Epson CX5000 | Product Information Guide - Page 17
and close the paper support. 3. Unplug the power cord from the electrical outlet. Then disconnect the USB cable from the CX5000 Series. 4. Open the scanner section and make sure the ink cartridge holder is in the home position on the right. 5. Secure the ink cartridge holder (print head) to the case - Epson CX5000 | Product Information Guide - Page 18
Epson Stylus CX5000 Series 18 6/06
-
 1
1 -
 2
2 -
 3
3 -
 4
4 -
 5
5 -
 6
6 -
 7
7 -
8
-
9
-
10
-
11
-
12
-
13
-
14
-
15
-
16
-
17
-
18
 |
 |

Epson Stylus CX5000 Series
6/06
1
Epson Stylus CX5000 Parts
Accessories
Ink Cartridges
Media
Paper support
extension
Feeder guard
Left edge
guide
Memory
card cover
USB external device
connector (camera only)
Document
cover
Document
table
Memory card slots
Output tray and
extension
Paper
thickness
lever
Control panel
(button and lights)
Scanner
Ink cartridges
Paper support
Color
Part number
T code number
Black
69
T069120
68
(High Capacity)
T068120
(High Capacity)
Cyan
69
T069220
Magenta
69
T069320
Yellow
69
T069420
Paper name
Size
Part
number
Epson Ultra Premium Photo Paper
Glossy
Epson Ultra Premium Glossy Photo
Paper
Borderless
4 x 6 inches
S041934
Letter
(8.5 x 11 inches)
S041935
Epson Premium Bright White Paper
Letter
(8.5 x 11 inches)
S041586
Epson Premium Photo Paper Glossy
Epson Premium Glossy Photo Paper
Borderless
4 x 6 inches
S041808
S041727
Borderless
5 x 7 inches
S041464
Borderless
8 x 10 inches
S041465
Letter
(8.5 x 11 inches)
S041286
S041667
Epson Premium Photo Paper
Semigloss
Epson Premium Semigloss Photo
Paper
Letter
(8.5 × 11 inches)
S041331
USB port
AC inlet