Epson C7500 Setup Guide
Epson C7500 Manual
 |
View all Epson C7500 manuals
Add to My Manuals
Save this manual to your list of manuals |
Epson C7500 manual content summary:
- Epson C7500 | Setup Guide - Page 1
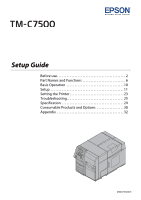
Setup Guide Before use 2 Part Names and Functions 6 Basic Operation 10 Setup 11 Setting the Printer 23 Troubleshooting 25 Specification 29 Consumable Products and Options 30 Appendix 32 M00079300EN - Epson C7500 | Setup Guide - Page 2
manual carefully before using this product. For details about the functions and operation procedure of this product and software, maintenance information, and troubleshooting, refer to Technical Reference Guide manual specified in this manual. (U " product specified in this manual when lifting up this - Epson C7500 | Setup Guide - Page 3
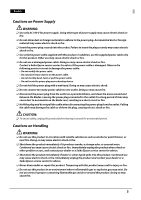
or unusual noise. Continued use may cause electric shock or fire. Immediately unplug the product when a fault or other problem occurs, and contact your dealer or a Seiko Epson service center for advice. ❏ Shut down the product immediately if water or other liquid spills into this product. Continued - Epson C7500 | Setup Guide - Page 4
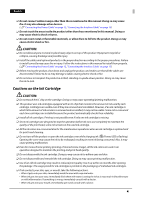
injury. Follow the instructions in this manual to install them ink runs out completely to maintain the quality of the print head, some ink remains in the used ink cartridge. ❏ All the ink colors are consumed also for the maintenance operations when an ink cartridge is replaced and for print head - Epson C7500 | Setup Guide - Page 5
using the power button, the print head is automatically capped, which prevents the ink from drying. After installing the ink cartridges, be sure to turn the or ink may adhere to your fingers when you touch it. Select paper not to case print stains before use. Caution Label The caution label on - Epson C7500 | Setup Guide - Page 6
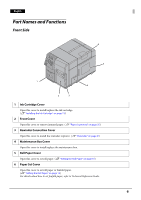
install/replace the ink cartridge. (U "Installing the Ink Cartridge" on page 13) 2 Front Cover Open this cover to remove jammed paper. (U "Paper is jammed" on page 25) 3 Rewinder Connection Cover Open this cover to install the rewinder (option). (U "Rewinder" on page 31) 4 Maintenance Box Cover Open - Epson C7500 | Setup Guide - Page 7
9 Status Pause Paper Ink K CM Y M/B Pause Back Feed 8 Menu Cancel OK Feed 7 Cut 6 4 5 1 LCD Displays the menus and messages. 2 Pause Button Press this button during printing to pause printing after one page of data is printed. Press this button while the printer is paused (while - Epson C7500 | Setup Guide - Page 8
. Lights in the following conditions: • The ink cartridge cover/maintenance box cover is open. • No ink cartridge/maintenance box is set. • It is time to replace the ink cartridge. • It is time to replace the maintenance box. 10 Paper LED Lights when the printer has no paper or jammed paper, or - Epson C7500 | Setup Guide - Page 9
English Rear Side 2 1 3 4 5 1 USB Connector For connecting a USB cable. 2 Ethernet Connector For connecting a LAN cable. 3 AC Inlet For connecting a power cable. 4 Wire Saddle Pass the USB cable through this saddle to prevent disconnection of the USB cable. 5 Air Vent Exhausts heat generated - Epson C7500 | Setup Guide - Page 10
English Basic Operation Turning On/Off This section describes how to turn on/off the product. Turning On Press (Power) button. (Power) LED lights up and the power turns on. Turning Off Hold down (Power) button for one second or more. (Power) LED turns off and the power turns off. 10 - Epson C7500 | Setup Guide - Page 11
for future transportation. Keep them in a safe place. Installing the Printer Secure sufficient space in a location appropriate for installation. !CAUTION: product in a location as follows: ❏ On a level and stable surface that can support the weight of the product (approx. 37 kg {81.57 lb}). ❏ On an - Epson C7500 | Setup Guide - Page 12
to install this product in the vicinity of a power outlet so that you can immediately unplug the product if some fault or other problem occurs. 1. Make sure that the printer is powered off. (U "Turning Off" on page 10) 2. Insert the power cable connector into the AC inlet on the product securely to - Epson C7500 | Setup Guide - Page 13
Saddle Installing the Ink Cartridge Install the ink cartridge by following the steps below. !CAUTION: Read the handling instructions carefully before installing the ink cartridge. (U "Cautions on the Ink Cartridge" on page 4, "Ink cartridge" on page 30) 1. Turn on the printer. (U "Turning On" on - Epson C7500 | Setup Guide - Page 14
label and of the ink cartridge holder label, and set the cartridges to each matching color. 5. Close the ink cartridge cover. Ink charging starts. The (Power) LED flashes during ink charging. QNotes: The ink cartridge included in the product package is used for initial charging. The printer uses ink - Epson C7500 | Setup Guide - Page 15
cartridge before completion of charging. 6. When ink charging completes, the 7. Press the Pause button. (Power) LED changes from flashing to on. Setting the Roll Paper Set the roll paper by following the steps below. 1. Make sure that the printer is powered on. (U "Turning On" on page 10) 2. Open - Epson C7500 | Setup Guide - Page 16
English 3. Open the roll paper cover. 4. Pull out the roll paper flange while holding the release lever of the roll paper flange between your fingers. Release Lever Roll Paper Flange 5. Attach the roll paper to the spindle, and push the core of the roll paper as far as possible so that it is - Epson C7500 | Setup Guide - Page 17
English 6. Pull out the end of roll paper. 7. Attach the roll paper flange to the spindle while holding the release lever of the roll paper flange between your fingers. Push the flange to the bottom to align it with the roll paper width. Release Lever Roll Paper Flange 17 - Epson C7500 | Setup Guide - Page 18
English 8. Open the paper hold inside the paper set cover. Paper Hold 9. Insert the paper along the paper guide (a). Align the end of the paper with mark. Mark Paper Guide (a) 18 - Epson C7500 | Setup Guide - Page 19
to align it with the paper width while pushing the paper guide (b) lever. Paper may become jammed if the position of the paper guide (b) is not aligned with the paper width. Adjust the paper guide (b) in accordance with the paper width. Lever Paper Guide (b) 11. Insert the end of the paper into the - Epson C7500 | Setup Guide - Page 20
English 12. Close the paper hold. Paper Hold 13. If the paper is loose, turn the roll paper flange in the direction of the arrow to tighten the paper. 14. Close the roll paper cover. 20 - Epson C7500 | Setup Guide - Page 21
check to check whether the nozzle is clogged from the printed pattern. 1. Make sure that the printer is powered on. (U "Turning On" on page 10) 2. Press (Menu) button to head cleaning if this occurs. For details about head cleaning, refer to Technical Reference Guide. 21 - Epson C7500 | Setup Guide - Page 22
Set the IP address of the product by following the steps below. 1. Make sure that the printer is powered on. (U "Turning On" on page 10) 2. Press (Menu) button to display other network connection settings, refer to Technical Reference Guide. This is the end of the printer setup procedures. 22 - Epson C7500 | Setup Guide - Page 23
Setting Set the current date and time by following the steps below. 1. Make sure that the printer is powered on. (U "Turning On" on page 10) 2. Press (Menu) button to display the menu. 3. Select [PRINTER SETUP3] and press the OK button. 4. Select [CLOCK] and press the OK button. 5. Enter the - Epson C7500 | Setup Guide - Page 24
the steps below. 1. Make sure that the printer is powered on. (U "Turning On" on page 10) 2. Press the (Menu) button to display the menu. 3. Select [PRINTER SETUP3] and press the OK button. 4. completes language setting. QNotes: For details about other settings, refer to Technical Reference Guide. 24 - Epson C7500 | Setup Guide - Page 25
English Troubleshooting Power is not turned on/LED is not turned on ink cartridge. (U "Installing the Ink Cartridge" on page 13, "Ink cartridge" on page 30) ❏ Check that the maintenance box is set properly and if it is time to replace the maintenance box. (U "Maintenance Box" on page 30) ❏ Printer - Epson C7500 | Setup Guide - Page 26
English 3. Pull the front cover open lever at the paper feed slot. 4. Open the front cover. Front Cover Open Lever 26 - Epson C7500 | Setup Guide - Page 27
English 5. Cut the jammed paper and remove it. !WARNING: Do not touch the metal wheels. Doing so may cause injury. 6. Pull out the paper from the paper feed slot. 27 - Epson C7500 | Setup Guide - Page 28
English 7. Close the front cover. 8. Set the paper again. (U "Setting the Roll Paper" on page 15) 28 - Epson C7500 | Setup Guide - Page 29
Plain, Plain label, Matte, Matte label, Synthetic label, Glossy label Type Continuous paper (with black marks) Label roll paper (with black marks) Die-cut label paper (with/without black marks) Form Roll paper, fanfold paper Ink cartridge Model: SJIC26P (C, M, Y, K) Maintenance Box Model - Epson C7500 | Setup Guide - Page 30
box, refer to the manual supplied with the maintenance box. Genuine Maintenance Box Recommended It is recommended to use a genuine Epson maintenance box in order to ensure optimal printer operation. Use of non-genuine Epson maintenance boxes can prevent the printer from optimal operation. Repairs - Epson C7500 | Setup Guide - Page 31
English Rewinder The rewinder is a device used to rewind the printed paper into a roll form. The rewinder available for this product is: Model: TU-RC7508 For details about how to install the rewinder, refer to the manual supplied with the rewinder. 31 - Epson C7500 | Setup Guide - Page 32
and Manuals Printer drivers, utilities, and manuals can be downloaded from one of the following URLs: For customers in North America, go to the following web site: http://www.epsonexpert.com/ For customers in other countries, go to the following web site: https://download.epson-biz.com/?service=pos - Epson C7500 | Setup Guide - Page 33
Vision is a registered trademark or trademark of Seiko Epson Corporation. All other trademarks are the property of their respective owners and used for identification purpose only. Product information is subject to change without due notice. ©2014 Seiko Epson Corporation. All rights reserved. 33
-
 1
1 -
 2
2 -
 3
3 -
 4
4 -
 5
5 -
 6
6 -
 7
7 -
8
-
9
-
10
-
11
-
12
-
13
-
14
-
15
-
16
-
17
-
18
-
19
-
20
-
21
-
22
-
23
-
24
-
25
-
26
-
27
-
28
-
29
-
30
-
31
-
32
-
33
 |
 |

Setup Guide
Before use. . . . . . . . . . . . . . . . . . . . . . . . . . . . . . . . . . . . . . . . . . . 2
Part Names and Functions . . . . . . . . . . . . . . . . . . . . . . . . . . . 6
Basic Operation . . . . . . . . . . . . . . . . . . . . . . . . . . . . . . . . . . . .10
Setup . . . . . . . . . . . . . . . . . . . . . . . . . . . . . . . . . . . . . . . . . . . . . .11
Setting the Printer . . . . . . . . . . . . . . . . . . . . . . . . . . . . . . . . . . 23
Troubleshooting. . . . . . . . . . . . . . . . . . . . . . . . . . . . . . . . . . . . 25
Specification . . . . . . . . . . . . . . . . . . . . . . . . . . . . . . . . . . . . . . .29
Consumable Products and Options . . . . . . . . . . . . . . . . .30
Appendix . . . . . . . . . . . . . . . . . . . . . . . . . . . . . . . . . . . . . . . . . .32
M00079300EN