Brother International MFC-J470DW Quick Setup Guide
Brother International MFC-J470DW Manual
 |
View all Brother International MFC-J470DW manuals
Add to My Manuals
Save this manual to your list of manuals |
Brother International MFC-J470DW manual content summary:
- Brother International MFC-J470DW | Quick Setup Guide - Page 1
country. Starter Ink Cartridges Black Yellow Cyan Magenta Quick Setup Guide CD-ROM 1 Basic User's Guide Product Safety Guide Telephone Line Cord 1 If your computer does not have a CD-ROM drive, you can download the drivers from your model's download page at http://solutions.brother.com/. For - Brother International MFC-J470DW | Quick Setup Guide - Page 2
containing the ink cartridges from on top of the paper tray. b Lift the scanner cover until the jack marked LINE on the machine. Carefully guide the telephone line cord into the cable channel page 4. • To prolong the life of the print head, provide the best ink cartridge economy and maintain print - Brother International MFC-J470DW | Quick Setup Guide - Page 3
Gently push the scanner cover support down b and close the scanner cover c using both Be careful not to pinch your fingers when the scanner cover closes. NOTE If you are sharing one telephone Choose the correct Receive Mode on page 10. For additional details, see Connecting an external TAD (telephone - Brother International MFC-J470DW | Quick Setup Guide - Page 4
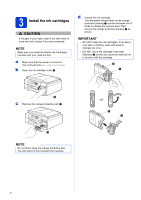
doctor if you are concerned. NOTE Make sure you install the Starter Ink Cartridges included with your machine first. a Make sure that the power is turned on. The LCD will show No Ink Cartridge. b Open the ink cartridge cover a. d Unpack the ink cartridge. Turn the green release lever on the orange - Brother International MFC-J470DW | Quick Setup Guide - Page 5
only Genuine Brother Brand replacement ink cartridges. Use or attempted use of potentially incompatible ink and/or cartridges in the Brother machine may cause damage to the machine and/or may result in unsatisfactory print quality. Our warranty coverage does not apply to any problem that is caused - Brother International MFC-J470DW | Quick Setup Guide - Page 6
fit the paper size. Make sure that the triangular marks c on the paper width guides a and paper length guide b line up with the mark for the paper size you are using. NOTE Make sure the first printed page is Letter/A4 size. 1 3 2 3 d Fan the stack of paper well to avoid paper jams and misfeeds - Brother International MFC-J470DW | Quick Setup Guide - Page 7
print side down and top edge first. Check that the paper is flat in the tray. IMPORTANT Be careful that you do not push the paper in too far; it may lift at the back of the tray and cause paper feed problems. f Gently adjust the paper width guides the universal guide release button a as you - Brother International MFC-J470DW | Quick Setup Guide - Page 8
5 Check the print quality a When the preparation process has finished, the LCD shows Load Paper and Press can also add the current date and time to each fax you send by setting your Station ID (see step 10). a Enter the last two digits of the year on the dial pad, and then press OK. NOTE You can - Brother International MFC-J470DW | Quick Setup Guide - Page 9
. b Press a or b to choose No. Press OK. Go to step 8 and continue with the machine setup. Wireless setup instructions for Windows® and Macintosh users will be covered later, starting on page 20. NOTE If a prompt message appears on the LCD, read it and press OK to continue. 8 Choose your language - Brother International MFC-J470DW | Quick Setup Guide - Page 10
calls. See Voice Mail in chapter 6 of the Basic User's Guide for instructions on setting up your machine using this service. Will you be using a Telephone Answering Device on the same telephone line as your Brother machine? Your external telephone answering device (TAD) will automatically answer - Brother International MFC-J470DW | Quick Setup Guide - Page 11
Verification Report Your Brother machine is equipped with a Transmission Verification Report that can be used as confirmation that you sent a fax. This report lists the name or fax number of the receiving party, the date, time, and duration of the transmission, the number of pages transmitted, and - Brother International MFC-J470DW | Quick Setup Guide - Page 12
or Pulse dialing mode (Canada only) Your machine comes set for a Tone dialing service. If you have a Pulse dialing (rotary) service, you need to change the dialing mode. a Press Menu. b Press a or b to choose Initial Setup. Press OK. c Press a or b to choose Tone/Pulse. Press OK. d Press a or b to - Brother International MFC-J470DW | Quick Setup Guide - Page 13
type These installation instructions are for Windows® XP Home, XP Professional, XP Professional x64 Edition, Windows Vista®, Windows® 7, Windows® 8, and Mac OS X v10.6.8, 10.7.x, 10.8.x. NOTE • For Windows Server® 2003/2008/2008 R2/2012, the drivers can be found on your model's download page at http - Brother International MFC-J470DW | Quick Setup Guide - Page 14
™ PaperPort™ 12SE. This software supports Windows® XP Home (SP3 or greater), XP Professional (SP3 or greater), XP Professional x64 Edition (SP2 or greater), Windows Vista® (SP2 or greater), Windows® 7 and Windows® 8. Update to the latest Windows® Service Pack before installing MFL-Pro Suite. • If - Brother International MFC-J470DW | Quick Setup Guide - Page 15
On-Line Registration screen appears, follow the on-screen instructions. Click Next. h If you do not want to set your machine as the default printer, clear the Set as Default Printer check box, and then click Next. i When the Setup is Complete window appears, confirm the settings, and then click - Brother International MFC-J470DW | Quick Setup Guide - Page 16
Help will also be installed automatically. Brother Help allows you to access the Brother Solutions Center when you click in the task tray. Finish The installation is now complete. To install optional applications: Now go to Page 33 NOTE Windows® 8 users: If the Brother manuals included on the CD - Brother International MFC-J470DW | Quick Setup Guide - Page 17
scanner cover until it locks securely into the open position. c Carefully guide the USB cable into the cable channel and out the back of the machine. Connect the cable to your Macintosh. IMPORTANT Make sure that the cable does not restrict the cover from closing, or an error may occur. Windows - Brother International MFC-J470DW | Quick Setup Guide - Page 18
Add Printer. g Choose your machine from the list. Click Add and then click Next. NOTE (OS X v10.8.x) Select Brother MFC-XXXX CUPS (where XXXX is your model name) driver from the Use pop-up menu. When the support screen appears, follow the on-screen instructions if you want to download Presto - Brother International MFC-J470DW | Quick Setup Guide - Page 19
scan, share and organize photos and documents using Presto! PageManager. a On the Brother Support screen, click the Presto! PageManager icon to go to the Presto! PageManager download site, and follow the on-screen instructions. Finish The installation is now complete. Macintosh Windows® Macintosh - Brother International MFC-J470DW | Quick Setup Guide - Page 20
machine from these computers, you will need to install the drivers and software. The following steps will guide you through the configuration and installation process. To achieve optimum results with normal everyday document printing, place the Brother machine as close to the network access point - Brother International MFC-J470DW | Quick Setup Guide - Page 21
instructions will offer three methods for setting up your Brother machine on a wireless network. If you began the wireless setup from step 7 on page 9, go to method b or c. For all other users, choose the method you prefer for your environment. Method a is the recommended way to connect (Windows - Brother International MFC-J470DW | Quick Setup Guide - Page 22
For Wireless Network Users c One-push setup using WPS or AOSS™ (Windows®, Macintosh and mobile devices) Use this method if your wireless access point/router supports automatic wireless (one-push) setup (WPS or AOSS™). Now go to page 25 22 - Brother International MFC-J470DW | Quick Setup Guide - Page 23
the on-screen instructions to set up the Brother machine. f Your machine will now try to connect to your wireless network. It may take a few minutes. Wireless setup is now complete. To install MFL-Pro Suite For Windows® users: Now go to Step 20-e on page 29 c Choose Wireless Network Connection - Brother International MFC-J470DW | Quick Setup Guide - Page 24
network. It may take a few minutes. Wireless setup is now complete. NOTE For mobile device users: • Connect your mobile device to a wireless access point/router using a Wi-Fi connection. • Download and install Brother iPrint&Scan (Android™/iOS/Windows® Phone) from your mobile device's application - Brother International MFC-J470DW | Quick Setup Guide - Page 25
, see the instructions provided with your wireless access point/router), and then press OK on your machine. NOTE For mobile device users: • Connect your mobile device to a wireless access point/router using a Wi-Fi connection. • Download and install Brother iPrint&Scan (Android™/iOS/Windows® Phone - Brother International MFC-J470DW | Quick Setup Guide - Page 26
For Wireless Network Users Troubleshooting If you need assistance during setup and want to contact Brother Customer Service, make sure you have your SSID (Network Name) and Network Key ready. We cannot assist you in locating this information. How can I find the wireless security information (SSID - Brother International MFC-J470DW | Quick Setup Guide - Page 27
, enter the key used as the first WEP key. Your Brother machine supports the use of the first WEP key only. See How can I find the wireless security information (SSID and Network Key*) on page 26 to confirm. The machine cannot detect a wireless access point/router that has WPS or AOSS™ enabled. If - Brother International MFC-J470DW | Quick Setup Guide - Page 28
This software supports Windows® XP Home (SP3 or greater), XP Professional (SP3 or greater), XP Professional x64 Edition (SP2 or greater), Windows Vista® (SP2 or greater), Windows® 7 and Windows® 8. Update to the latest Windows® Service Pack before installing MFL-Pro Suite. c Choose Wireless Network - Brother International MFC-J470DW | Quick Setup Guide - Page 29
17-b on page 21 and setup the wireless connection again. • If you are using WEP and the LCD displays Connected but your machine is not found on the network, make sure you entered the WEP key correctly. The WEP key is case-sensitive. f The installation of the Brother drivers will automatically - Brother International MFC-J470DW | Quick Setup Guide - Page 30
for up to five additional users. To purchase the NL-5 pack, contact your authorized Brother dealer or contact Brother customer service. To install optional applications: Now go to Page 33 NOTE Windows® 8 users: If the Brother manuals included on the CD-ROM are in PDF format, use Adobe® Reader® to - Brother International MFC-J470DW | Quick Setup Guide - Page 31
Report. See How to Print the Network Configuration Report in the Software and Network User's Guide. • If the Setup Network "Scan to" name screen appears, follow the instructions below. Windows® Macintosh Wireless Network d After the installation, the Brother software will search for the - Brother International MFC-J470DW | Quick Setup Guide - Page 32
) driver from the Use pop-up menu. When the support screen appears, follow the on-screen instructions if you want to download Presto! PageManager. You can also download Presto! PageManager later from the Brother Support screen. Click Next. i When this screen appears, click Close. 22 Install MFL - Brother International MFC-J470DW | Quick Setup Guide - Page 33
software can correct your scanned book images automatically. The Whiteboard Enhancer software cleans up and enhances text and images from photos taken of your whiteboard. Homepage Print 2* supported by CORPUS Homepage Print 2 is an application that helps you capture and edit web pages so that you - Brother International MFC-J470DW | Quick Setup Guide - Page 34
to factory default To restore all network settings of the internal Print/Scan server to the factory default, please follow the steps below: Text for Wireless Settings Most number keys have three or four letters printed on them. The keys for 0, # and l do not have printed letters because they - Brother International MFC-J470DW | Quick Setup Guide - Page 35
Reader® is now the default application for reading .pdf files until you change this file association. Brother CreativeCenter Get inspired. If you're using Windows®, double-click the Brother CreativeCenter icon on your desktop to access our FREE website with many ideas and resources for personal - Brother International MFC-J470DW | Quick Setup Guide - Page 36
providing you with "beautiful" and "long lasting" print results. Trademarks The Brother logo is a registered trademark of Brother Industries, Ltd. Brother is a trademark of Brother Industries, Ltd. Microsoft, Windows, Windows Vista, Windows Server and Internet Explorer are either registered
-
 1
1 -
 2
2 -
 3
3 -
 4
4 -
 5
5 -
 6
6 -
 7
7 -
8
-
9
-
10
-
11
-
12
-
13
-
14
-
15
-
16
-
17
-
18
-
19
-
20
-
21
-
22
-
23
-
24
-
25
-
26
-
27
-
28
-
29
-
30
-
31
-
32
-
33
-
34
-
35
-
36
 |
 |

1
Start Here
Quick Setup Guide
USA/CAN Version 0
MFC-J450DW
MFC-J470DW
MFC-J475DW
Thank you for choosing Brother, your support is important to us and we value your business. Your Brother product
is engineered and manufactured to the highest standards to deliver reliable performance, day-in and day-out.
Please read the Product Safety Guide first before you set up your machine. Then, please read this Quick Setup
Guide for the correct setup and installation.
Manuals in Spanish for this model are available on the enclosed CD-ROM.
Manuales en Español para este modelo están disponibles en el CD-ROM incluido.
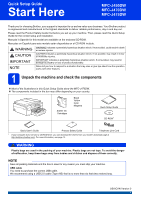
1
Unpack the machine and check the components
Most of the illustrations in this Quick Setup Guide show the MFC-J470DW
.
The components included in the box may differ depending on your country
.
1
If your computer does not have a CD-ROM drive, you can download the drivers from your model’s download page at
. For more information, see page 13.
WARNING
Plastic bags are used in the packing of your machine. Plastic bags are not toys. To avoid the danger
of suffocation, keep these bags away from babies and children and dispose of them correctly.
WARNING
WARNING
indicates a potentially hazardous situation which, if not avoided, could result in death
or serious injuries.
CAUTION
CAUTION
indicates a potentially hazardous situation which, if not avoided, may result in minor
or moderate injuries.
IMPORTANT
IMPORTANT
indicates a potentially hazardous situation which, if not avoided, may result in
damage to property or loss of product functionality.
NOTE
Notes tell you how to respond to a situation that may arise or give tips about how the operation
works with other features.
Starter Ink
Cartridges
Black
Yellow
Cyan
Magenta
Quick Setup Guide
CD-ROM
1
Basic User’s Guide
Product Safety Guide
Telephone Line Cord
NOTE
Save all packing materials and the box in case for any reason you must ship your machine.
USB cable
You need to purchase the correct USB cable.
We recommend using a USB 2.0 cable (Type A/B) that is no more than six feet (two meters) long.