Brother International ADS-1700W Quick Setup Guide
Brother International ADS-1700W Manual
 |
View all Brother International ADS-1700W manuals
Add to My Manuals
Save this manual to your list of manuals |
Brother International ADS-1700W manual content summary:
- Brother International ADS-1700W | Quick Setup Guide - Page 1
, use a USB 2.0 (Micro) or USB 3.0 (Micro) cable. These cables are not included with some models. • For detailed instructions, see the Online User's Guide at support.brother.com/manuals • Use of a USB 3.0 (Micro) cable to scan in Bus Power Mode is recommended (ADS-1190, ADS‑1200, ADS-1250W only - Brother International ADS-1700W | Quick Setup Guide - Page 2
, restart your computer. For detailed scanning instructions, see the Online User's Guide at support.brother.com/manuals B Using your scanner with your mobile device or as a standalone device (Wi-Fi® connection to network (ADS-1250W, ADS-1700W only)) ADS-1250W (To connect your device directly - Brother International ADS-1700W | Quick Setup Guide - Page 3
on the LCD of the machine. Follow all warnings and instructions marked on the machine. NOTE The illustrations in this guide show the ADS‑1700W. Compilation and Publication Under the supervision of Brother Industries, Ltd., this manual has been compiled and published, covering the latest product - Brother International ADS-1700W | Quick Setup Guide - Page 4
indicated on Specifications in the Online User's Guide. DO NOT connect it to a DC others and serious damage to the unit. Ensure that cables and cords leading to the unit are secured so as such as speakers or the base units of non-Brother cordless telephones. Doing so may interfere with the operation - Brother International ADS-1700W | Quick Setup Guide - Page 5
from the power outlet and contact Brother Authorized Service Personnel. If water, other liquids Guide. Failure to do so may result in injury to yourself or others, or damage to the machine or other property. Brother outlet, always hold the connector, not the cable, and pull firmly. Failure to do so - Brother International ADS-1700W | Quick Setup Guide - Page 6
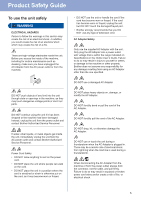
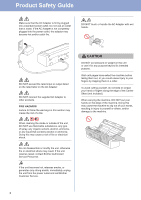
Product Safety Guide Make sure that the AC Adapter is firmly plugged into a standard smoke, or generates any strong smells, immediately unplug the unit from the power outlet and call Brother Customer Service. CAUTION DO NOT put pressure or weight on the unit or use it for any purpose beyond - Brother International ADS-1700W | Quick Setup Guide - Page 7
Guide service. • (ADS-1700W only) DO NOT touch the touchscreen while the machine is booting up. Doing this may cause an error. Important safety instructions DO NOT attempt to service to shut off the power completely. IMPORTANT • Brother cannot accept any financial or other responsibilities that may - Brother International ADS-1700W | Quick Setup Guide - Page 8
Brother International Corporation 200 Crossing Boulevard Bridgewater, NJ 08807-0911 USA TEL: (908) 704-1700 declares, that the products Product Name: ADS-1190, ADS-1200, ADS-1250W and ADS‑1700W installed and used in accordance with the instructions, may cause harmful interference to radio - Brother International ADS-1700W | Quick Setup Guide - Page 9
Product Safety Guide RF Exposure Notice (USA /Canada only) (ADS‑1250W, ADS-1700W only) This equipment complies with FCC Brother Industries, Ltd. All rights reserved. Open Source Licensing Remarks This product includes open-source software. Please visit the Brother Solutions Center at support.brother - Brother International ADS-1700W | Quick Setup Guide - Page 10
Visit us on the World Wide Web www.brother.com www.brotherearth.com D011D60013
-
 1
1 -
 2
2 -
 3
3 -
 4
4 -
 5
5 -
 6
6 -
 7
7 -
8
-
9
-
10
 |
 |

1
•
Not all models are available in all countries.
•
Thank you for choosing Brother. Your support
is important to us and we value your business.
Your Brother product is engineered and
manufactured to the highest standards to deliver
reliable performance, day-in and day-out.
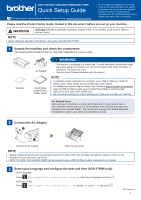
Quick Setup Guide
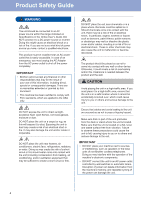
Please read the
Product Safety Guide
, located in this document, before you set up your machine.
WARNING
WARNING indicates a potentially hazardous situation which, if not avoided, could result in death or
serious injuries.
1
2
AC Adapter
Warranty
3
Connect the AC Adapter.
Open the Top Cover.
The latest manuals are available at the Brother Solutions Center: support.brother.com/manuals
Quick Setup
Guide/Product
Safety Guide
USA Version A
For Network Users:
Best practice is to configure a unique admin password for any network device.
Your machine’s default password is on the bottom of the machine (the eight-digit
character string marked “
Pwd
”). We recommend changing this default password
immediately in order to use network tools/utilities securely.
WARNING
• This product is packaged in a plastic bag. To avoid suffocation, keep plastic bags
away from babies and children. Do not use the bag in cribs, beds, carriages, or
play pens. The bag is not a toy.
• Use only the AC Adapter supplied with this product.
NOTE
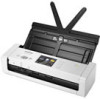
Unless otherwise specified, illustrations in this guide show the ADS-1700W.
NOTE
• To establish a local connection to a computer, use a USB 2.0 (Micro) or USB 3.0
(Micro) cable. These cables are not included with some models.
• For detailed instructions, see the
Online User’s Guide
at support.brother.com/manuals
• Use of a USB 3.0 (Micro) cable to scan in Bus Power Mode is recommended
(ADS-1190, ADS-1200, ADS-1250W only).
• We recommend saving the original packaging in case you must ship your machine.
NOTE
• Before loading documents into the Automatic Document Feeder (ADF), fan the paper and align its edges as shown in the
illustration on the machine's Top Cover.
• ADS-1190, ADS-1200 and ADS-1250W can be powered using a USB 3.0 (Micro) cable connected to a computer.
ADS-1190/ADS-1200/ADS-1250W/ADS-1700W
Unpack the machine and check the components
The components included in the box may differ depending on your country.
Connect the AC Adapter
Select your language and configure the date and time (ADS-1700W only)
• Select language
Press
(
Settings
)>
Initial Setup
>
Local Language
. Select your language and press
.
• Set Date & Time
Press
(
Settings
)>
Initial Setup
>
Date & Time
. Set the
Date
and
Time
and press
.