Audiovox D1718PK User Guide
Audiovox D1718PK - DVD Player - 7 Manual
 |
UPC - 044476039904
View all Audiovox D1718PK manuals
Add to My Manuals
Save this manual to your list of manuals |
Audiovox D1718PK manual content summary:
- Audiovox D1718PK | User Guide - Page 1
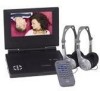
D1718PK PORTABLE 7" LCD MONITOR AND DVD PLAYER - Audiovox D1718PK | User Guide - Page 2
the driver if the LCD panel or video monitor is used for vehicle information, system control, rear or side observation or navigation. If the LCD panel or video monitor is used for television reception, video or DVD play, the LCD panel or video monitor must be installed so that these features will - Audiovox D1718PK | User Guide - Page 3
A. Introduction Thank you for choosing the D1718PK portable DVD player. The main features include a 7" Wide Screen (16:9 Aspect Ratio) Liquid Crystal Display (LCD) monitor and a DVD player. The unit applies the latest state of the art electronics and is designed for use in hotels, offices or your - Audiovox D1718PK | User Guide - Page 4
qualified service personnel if your system is in need of repair. 5. Cleaning Unit When cleaning, make sure the system is unplugged from the power source. not be available. Also refer to the instructions supplied with the discs. 7. Regional Coding Both the DVD player and disc are coded by region. - Audiovox D1718PK | User Guide - Page 5
LCD Monitor & DVD Player Combo 2. 1 x AC to DC Adapter 3. 1 x Remote Control with battery (CR2025) 4. 1 x Instruction Manual 5. 1 x Audio/Video Cable 6. 1 x DC Power Adapter 7. 1 x Rechargeable Battery 8. 2 x Wired Headphones 9. 1 x Carry Bag With Straps D. Powering and installation 1. Powering the - Audiovox D1718PK | User Guide - Page 6
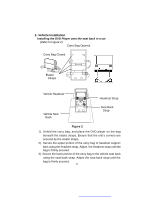
Strap Figure 2 1). Unfold the carry bag, and place the DVD player on the bag beneath the elastic straps. Ensure that the unit's corners are secured by the elastic straps. 2). Secure the upper portion of the carry bag to headrest support bars using the headrest strap. Adjust the headrest strap until - Audiovox D1718PK | User Guide - Page 7
/Left/Right/OK Buttons 3) Open Button 4) Previous/Next/Pause/ Stop/Play Buttons 5) Screen Mode Button 6) Remote Sensor 7) Power Indicator 8) Power On/Off Switch 9) Brightness Up/Down Control 10) Volume Up/Down Control 11) Headphone Jack 1 12) Headphone Jack 2 13) E-Port 14) AV In/Out Switch 15) AV - Audiovox D1718PK | User Guide - Page 8
2. Remote Control View (Refer to Figure 4) 1) Setup Button 2) Up Button 3) Previous Button 4) Enter controls to adjust the LCD's brightness and the DVD player's volume. e. To stop playing a disc, press STOP. f. To turn off the DVD player, slide the POWER ON/OFF to OFF. The DVD player's POWER - Audiovox D1718PK | User Guide - Page 9
/DOWN, and press ENTER to confirm the setting. Press LEFT to return. * Normal/PS: When the player is connected to a normal TV, and a wide picture is shown on the full screen. * Normal/LB: When the player is connected to a normal TV, and a wide picture is shown on the screen with a black strip - Audiovox D1718PK | User Guide - Page 10
are disc dependent. c). Select 'Screen Saver' using the UP/DOWN button. Screen Saver Screen *On: Enable screen saver *Off: Disable screen saver (off) *NOTE: The DVD player will enter the Screen Saver mode after approximately five minutes if the same image remains on the screen. 10 - Audiovox D1718PK | User Guide - Page 11
d). Select 'Last Memory' by UP/DOWN button. State Last Memory Screen *On: The unit will return to the last position on the disc. *Off: The unit will not return to the last position on the disc. 2) Select 'Video Quality Setup' by using the LEFT/RIGHT button, press ENTER to enter the video quality - Audiovox D1718PK | User Guide - Page 12
b).Select 'Contrast' by using the UP or DOWN button, then press ENTER. You can adjust the Contrast by pressing the LEFT or RIGHT button. Contrast Screen To exit 'Contrast' Setting, press ENTER again to return the main Menu. c).Select 'Hue' by using the UP or DOWN button, then press ENTER. You can - Audiovox D1718PK | User Guide - Page 13
Confirmed New Password. Press ENTER to confirm the change. Password Change Menu Screen NOTE: The default password is 3308. 4).With no disc inside the player select 'Preference' using the LEFT or RIGHT button, then press ENTER to enter the preference page. a. Select 'Audio' using the UP/DOWN button - Audiovox D1718PK | User Guide - Page 14
: Language and subtitle selection is only available for discs that are recorded in the above listed languages. If the selected language is not available, the player will play and display on the screen the original recorded language contained in the disc. 14 - Audiovox D1718PK | User Guide - Page 15
default password to set the parental level and change the password, you can record this default password in another area and delete it from this manual. Some discs can be limited depending on the age of users while some discs cannot. 15 - Audiovox D1718PK | User Guide - Page 16
1. Basic Operation POWER OPEN PLAY SLOW PAUSE STOP SKIP+(NEXT) SKIP-(PREVIOUS) FORWARD REVERSE LEFT/RIGHT/UP/DOWN ENTER NUMBERS RETURN MENU REPEAT A-B DISPLAY ANGLE SUBTITLE AUDIO ZOOM - Audiovox D1718PK | User Guide - Page 17
The contents of the menu vary from disc to disc. Press MENU during playback to display the menu. Some DVDs only allow you to select disc playback options using the DVD root menu. 3. DISPLAY 1. PLAYING TIME AND REMAINING TIME a. During playback press the 'DISPLAY' button to display the current Title - Audiovox D1718PK | User Guide - Page 18
c. Press 'DISPLAY' a 3rd time to display the Elapsed Time for the chapter. The heading will disappear automatically in 3 seconds. Chapter Elapsed Time Screen Display d. Press 'DISPLAY' a 4th time to display the Remaining Time for the chapter. The heading will disappear automatically in 3 seconds. - Audiovox D1718PK | User Guide - Page 19
until 'SUBTITLE OFF' is displayed. The Subtitle display will disappear automatically if the 'SUBTITLE' button is not pressed again within 3 seconds. Subtitle Screen Display * Some DVDs only allow access to this function through the - Audiovox D1718PK | User Guide - Page 20
. The audio display will disappear automatically if the AUDIO! button is not pressed within 3 seconds. Audio Language Screen Display * Some DVDs only allow access to this function through the DVD menu. 5. ZOOM During playback press ZOOM! to enlarge the picture by 2x, 3x or 4X with the current zoom - Audiovox D1718PK | User Guide - Page 21
6. A-B REPEAT a. During playback press first time 'A-B' to set the Starting Point A. A-B Repeat Starting Point Screen Display b. Press 'A-B'second time to set the Ending Point B and the layer will repeatedly play the part between Point A and Point B. A-B Repeat Ending Point Screen Display c. Press - Audiovox D1718PK | User Guide - Page 22
7. REPEAT a. During playback press 'REPEAT' once to repeatedly play the current chapter. Chapter Repeat Screen Display b. During playback press 'REPEAT' again to repeatedly play the current title. Title Repeat Screen Display c. During playback press 'REPEAT' a 3rd time to repeat all Chapters and - Audiovox D1718PK | User Guide - Page 23
a 4th time, to resume normal play. Repeat Off Screen Display 4. PLAYING AUDIO CDS When playing an audio CD press the DISPLAY button on the remote to view time information. The options below show you what information is available using this function. a. The current track and playing timeof that track - Audiovox D1718PK | User Guide - Page 24
c. Press 'DISPLAY' a 2nd time and Total Elasped appears along with the current track playing and the total time that the CD has been playing. Total Elapsed Screen Display d. Press 'DISPLAY' a 3rd time and Total Remain appears along with the current track playing and the amount of time remained on - Audiovox D1718PK | User Guide - Page 25
. Playback modes: Folder (normal playback) Single Repeat One (repeat playback of a song) Repeat Folder (repeat playback of a specific folder) Insert a MP3 CD, the DVD player will initialize the disc and the directory (folder) will be shown on the TV screen. MP3 MENU Screen Display When a MP3 disc is - Audiovox D1718PK | User Guide - Page 26
Use the ( NEXT ) button to move to the next song. Press the (PREVIOUS) button to move to the beginning of the previous song. USING THE REPEAT FEATURE The default mode is Folder. Pressing REPEAT consecutively changes the repeat options: • Single • Repeat One • Repeat Folder • Folder As you toggle - Audiovox D1718PK | User Guide - Page 27
6. Playing JPEG file 1) Load the JPEG Disc into tray. 2) Select JPEG file by pressing "UP/DOWN" button. 3) You can preview the JPEG file by pressing "Play" or "ENTER". 4) Pressing the "Left Key" will rotate the picture 90 degrees counterclocckwise. Pressing the "Right Key" will rotate the picture - Audiovox D1718PK | User Guide - Page 28
Connecting to a TV or another monitor a. Slide the AV In/Out switch to Out. b. Connect one end of the supplied audio/video adapter cable (1/8" ) plug into the unit's DVD's AV jack, and connect the other end to the AV INPUT jacks on your TV or Monitor through an optional RCA cable (white - Audiovox D1718PK | User Guide - Page 29
2. AV In Connecting to a Game or Camcorder. a. Slide the AV In/Out switch to In. b. Connect one end of the supplied audio/video adapter cable (1/8") plug into the unit's DVD's AV jack, and connect the other end to the AUDIO OUTPUT jacks on your Game or Camcorder through an optional RCA cable (white - Audiovox D1718PK | User Guide - Page 30
Port" at the same time when in "AV IN" mode. Unplug the game controller when using the A/V input jack. 4. Connecting Headphones Plug the headphones into either Headphone 1 jack or Headphone 2 jack on the right side of the D1718PK. Plugging into Headphone jack 1 will disable the internal speakers. 30 - Audiovox D1718PK | User Guide - Page 31
"Memory Effect" and thus can be recharged safely regardless of whether the battery is fully or only partially discharged. Please fully charge the battery prior to first use. NOTE: When the DVD player is used with the battery as a power source, ensure that the battery has been charged for at least - Audiovox D1718PK | User Guide - Page 32
please connect the power jack directly into the DVD player and leave the POWER switch in the off position. Using and Maintaining your Rechargeable Batteries 1. Please make sure you always use only the AC adapter included with the player to recharge your batteries. 2. Recharge efficiency will degrade - Audiovox D1718PK | User Guide - Page 33
. The lock position is indicated by a click. The unit will fit snugly to the player. 5. Push the battery plug into the DVD player DC input jack. Removing the Battery Pack: 1. First, make sure the player is off and the battery plug has been discon- nected. 2. Press the release button on the left of - Audiovox D1718PK | User Guide - Page 34
problems, to costs incurred for installation, removal or reinstallation of the product, or to damage to digital memory/media devices, gaming devices, discs, speakers, accessories REPLACEMENT PROVIDED ABOVE AND, IN NO EVENT, SHALL THE COMPANY'S LIABILITY EXCEED THE PURCHASE PRICE : AUDIOVOX ELECTRONICS - Audiovox D1718PK | User Guide - Page 35
© 2007 Audiovox Electronics Corporation 128-8025
-
 1
1 -
 2
2 -
 3
3 -
 4
4 -
 5
5 -
 6
6 -
 7
7 -
8
-
9
-
10
-
11
-
12
-
13
-
14
-
15
-
16
-
17
-
18
-
19
-
20
-
21
-
22
-
23
-
24
-
25
-
26
-
27
-
28
-
29
-
30
-
31
-
32
-
33
-
34
-
35
 |
 |

D1718PK
PORTABLE 7" LCD MONITOR AND DVD PLAYER