Amana NED4600YQ Installation Instruction
Amana NED4600YQ Manual
 |
View all Amana NED4600YQ manuals
Add to My Manuals
Save this manual to your list of manuals |
Amana NED4600YQ manual content summary:
- Amana NED4600YQ | Installation Instruction - Page 1
3 Electrical Requirements 4 Install Leveling Legs 5 Electrical Connection 6 VENTING 12 Venting Requirements 12 Plan Vent System 13 Venting Kits 13 Install Vent System 14 Connect Vent 15 Level Dryer 15 Complete Installation Checklist 15 Reverse Door Swing (Optional 16 Troubleshooting 19 - Amana NED4600YQ | Installation Instruction - Page 2
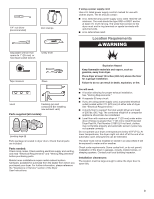
Tools and Parts Gather the required tools and parts before starting installation. Read and follow the instructions provided with any tools listed here. Tools needed: Flat-blade screwdriver 2 #2 Phillips screwdriver Wire stripper (direct wire installations) Tin snips (new vent installations) - Amana NED4600YQ | Installation Instruction - Page 3
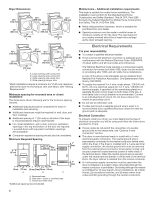
Service" section of the Dryer User Instructions. You will need: ■■ A location allowing for proper exhaust installation. See "Venting Requirements." ■■ A separate 30 amp circuit. ■■ If you are using power supply cord, a grounded electrical outlet located within 2 ft. (610 mm) of either side of dryer - Amana NED4600YQ | Installation Instruction - Page 4
the dryer for the exhaust vent with elbow. See "Venting Requirements." Minimum spacing for recessed area or closet installation The dimensions shown following are for the minimum spacing allowed. ■■ Additional spacing should be considered for ease of installation and servicing. ■■ Additional - Amana NED4600YQ | Installation Instruction - Page 5
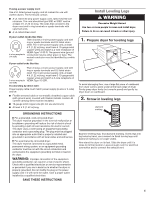
Install Leveling Legs WARNING Excessive Weight Hazard Use two or more people to move and install dryer. Failure to do so can result in back or other injury. 1. Prepare dryer the dryer on its feet. Slide the dryer until it is close to its final location. Leave enough room for electrical connection and - Amana NED4600YQ | Installation Instruction - Page 6
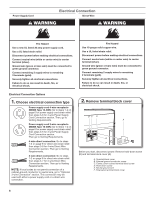
, fire, or electrical shock. Electrical Connection Options 1. Choose electrical connection type Power supply cord 4-wire receptacle (NEMA Type 14-30R): Go to steps 1-2 on page 6 for power supply cord strain relief: then steps 3-6 for 4-wire Power Supply Cord Connection section. Then, go to Venting - Amana NED4600YQ | Installation Instruction - Page 7
Be sure that the wire insulation on the power supply cord is inside the strain relief. The strain relief should have a tight fit with the dryer cabinet and be in a horizontal position. Do not further tighten strain relief screws at this point. For 3-wire Power Supply Cord Connection, see page 8. For - Amana NED4600YQ | Installation Instruction - Page 8
to outer terminal block screws. Tighten screws. Finally, reinsert tab of terminal block cover into slot of dryer rear panel. Secure cover with hold-down screw. Now, go to Venting Requirements. Remove center, silver-colored terminal block screw (B). 4. Connect neutral wire BC Connect neutral wire - Amana NED4600YQ | Installation Instruction - Page 9
onto the strain relief threads (C). 2. Attach direct wire cable to strain relief (127 5" mm) Direct wire cable must have 5 ft. (1.52 m) of extra length so dryer may be moved if needed. Strip 5" (127 mm) of outer covering from end of cable, leaving bare ground wire at 5" (127 mm). Cut 11/2" (38 - Amana NED4600YQ | Installation Instruction - Page 10
terminal block screws (hooks facing right). Squeeze hooked ends together and tighten screws. Finally, reinsert tab of terminal block cover into slot of dryer rear panel. Secure cover with hold-down screw. Now, go to Venting Requirements. Remove center, silver-colored terminal block screw (B). 10 - Amana NED4600YQ | Installation Instruction - Page 11
hooked ends together and tighten screws. Finally, reinsert tab of terminal block cover into slot of dryer rear panel. Secure cover with hold-down screw. Now, go to Venting Requirements. Optional 3-wire Connection You must verify with a qualified electrician that this grounding method is acceptable - Amana NED4600YQ | Installation Instruction - Page 12
crushing and kinking. Flexible metal vent: (Acceptable only if accessible to clean) ■■ Must be fully extended and supported in final dryer location. ■■ Remove excess to avoid sagging and kinking that may result in reduced airflow and poor performance. ■■ Do not install in enclosed walls, ceilings - Amana NED4600YQ | Installation Instruction - Page 13
's instructions. A A. Dryer B. Elbow C. Wall D. Exhaust hood C D E F G B H E. Clamps F. Rigid metal or flexible metal vent G. Vent length necessary to connect elbows H. Exhaust outlet Over-The-Top installation (also available with one offset elbow) Periscope installation NOTE: The following kits - Amana NED4600YQ | Installation Instruction - Page 14
of dryer. ■■ Reduce performance, resulting in longer drying times and increased energy usage. The Vent system chart provides venting requirements that will help achieve best drying performance. 4 Rigid metal 5 Rigid metal 80 ft. (24.4 m) 70 ft. (21.3 m) Install Vent System 1. Install exhaust - Amana NED4600YQ | Installation Instruction - Page 15
wire installation, turn on power. q Check that dryer is level. See "Level Dryer". q Remove film on console and any tape remaining on dryer. q Wipe dryer drum interior thoroughly with a damp cloth to remove any dust. q Read "Dryer Use" in your Use and Care Guide. q Set the dryer on a full heat cycle - Amana NED4600YQ | Installation Instruction - Page 16
. This odor is common when the heating element is first used. The odor will go away. Reverse Door Swing (Optional) If your door is the 29" Large Side-Swing Door, follow steps 1-6. 2. Remove bottom screws Open dryer door. Remove bottom screws from dryer cabinet side of hinges. Loosen (do not remove - Amana NED4600YQ | Installation Instruction - Page 17
. Tighten screws. Insert and tighten top screws in hinges. 6. Check door strike alignment Open dryer door. Remove bottom screws from dryer cabinet side of hinges. Loosen (do not remove) top screws from dryer cabinet side of hinges. 3. Lift door off top screws Close door and check that door strike - Amana NED4600YQ | Installation Instruction - Page 18
5. Remove screws from door 8. Attach door hinges Remove screws at top, bottom, and side of door (4 screws). Keep door screws separate from hinge screws as they are diferent sizes. Holding door over towel on dryer, grasp sides of outer door and lift to separate it from inner door. NOTE: Do not pry - Amana NED4600YQ | Installation Instruction - Page 19
maybe needed to reinstall door. Insert screws into the bottom holes on left side of dryer cabinet. Tighten screws halfway. Position door so large end Troubleshooting See the Use and Care Guide or visit our website and reference Frequently Asked Questions to possibly avoid the cost of a service call - Amana NED4600YQ | Installation Instruction - Page 20
W10096987A W10097001A-SP 2©Al0l2r0ig1h0tsWrehsirelprvoeodl Corporation. ® Registered Trademark/TM Trademark of Whirlpool, U.S.A. 2/10 Printed in U.S.A.
-
 1
1 -
 2
2 -
 3
3 -
 4
4 -
 5
5 -
 6
6 -
 7
7 -
8
-
9
-
10
-
11
-
12
-
13
-
14
-
15
-
16
-
17
-
18
-
19
-
20
 |
 |

W10096987A
W10097001A-SP
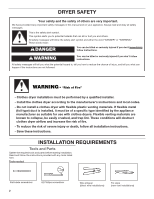
DRYER SAFETY
.........................................................................
2
INSTALLATION REQUIREMENTS
.............................................
2
Tools and Parts
......................................................................
2
Location Requirements
.........................................................
3
Electrical Requirements
........................................................
4
Install Leveling Legs
..............................................................
5
Electrical Connection
............................................................
6
VENTING
...................................................................................
12
Venting Requirements
.........................................................
12
Plan Vent System
.................................................................
13
Venting Kits
..........................................................................
13
Install Vent System
..............................................................
14
Connect Vent
........................................................................
15
Level Dryer
...........................................................................
15
Complete Installation Checklist
.........................................
15
Reverse Door Swing (Optional)
..........................................
16
Troubleshooting
...................................................................
19
ELECTRIC DRYER INSTALLATION INSTRUCTIONS
29" WIDE MODELS - U.S.A. ONLY
Para obtener acceso al manual de uso y cuidado en español, o para obtener información adicional acerca de su producto, visite:
www.whirlpool.com
Tenga listo su número de modelo completo. Puede encontrar el número de modelo y de serie dentro de la cavidad superior de la puerta.
Table of Contents