Amana ASD2575BRB Installation Instruction
Amana ASD2575BRB Manual
 |
View all Amana ASD2575BRB manuals
Add to My Manuals
Save this manual to your list of manuals |
Amana ASD2575BRB manual content summary:
- Amana ASD2575BRB | Installation Instruction - Page 1
7 Connect Water Supply 8 REFRIGERATOR CARE 10 Cleaning 10 Lights 10 Vacation and Moving Care 10 PROBLEM SOLVER 11 WATER FILTER CERTIFICATIONS 15 PERFORMANCE DATA SHEET 16 SÉCURITÉ DU RÉFRIGÉRATEUR 18 Mise au rebut appropriée de votre vieux réfrigérateur 19 INSTRUCTIONS D'INSTALLATION - Amana ASD2575BRB | Installation Instruction - Page 2
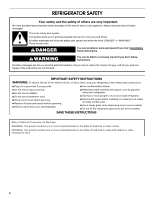
power before installing ice maker (on ice maker kit ready models only). ■ Use a sturdy glass when dispensing ice (on some models). ■ Do not hit the refrigerator glass doors (on some models). SAVE THESE INSTRUCTIONS State of California Proposition 65 Warnings: WARNING: This product contains - Amana ASD2575BRB | Installation Instruction - Page 3
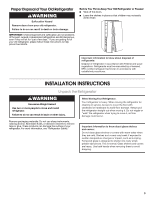
IMPORTANT: Child entrapment and suffocation are not problems of the past. Junked or abandoned refrigerators are still dangerous, even if they will sit for "just a few days." If you are getting rid of your old refrigerator, please follow these instructions to help prevent accidents. Before You Throw - Amana ASD2575BRB | Installation Instruction - Page 4
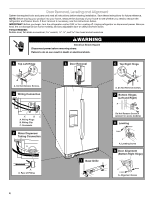
instructions below. IMPORTANT: Before you begin, turn the refrigerator control OFF or turn cooling off. Unplug refrigerator or disconnect power. Remove food, the ice storage bin (on some models A. Wiring Plugs B. Wiring Clip C. Grommets 2 Water Dispenser Tubing Connection A A A. Face of Fitting - Amana ASD2575BRB | Installation Instruction - Page 5
. Failure to do so can result in death or electrical shock. 1. Unplug refrigerator or disconnect power. 2. Open both doors (refrigerator and freezer) and the water filter cover door. It is not necessary to remove the water filter itself. 3. Remove the base grille by pulling up on the bottom outside - Amana ASD2575BRB | Installation Instruction - Page 6
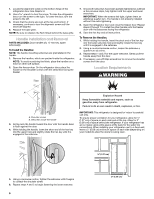
. Handle Installation and Removal PARTS INCLUDED: Door handles (2 facing the refrigerator. 9. Save the hex key and all instructions. To Remove water line connections. When installing your refrigerator next to a fixed wall, leave a 2" (5.08 cm) minimum space on each side (depending on your model - Amana ASD2575BRB | Installation Instruction - Page 7
after heavy usage. ■ If your refrigerator has a water filter, it may further reduce the water pressure when used in conjunction with a reverse osmosis system. Remove the water filter. See "Water Filtration System" in the User Instructions, User Guide, or Use & Care Guide. If you have questions about - Amana ASD2575BRB | Installation Instruction - Page 8
to meet the water line inlet, which is located on the back of the refrigerator cabinet as shown. Leave a coil of copper tubing to allow the refrigerator to be pulled out of the cabinet or away from the wall for service. TOOLS NEEDED: Gather the required tools and parts before starting installation - Amana ASD2575BRB | Installation Instruction - Page 9
On some models, the ice maker is equipped with a built-in water strainer. If your water conditions require a second water strainer, install it in the ¹⁄₄" (6.35 mm) water line at either tube connection. Obtain a water strainer from your nearest appliance dealer. AB CD A. Refrigerator water tubing - Amana ASD2575BRB | Installation Instruction - Page 10
ice bin. 4. Depending on the model, turn the Refrigerator Control to OFF or turn cooling off. See "Using the Controls" in the User Instructions, User Guide, or Use & Care Guide. 5. Unplug refrigerator. 6. Clean, wipe, and dry thoroughly. 7. Take out all removable parts, wrap them well, and tape them - Amana ASD2575BRB | Installation Instruction - Page 11
or reset the circuit breaker. If the problem continues, contact a licensed electrician. ■ Control or cooling is not turned on - Turn on the refrigerator control, or turn cooling on. See "Using the Controls" in the User Instructions or User Guide. ■ New installation - Following installation, allow 24 - Amana ASD2575BRB | Installation Instruction - Page 12
often or not closed completely - This allows humid air to enter the refrigerator. Minimize door openings, keep the doors fully closed, and make sure blocked. See "Water and Ice Dispensers" in the User Instructions or User Guide. NOTE: On models with LED lights, call for assistance or service if the - Amana ASD2575BRB | Installation Instruction - Page 13
that the household has adequate water pressure. See "Water Supply Requirements." ■ Water filter is installed incorrectly - Make sure the filter is properly installed. See "Water Filtration System" in the User Instructions or User Guide. ■ A reverse osmosis water filtration system is connected to - Amana ASD2575BRB | Installation Instruction - Page 14
- After connecting the refrigerator to a water source, flush the water system. See "Water and Ice Dispensers" in the User Instructions or User Guide. ■ Dispenser is locked - Unlock the dispenser. See "Water and Ice Dispensers" in the User Instructions or User Guide. ■ Water filter is clogged or - Amana ASD2575BRB | Installation Instruction - Page 15
the air in the water lines. See "Water and Ice Dispensers" in the User Instructions or User Guide. ■ Residual ice in the dispenser chute is melting - Make sure the ice chute is free of ice shavings or pieces. Water is leaking from the back of the refrigerator ■ Water line connections are not - Amana ASD2575BRB | Installation Instruction - Page 16
red, it is recommended that you replace the filter. ■ After changing the water filter, flush the water system. See "Water and Ice Dispensers" or "Water Dispenser" in the User Instructions or User Guide. ■ These contaminants are not necessarily in your water supply. While testing was performed under - Amana ASD2575BRB | Installation Instruction - Page 17
Notes 17 - Amana ASD2575BRB | Installation Instruction - Page 18
des glaçons (sur certains modèles). ■ Ne pas heurter les portes en verre du réfrigérateur (sur certains modèles). CONSERVEZ CES INSTRUCTIONS Avertissements de la proposition 65 de l'État de Californie : AVERTISSEMENT : Ce produit contient au moins un produit chimique connu par l'État de Californie - Amana ASD2575BRB | Installation Instruction - Page 19
ée de votre vieux réfrigérateur AVERTISSEMENT Risque de suffoquer Enlever les portes de votre vieux réfrigérateur. Le non-respect de cette instruction peut causer un décès ou des lésions cérébrales. Avant de jeter votre vieux réfrigérateur ou congélateur : ■ Enlever les portes. ■ Laisser les - Amana ASD2575BRB | Installation Instruction - Page 20
s'il est nécessaire d'ôter les portes de réfrigérateur et de congélateur. S'il s'avère nécessaire d'ôter les portes, voir les instructions ci-dessous. IMPORTANT : Avant de commencer, tourner la commande du réfrigérateur à OFF (arrêt) ou désactiver le refroidissement. Débrancher le réfrigérateur - Amana ASD2575BRB | Installation Instruction - Page 21
réfrigérateur semble instable ou si vous désirez que les portes se ferment plus facilement, ajuster l'inclinaison du réfrigérateur en observant les instructions cidessous : 1. Déplacer le réfrigérateur à sa position finale. 2. Retirer la grille de la base pour repérer les deux vis de nivellement - Amana ASD2575BRB | Installation Instruction - Page 22
l'autre poignée sur la porte du congélateur en orientant les vis de blocage vers le réfrigérateur. 9. Conserver la clé hexagonale et toutes les instructions. Retrait des poignées : 1. Tout en maintenant la poignée, insérer l'extrémité courte de la clé hexagonale dans le trou de vis de blocage - Amana ASD2575BRB | Installation Instruction - Page 23
, réfrigérateur ou congélateur selon le modèle) au réglage désiré. Voir "Utilisation des commandes" dans les instructions d'utilisation, le guide d'utilisation, ou le guide d'utilisation et d'entretien. Spécifications de l'alimentation en eau Rassembler les outils et pièces nécessaires avant de - Amana ASD2575BRB | Installation Instruction - Page 24
. Retirer le filtre à eau. Voir "Système de filtration d'eau" dans les instructions d'utilisation, le guide d'utilisation, ou le guide d'utilisation et d'entretien. Si vous avez des questions au sujet de la pression de le réfrigérateur du placard ou du mur en cas d'intervention de service. 24 - Amana ASD2575BRB | Installation Instruction - Page 25
Style 2 1. Débrancher le réfrigérateur ou déconnecter la source de courant électrique. 2. FERMER le robinet principal d'arrivée d'eau. OUVRIR le robinet de puisage le plus proche pendant une période suffisante pour que la canalisation d'eau se vide. 3. Repérer une canalisation d'eau froide verticale - Amana ASD2575BRB | Installation Instruction - Page 26
sur une prise à 3 alvéoles reliée à la terre. 2. Vider le système d'eau. Voir "Distributeurs d'eau et de glaçons" dans les instructions d'utilisation ou le guide d'utilisation. REMARQUE : Attendre 24 heures pour produire la première quantité de glaçons. Attendre 72 heures pour que le bac à glaçons - Amana ASD2575BRB | Installation Instruction - Page 27
eau et de glaçons" (dans les instructions d'utilisation, le guide d'utilisation, ou le guide d'utilisation et d'entretien) ou si les çons. Si vous choisissez d'arrêter le fonctionnement du réfrigérateur avant votre départ : 1. Enlever tous les aliments du réfrigérateur. 2. Si votre réfrigérateur - Amana ASD2575BRB | Installation Instruction - Page 28
n'est pas activé(e) - Activer la commande du réfrigérateur ou le refroidissement. Voir "Utilisation des commandes" dans les instructions d'utilisation ou le guide d'utilisation. ■ Nouvelle installation - Attendre 24 heures après l'installation pour permettre au réfrigérateur et au congélateur de - Amana ASD2575BRB | Installation Instruction - Page 29
obtenir de l'aide ou un dépannage si les témoins lumineux intérieurs ne s'allument pas lorsqu'on ouvre une porte. Voir la garantie dans les instructions d'utilisation ou le guide d'utilisation pour savoir qui contacter. 29 - Amana ASD2575BRB | Installation Instruction - Page 30
(veilleuse), s'assurer que le détecteur de lumière du distributeur n'est pas obstrué. Voir "Distributeurs d'eau et de glaçons" dans les instructions d'utilisation ou le guide d'utilisation. REMARQUE : Sur les modèles équipés de témoins DEL, appeler les numéros fournis pour obtenir de l'aide ou un - Amana ASD2575BRB | Installation Instruction - Page 31
réfrigérateur à une source d'alimentation en eau, vidanger le système d'eau. (Voir "Distributeurs d'eau et de glaçons" dans les instructions d'utilisation ou le guide d'utilisation.) Attendre 24 heures pour que la production de glaçons commence. Attendre 72 heures pour que la production de glaçons - Amana ASD2575BRB | Installation Instruction - Page 32
eau est obstrué ou mal installé - Remplacer le filtre ou le réinstaller correctement. Voir "Système de filtration de l'eau" dans les instructions d'utilisation ou le guide d'utilisation. Mauvais goût, odeur ou couleur grisâtre des glaçons ou de l'eau ■ Raccords de plomberie neufs - Des raccords de - Amana ASD2575BRB | Installation Instruction - Page 33
. Rincer le système de distribution d'eau pour évacuer l'air des canalisations. Voir "Distributeurs d'eau et de glaçons" dans les instructions d'utilisation ou le guide d'utilisation. ■ De la glace restée dans la goulotte du distributeur fond - S'assurer qu'il n'y a aucun copeau ou morceau de glace - Amana ASD2575BRB | Installation Instruction - Page 34
= 68°F à 71,6°F (20°C à 22°C). Capacité de service nominale = 200 gallons (757 litres). ■ Il est important que de remplacer le filtre. Style 4 - Appuyer sur FILTER (filtre) pour vérifier l'état du filtre à "Garantie" (dans les instructions d'utilisation ou le guide d'utilisation) pour obtenir le - Amana ASD2575BRB | Installation Instruction - Page 35
Notes 35 - Amana ASD2575BRB | Installation Instruction - Page 36
W10436749B © 2013 Whirlpool Corporation. All rights reserved. Used under license in Canada. Tous droits réservés. Utilisée sous licence au Canada. 1/13 Printed in Mexico Imprimé au Mexique
-
 1
1 -
 2
2 -
 3
3 -
 4
4 -
 5
5 -
 6
6 -
 7
7 -
8
-
9
-
10
-
11
-
12
-
13
-
14
-
15
-
16
-
17
-
18
-
19
-
20
-
21
-
22
-
23
-
24
-
25
-
26
-
27
-
28
-
29
-
30
-
31
-
32
-
33
-
34
-
35
-
36
 |
 |

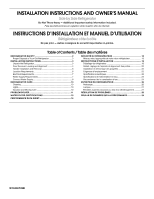
INSTALLATION INSTRUCTIONS AND OWNER’S MANUAL
Side by Side Refrigerator
Do Not Throw Away — Additional important safety information included.
Para las instrucciones en español, visite nuestro sitio de internet.
INSTRUCTIONS D’INSTALLATION ET MANUEL D’UTILISATION
Réfrigérateur côte à côte
Ne pas jeter — Autres consignes de sécurité importantes ci-jointes.
Table of Contents / Table des matières
REFRIGERATOR SAFETY
.....................................................................
2
Proper Disposal of Your Old Refrigerator
...........................................
3
INSTALLATION INSTRUCTIONS
.........................................................
3
Unpack the Refrigerator
......................................................................
3
Door Removal, Leveling and Alignment
.............................................
4
Handle Installation and Removal
........................................................
6
Location Requirements
.......................................................................
6
Electrical Requirements
......................................................................
7
Water Supply Requirements
...............................................................
7
Connect Water Supply
........................................................................
8
REFRIGERATOR CARE
.......................................................................
10
Cleaning
............................................................................................
10
Lights
.................................................................................................
10
Vacation and Moving Care
...............................................................
10
PROBLEM SOLVER
.............................................................................
11
WATER FILTER CERTIFICATIONS
....................................................
15
PERFORMANCE DATA SHEET
..........................................................
16
SÉCURITÉ DU RÉFRIGÉRATEUR
.....................................................
18
Mise au rebut appropriée de votre vieux réfrigérateur
.....................
19
INSTRUCTIONS D'INSTALLATION
...................................................
19
Déballage du réfrigérateur
................................................................
19
Retrait, réglage de l'aplomb et alignement des portes
....................
20
Installation et démontage des poignées
..........................................
22
Exigences d'emplacement
...............................................................
23
Spécifications électriques
.................................................................
23
Spécifications de l’alimentation en eau
............................................
23
Raccordement de la canalisation d'eau
...........................................
24
ENTRETIEN DU RÉFRIGÉRATEUR
...................................................
26
Nettoyage
..........................................................................................
26
Lampes
.............................................................................................
27
Entretien avant les vacances ou lors d’un déménagement
.............
27
RÉSOLUTION DE PROBLÈMES
........................................................
28
FEUILLE DE DONNÉES SUR LA PERFORMANCE
..........................
34
W10436749B