Adaptec XHub7 Quick Start Guide
Adaptec XHub7 - Plus Hub - Stackable Manual
 |
UPC - 760884138472
View all Adaptec XHub7 manuals
Add to My Manuals
Save this manual to your list of manuals |
Adaptec XHub7 manual content summary:
- Adaptec XHub7 | Quick Start Guide - Page 1
Adaptec XHub Quick Start Guide R - Adaptec XHub7 | Quick Start Guide - Page 2
Package 2 This Is Your Hub 3 Plugging in Your Hub 6 Plugging in Your Devices 7 Organizing Your Cables (Plus models only) 8 Stacking Your Hubs 9 Removing the Desk Stand (Plus models only) 12 Personalizing Your Adaptec XHub 13 What's On the CD 14 About USB 2.0 Drivers 14 Technical - Adaptec XHub7 | Quick Start Guide - Page 3
and start using it right away. What's in the Package The Adaptec XHub package includes: I Adaptec XHub 4- or 7-port USB 2.0 hub I USB 2.0-certified cable I Fully-powered 2.5A (XHub4/4 Plus) or 5A (XHub7 Plus) power adapter I XHub Quick Start Guide I XHub CD (See What's On the CD on page 14 for more - Adaptec XHub7 | Quick Start Guide - Page 4
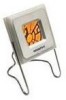
This Is Your Hub XHub4 Plus and XHub7 Plus Models Clear photo cover Picture Frame plate Latch Ports Desk stand LEDs (inside top of hub) Serial number Stacking connector Cable management loop Silicone foot Ports Plus Model (XHub7 Plus shown here) 3 Stacking tab - Adaptec XHub7 | Quick Start Guide - Page 5
XHub4 Model Face plate LEDs (inside top of hub) Stacking connector Serial number Latch Ports Silicone foot Ports XHub4 Stacking tab Note: The ports correspond to the LEDs. When you plug a device into the hub, the matching LED lights up. (Depending on the device, the LED may light up only when - Adaptec XHub7 | Quick Start Guide - Page 6
Port Details USB 2.0 uplink port USB 2.0 device ports (7) Power port Port numbers 1 2 3 4 5 6 7 XHub7 Plus Port Details USB 2.0 uplink port USB 2.0 device ports (4) Power port 4 Port numbers 1 2 3 4 XHub4 / XHub4 Plus Port Details More information about your XHub is in Technical - Adaptec XHub7 | Quick Start Guide - Page 7
Power LED remains lit when the hub is plugged in, the hub enters power-saver mode if there has been no activity on the USB bus for 3 ms. Power LED Step 3: Plug USB cable into USB port on computer. Step 2: Plug USB cable into XHub USB Uplink port. Hub Connections 6 Step 1: Plug power adapter into - Adaptec XHub7 | Quick Start Guide - Page 8
Plugging in Your Devices Follow the picture below to connect your USB devices to your XHub unit. You can plug devices into any of the USB ports. USB Device Cable into USB Port USB Device Connections 7 - Adaptec XHub7 | Quick Start Guide - Page 9
Organizing Your Cables (Plus models only) You can use the cable management loop in the desk stand to help you keep your device cables organized. loop. . Step 1: Plug in device cable. Unplugged cables remain secured in cable management loop. Cable Management Using the Desk Stand (Plus models only) 8 - Adaptec XHub7 | Quick Start Guide - Page 10
If you want to add more USB 2.0 ports to your system, Adaptec XHubs can be daisy-chained (linked in series) and stacked together. (See Making the Most of Your Daisy-Chain on page 11 for more information.) Hubs can be piled on a flat surface (such as your desk) or they can be joined together using - Adaptec XHub7 | Quick Start Guide - Page 11
2 Follow the pictures below to join your hubs together. Step 1: Put two hubs together. Step 2: Slide top hub down to lock in place. LEDs visible along top Ports accessible from bottom Stacking Hubs on a Desk Stand Note: Keep gravity in mind: no more than three hubs should be stacked on a desk stand. - Adaptec XHub7 | Quick Start Guide - Page 12
2.0 cable, following the connection suggestions in the diagram below. XHub4/XHub4 Plus Use any USB port to connect to another XHub XHub7 Plus For maximum performance, use USB port 1, 3, or 5, especially when stacking more than two hubs. Making the Most of Your Daisy-Chain You can connect up to five - Adaptec XHub7 | Quick Start Guide - Page 13
Removing the Desk Stand (Plus models only) Follow the picture below to remove your hub from the desk stand. Releasing the Hub from the Desk Stand To replace the desk stand, pull the sides of the stand slightly apart and carefully fit the hub into place. Avoid scraping the ends of the desk stand - Adaptec XHub7 | Quick Start Guide - Page 14
The following sections explain how to personalize your Adaptec XHub. Adding a Photo (Plus models only) You can place a photo frame plate into the hub until the latch snaps closed. More Customization Options You can find more customization options at the Adaptec Web site. Go to www.adaptec.com/usb. 13 - Adaptec XHub7 | Quick Start Guide - Page 15
Registration card I Adaptec XHub Quick Start Guide I ReadMe files About USB 2.0 Drivers USB 2.0 driver software with hub support is required for the XHub unit to operate at USB 2.0 speeds. USB 2.0 drivers with hub support can be found on the XHub CD included in your XHub kit. USB 1.1 devices cannot - Adaptec XHub7 | Quick Start Guide - Page 16
Self-powered AC 100 V - 240 V, 50 Hz/60 Hz DC 5 V/2.5 A Adaptec USB 2 Hi-Speed 7-Port Hub (XHub 7 Plus) USB Compliant Version Number of USB Ports Operating Temperature Power Source Power Adapter Input Power Adapter Output USB 2.0, USB Hi-Speed Certified 7 0 °C - 40 °C Self-powered AC 100 V - 240 - Adaptec XHub7 | Quick Start Guide - Page 17
, mechanical, photocopying, recording or otherwise, without the prior written consent of Adaptec, Inc., 691 South Milpitas Blvd., Milpitas, CA 95035. Trademarks Adaptec, XHub, and the Adaptec logo are trademarks of Adaptec, Inc., which may be registered in some jurisdictions. Microsoft, Windows 98SE - Adaptec XHub7 | Quick Start Guide - Page 18
per day, 7 days per week. I To speak with a Technical Support Specialist, Call +1 408-934-7274, Monday-Friday, 3:00 a.m. to 5:00 p.m., Pacific Time. To expedite your service, have your XHub unit in front of you. I To order Adaptec products, including accessories and cables, call +1 408-957-7274. 17 - Adaptec XHub7 | Quick Start Guide - Page 19
to Friday, 10:00 A.M. to 4:30 P.M., Eastern Australia Time. To expedite your service, have your computer in front of you. Hong Kong and China I Visit our Web site at http://www.adaptec.com. I To speak with a Technical Support Specialist, call +852 2869 7200, Monday to Friday, 10:00 A.M. to 5:00 - Adaptec XHub7 | Quick Start Guide - Page 20
, call +65 245 7470, Monday to Friday, 10:00 A.M. to 5:00 P.M. To expedite your service, have your computer in front of you. Japan I Visit our Web site at http://www.adaptec.co.jp. I To speak with a Technical Support Specialist, call +81 3 5308 6120 Monday-Friday, 9:00 A.M. to 12:00 P.M and 1:00 - Adaptec XHub7 | Quick Start Guide - Page 21
, or refund the purchaser's purchase price for the product, provided it is delivered at the purchaser's expense to an authorized Adaptec service facility or to Adaptec. 2. Repair or replacement parts or products will be furnished on an exchange basis and will either be new or reconditioned. All - Adaptec XHub7 | Quick Start Guide - Page 22
OR CONSEQUENTIAL DAMAGES, INCLUDING WITHOUT LIMITATION LOSS OF DATA, ARISING FROM BREACH OF ANY EXPRESS OR IMPLIED WARRANTY ARE NOT THE RESPONSIBILITY OF ADAPTEC AND, TO THE EXTENT PERMITTED BY LAW, ARE HEREBY EXCLUDED BOTH FOR PROPERTY DAMAGE, AND TO THE EXTENT NOT UNCONSCIONABLE, FOR PERSONAL - Adaptec XHub7 | Quick Start Guide - Page 23
back-up purposes, provided you reproduce Adaptec's copyright proprietary legends. Notwithstanding the foregoing additional copy of the Software may be made to support such use. As used in this license, the not use the Software in a computer service business, including in time sharing applications. - Adaptec XHub7 | Quick Start Guide - Page 24
related documentation) together with all copies or modifications in any form. Adaptec will have the right to terminate our license immediately if you fail or workmanship under normal use and service for a period of thirty (30) days from the date of delivery to you. ADAPTEC AND ITS LICENSORS DO NOT - Adaptec XHub7 | Quick Start Guide - Page 25
ITS LICENSORS BE LIABLE TO YOU FOR ANY INCIDENTAL, CONSEQUENTIAL OR INDIRECT DAMAGES, INCLUDING ANY LOST PROFITS, LOST SAVINGS, OR LOSS OF DATA, EVEN IF ADAPTEC OR A LICENSOR HAS BEEN ADVISED OF THE POSSIBILITY OF SUCH DAMAGES, OR FOR ANY CLAIM BY ANY OTHER PARTY. Some states do not allow the - Adaptec XHub7 | Quick Start Guide - Page 26
gives its express consent, including an express waiver of the terms of this Agreement, in writing signed by an officer of Adaptec. You assume full responsibility for the use of the Software and agree to use the Software legally and responsibly. This Agreement shall be governed by - Adaptec XHub7 | Quick Start Guide - Page 27
, and if not installed and used in accordance with the instruction manual, may cause harmful interference to radio communications. However, there received, including interference that may cause undesired operation. Adaptec, Inc. XHub 4/XHub 4+/XHub 7+ Tested to Comply With FCC Standards FOR HOME - Adaptec XHub7 | Quick Start Guide - Page 28
European Union Compliance Statement This Information Technology Equipment has been tested and found to comply with the following European directives: EMC Directive 89/336/EEC, as amended by 92/31/EEC and 93/68/EEC EN50081-1 (1992) EN55022 (1994) Class B EN50082-1 (1992) EN61000-4-2 (1998) EN61000 - Adaptec XHub7 | Quick Start Guide - Page 29
R Adaptec, Inc. 691 South Milpitas Boulevard Milpitas, CA 95035 USA © 2001 Adaptec, Inc. All rights reserved. Adaptec and the Adaptec logo are trademarks of Adaptec, Inc. which may be registered in some jurisdictions. Part Number: 512964-06, Ver. AB LW 10/01
-
 1
1 -
 2
2 -
 3
3 -
 4
4 -
 5
5 -
 6
6 -
 7
7 -
8
-
9
-
10
-
11
-
12
-
13
-
14
-
15
-
16
-
17
-
18
-
19
-
20
-
21
-
22
-
23
-
24
-
25
-
26
-
27
-
28
-
29
 |
 |

R
Adaptec XHub
Quick Start Guide