Adaptec 2200200 Quick Installation Guide
Adaptec 2200200 Manual
 |
View all Adaptec 2200200 manuals
Add to My Manuals
Save this manual to your list of manuals |
Adaptec 2200200 manual content summary:
- Adaptec 2200200 | Quick Installation Guide - Page 1
ADAPTEC STORAGE ENCLOSURE 335SAS QUICK INSTALLATION GUIDE - Adaptec 2200200 | Quick Installation Guide - Page 2
information only and is subject to change without notice. While reasonable efforts have been made in the preparation of this document to assure its accuracy, Adaptec, Inc. assumes no liability resulting from errors or omissions in this document, or from the use of the information contained herein - Adaptec 2200200 | Quick Installation Guide - Page 3
: North America ● Visit our Web site at www.adaptec.com. ● Search the Adaptec Support Knowledgebase (ASK) at ask.adaptec.com for articles, troubleshooting tips, and frequently asked questions for your product. ● For information about Adaptec's support options, call +1 408-957-2550, 24 hours per - Adaptec 2200200 | Quick Installation Guide - Page 4
, or refund the purchaser's purchase price for the product, provided it is delivered at the purchaser's expense to an authorized Adaptec service facility or to Adaptec. 2. Repair or replacement parts or products will be furnished on an exchange basis and will either be new or reconditioned. All - Adaptec 2200200 | Quick Installation Guide - Page 5
energy, and if not installed and used in accordance with the instruction manual, may cause harmful interference to radio communications. However, there is received, including interference that may cause undesired operation. Adaptec, Inc. Adaptec 335SAS Tested to Comply With FCC Standards FOR HOME - Adaptec 2200200 | Quick Installation Guide - Page 6
B Information Technology equipment based on VCCI (Voluntary Control Council for Interface). This equipment is designed for home use but it may causes radio frequency interference problem if used too near to a television or radio. Please handle it correctly per this documentation. - Adaptec 2200200 | Quick Installation Guide - Page 7
Adaptec Storage Enclosure 335SAS In This Guide About This Guide 8 Kit Contents 8 Enclosure Features 9 Supported Disk Drives 9 Installation Checklist 10 Before You Begin 10 Installing Disk Drives 11 Removing the Fan (Optional 12 Installing the Enclosure 14 Connecting to a Controller - Adaptec 2200200 | Quick Installation Guide - Page 8
Enclosure 335SAS ● 8 About This Guide This Quick Install Guide provides installation instructions for the Adaptec Storage Enclosure 335SAS (Adaptec 335SAS). It also describes how to monitor enclosure status and maintain the enclosure's components. The Adaptec 335SAS has been extensively tested with - Adaptec 2200200 | Quick Installation Guide - Page 9
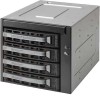
Storage Enclosure 335SAS ● 9 Enclosure Features The Adaptec 335SAS enclosure supports SAS and SATA II disk drives. See page 9 for information on supported disk drives. Other enclosure features are shown in the following figures: J43 - Backplane I/O J35 - Backplane Controller Reset J18 - Buzzer - Adaptec 2200200 | Quick Installation Guide - Page 10
Storage Enclosure 335SAS ● 10 Installation Checklist To install the Adaptec 335SAS enclosure, complete these tasks: ❏ Work through the tasks: 1 Install a SAS or SATA controller and device drivers into your computer. For instructions, refer to the controller's documentation. 2 Remove all components - Adaptec 2200200 | Quick Installation Guide - Page 11
Adaptec Storage Enclosure 335SAS ● 11 Installing Disk Drives Note: To hot-swap a disk drive, see page 21. 1 Press the lever button on the drive carrier, then pull open the lever to release the drive carrier from the enclosure. 2 Place a SAS or SATA disk drive into the driver carrier, then secure it - Adaptec 2200200 | Quick Installation Guide - Page 12
Adaptec Storage Enclosure 335SAS ● 12 3 Hold the drive carrier so that the LEDs are on the right and the lever is fully open. Slide it into - Adaptec 2200200 | Quick Installation Guide - Page 13
Adaptec Storage Enclosure 335SAS ● 13 2 Place a jumper on J42 to disable the fan function. (See the figure on page 9 for jumper location.) You may want to remove and replace the back cover to gain access to the jumper(s) or other components. 3 Continue with Installing the Enclosure on page 14. - Adaptec 2200200 | Quick Installation Guide - Page 14
Adaptec Storage Enclosure 335SAS ● 14 Installing the Enclosure 1 Turn off your server and disconnect the power cord. 2 Open the cabinet, following the manufacturer's instructions. 3 Discharge any static electricity build-up by touching a grounded metal object, such as the exposed metal parts on the - Adaptec 2200200 | Quick Installation Guide - Page 15
Storage Enclosure 335SAS ● 15 Connecting to a Controller To connect the Adaptec 335SAS enclosure, follow the instructions for your Adaptec SAS or SATA controller. Connecting One Enclosure to a SATA Controller Using an internal SATA fan-out cable, connect the enclosure to the SATA ports on - Adaptec 2200200 | Quick Installation Guide - Page 16
Adaptec Storage Enclosure 335SAS ● 16 Connecting Two Enclosures to a SATA Controller Note: This procedure is for SATA controllers that support more than 4 disk drives. Using 2-internal SATA fan-out cables, connect each enclosure to the SATA ports on the controller. AAR-2820SA 0 12 3 4 5 6 7 - Adaptec 2200200 | Quick Installation Guide - Page 17
Adaptec Storage Enclosure 335SAS ● 17 Connecting One Enclosure to a SAS Controller Using an page 18. Connecting Two Enclosures to a SAS Controller Note: This procedure is for SAS controllers that support more than 4 disk drives. Using two internal SAS cables, connect each enclosure to a SAS port - Adaptec 2200200 | Quick Installation Guide - Page 18
on the enclosure. 2 SATA controllers-Connect both the LED cable and the I2C cable to the controller and enclosure. When connecting more than one Adaptec 335SAS enclosure, the two I2C cables must be daisy chained from one enclosure to the other. For help locating connectors on the enclosure, see the - Adaptec 2200200 | Quick Installation Guide - Page 19
Adaptec Storage Enclosure 335SAS ● 19 These LEDs are located on the front of the enclosure (see the figure on page 9) - defect or the fan power is not connected while J42 is set. Monitoring Drive Status Each disk drive in the Adaptec 335SAS enclosure has two LEDs. Power/ Activity LED Failure LED - Adaptec 2200200 | Quick Installation Guide - Page 20
running which controls the LED Power/Activity. Failed disk drives can be hot-swapped. See page 21 for instructions. Solving Problems If you have trouble installing or using your Adaptec 335SAS enclosure, work through this list of suggestions: ● Ensure that all internal cables are fully and properly - Adaptec 2200200 | Quick Installation Guide - Page 21
's manual. Note: The ASM software application is included with an Adaptec SATA or SAS controller or through the Adaptec website. Hot-swapping Disk Drives Failed disk drives can be hot-swapped (replaced while the server is powered on). Follow the disk drive manufacturer's installation instructions - Adaptec 2200200 | Quick Installation Guide - Page 22
Adaptec Storage Enclosure 335SAS ● 22 Technical Specifications Occupancy Capacity Dimensions (H x W x D) Cooling system System monitoring Three 5.25 inch drive bays ■ Four SAS/SATA 3.5 inch disk drives ■ One - Adaptec 2200200 | Quick Installation Guide - Page 23
R Adaptec, Inc. 691 South Milpitas Boulevard Milpitas, CA 95035 USA ©2005 Adaptec, Inc. All rights reserved. Adaptec and the Adaptec logo are trademarks of Adaptec, Inc. which may be registered in some jurisdictions. Part Number: CDP-00105-01-A, Rev. A JB 09/05
-
 1
1 -
 2
2 -
 3
3 -
 4
4 -
 5
5 -
 6
6 -
 7
7 -
8
-
9
-
10
-
11
-
12
-
13
-
14
-
15
-
16
-
17
-
18
-
19
-
20
-
21
-
22
-
23
 |
 |

A
DAPTEC
S
TORAGE
E
NCLOSURE
335SAS
Q
UICK
I
NSTALLATION
G
UIDE