Acer PREDATOR X27 Quick Start Guide
Acer PREDATOR X27 Manual
 |
View all Acer PREDATOR X27 manuals
Add to My Manuals
Save this manual to your list of manuals |
Acer PREDATOR X27 manual content summary:
- Acer PREDATOR X27 | Quick Start Guide - Page 1
DP Note: Audio output is only for audio output model. Please check user manual for more instruction. PLEASE READ THIS BEFORE SETTING UP YOUR MONITOR. To ensure that your PC can support this NVIDIA® G-SYNCTM HDR monitor, download and install the latest graphics driver and firmware for your GEFORCE - Acer PREDATOR X27 | Quick Start Guide - Page 2
is active, press this button to select scenario mode or / game mode . 4 Function key a. Press to view Main page.Press . Grey indicates inoperable. Note: Acer monitor is purposed for video and visual installed and used in accordance with the instructions, may cause harmful interference to radio - Acer PREDATOR X27 | Quick Start Guide - Page 3
city office, your household waste disposal service or the shop where you purchased Environmental Considerations Dimensions Weight (N. W.) Mechanism spec External Controls: Functions TFT Color LCD notice. Find manuals and other documents for your Acer product on the official Acer support website.
-
 1
1 -
 2
2 -
 3
3
 |
 |

English
Acer LCD Monitor Quick Start Guide (QSG)
Important safety instructions
Please read the following instructions carefully.
1.
To clean the LCD monitor screen:
•
Turn off the LCD monitor and unplug the power cord.
•
Spray a non-solvent cleaning solution onto a rag and clean the screen gently.
2.
Do not place the LCD monitor near a window. Exposing the monitor to rain, moisture or sunlight can severely damage
it.
3.
Do not apply pressure to the LCD screen. Excessive pressure may cause permanent damage to the display.
4.
Do not remove the cover or attempt to service this unit yourself. An authorized technician should perform servicing of
any nature.
5.
Store the LCD monitor in a room with a temperature of -20° to 60° C (-4° to140° F). Storing the LCD monitor outside
this range may result in permanent damage.
6.
Immediately unplug your monitor and call an authorized technician if any of the following circumstances occur:
•
Monitor-to-PC signal cable is frayed or damaged.
•
Liquid spills onto the LCD monitor or the monitor is exposed to rain.
•
The LCD monitor or case is damaged.
Attaching the monitor to the base
1.
Remove the monitor from the packaging.
2.
Attach the footstand to the base. (for selected models).
3.
Turn clockwise to lock. Ensure that the base in locked onto the stand. (for selected models)
4.
Secure the base to the stand by turning the screw using the intergrated tab or a suitable coin. (for selected models)
Connecting your monitor to a computer
1.
Turn off your computer and unplug your computer's power cord.
2.
Connect the signal cable to the DP (optional) and/or HDMI (optional)
input socket of the monitor, and the DP (optional) and/or HDMI
(optional) output socket of the graphics card on the computer.
3.
Connect the USB Cable(Optional)
Connect the USB 3.0 cable to port for fast charge.
Connect the USB 3.0 cable to port.
4.
Insert the monitor power cable into the power port at the back of the
monitor.
5.
Connect the power adapter and power cord to the monitor, then to a
properly grounded AC outlet.
Note: Audio output is only for audio output model. Please check user
manual for more instruction.
USB
USB
DP
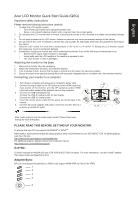
PLEASE READ THIS BEFORE SETTING UP YOUR MONITOR.
To ensure that your PC can support this NVIDIA
®
G-SYNC
TM
HDR monitor, download and install the latest graphics driver and firmware for your GEFORCE
®
GTX 10 Series
graphics
card from this link:
For additional support, please contact Acer Customer Care at
G-SYNC :
G-SYNC requires an NVIDIA GeForce GTX 1070 BOOST GPU or higher. For more information, visit the nVidia
®
website:
AdaptiveSync:
DP port could support AdaptiveSync, HDMI could support HDMI-VRR (for Xbox One VRR).
1
2
3
4
5