Frigidaire FAFW3801LW Wiring Diagram (All Languages)
Frigidaire FAFW3801LW Manual
 |
UPC - 012505383175
View all Frigidaire FAFW3801LW manuals
Add to My Manuals
Save this manual to your list of manuals |
Frigidaire FAFW3801LW manual content summary:
- Frigidaire FAFW3801LW | Wiring Diagram (All Languages) - Page 1
and a letter or two letters. The control will beep and the Door Lock, Wash, Rinse, and Final Spin indicator lights will flash. Troubleshoot the problem by using charts on the pages 3-5. Quick Check If there is no error displayed and the washer momentarily starts then turns back off: 1. Listen - Frigidaire FAFW3801LW | Wiring Diagram (All Languages) - Page 2
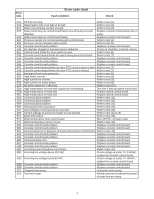
off NTC - rpl water valve. E75 Water temperature sensor circuit. Refer to test (12). E82 Console control board problem. Replace console control board. E83 Console control board problem. Replace console control board. E91 Comunnication error between UI board and console control board. Refer to - Frigidaire FAFW3801LW | Wiring Diagram (All Languages) - Page 3
(4). Yes. Go to step (3). No. Replace the control board. No. Replace water valve assembly. Yes. Check wiring to valve assembly for shorts. If wiring is good, replace the control board. Yes. Problem solved. No. Replace the control board. No. Close the door. Yes. Go the step (2). 0 volts. Check the - Frigidaire FAFW3801LW | Wiring Diagram (All Languages) - Page 4
. Correct wiring problem. the control board and the speed control board. Wiring good. Replace the control board. If the problem is not corrected, replace the speed control board. Test 12: 1. Check the resistance of the water valve NTC. Is it No. Replace the water inlet valve assembly around 50K - Frigidaire FAFW3801LW | Wiring Diagram (All Languages) - Page 5
une lettre ou de deux lettres. La commande retentit et les voyants lumineux Door Lock, Wash, Rinse, et Final Spin clignotent. Vérifier la source du détectée. "LOC" - commande de verrouillage activée. "PAU" - cycle interrompu. Pour annuler le dernier code d'erreur en mémoire : • Tournez le bouton de - Frigidaire FAFW3801LW | Wiring Diagram (All Languages) - Page 6
à l'intérieur lorsque le tambour tourne. 8. Tournez le bouton de programme de 7 clics à partir de la position démarrer. La commande signale le dernier code d'erreur. Quitter le mode diagnostic Il existe deux options pour quitter le mode test de diagnostic et retourner au fonctionnement normal de la - Frigidaire FAFW3801LW | Wiring Diagram (All Languages) - Page 7
Tableau de code d'erreur Code Défectuosité d'erreur Vérification E11 Durée de remplissage trop longue Référer au test (1) E13 Eau fuyant dans le tambour ou air fuyant dans la soufflette Référer - Frigidaire FAFW3801LW | Wiring Diagram (All Languages) - Page 8
Test Test Vérification Test 1: 1. Est-ce que le flux d'entrée d'eau est normal ? Correction Oui. Passez à l'étape (4). Non. Passez à l'étape (2). 2. Est-ce que les robinets d'entrée d'eau sont ouverts ? Non. Ouvrez les robinets d'eau. Oui. Passez à l'étape (3) 3. Est-ce que la pression d'entr - Frigidaire FAFW3801LW | Wiring Diagram (All Languages) - Page 9
tension. Test 7: 1. Commencez le test de diagnostic. Tournez le bouton de programmation de huit positions vers la droite à partir de la position de départ. Test 8: 1. Débranchez le raccord du moteur et mesurez la résistance des broches 4 et 5 du moteur. Non. Fermez la porte. Oui. Passez à l'étape - Frigidaire FAFW3801LW | Wiring Diagram (All Languages) - Page 10
(ciclo sanitario) "do" o "dr" - problema con la puerta. "Err" - se ha detectado un error. "LOC" - la traba de control está activada. "PAU" - el ciclo se ha interrumpido. Para borrar el último código de error guardado: • Gire la Perilla de Programa hasta la posición inicio, Centrifugado Solamente - Frigidaire FAFW3801LW | Wiring Diagram (All Languages) - Page 11
sus manos adentro cuando está rotando el tambor. 8. Gire la perilla de programa siete (7) veces desde la posición de inicio. El control señalará el último código de error. Cómo Salir del Modo Diagnóstico Hay dos opciones para salir del modo Prueba de Diagnóstico y volver la lavadora a operaci - Frigidaire FAFW3801LW | Wiring Diagram (All Languages) - Page 12
Circuito del sensor de temperatura de lavado. Ver prueba (12). E82 Problema de control de la consola. Cambiar el tablero de control. E83 Problema de control de la consola. Cambiar el tablero de control. E91 Error de comunicación entre el tablero de interfaz de usuario y Ver prueba (16) el - Frigidaire FAFW3801LW | Wiring Diagram (All Languages) - Page 13
Vaya al paso (2). No. Vaya al paso (4). 2. ¿Entra agua de manera continua en la lavadora? Sí. Vaya al paso (3). No. Cambie el tablero de control. 3. Corte la alimentación de la lavadora. ¿Deja de entrar agua? 4. Cambie el interruptor de presión. ¿Se corrigió el problema? No. Cambie la válvula - Frigidaire FAFW3801LW | Wiring Diagram (All Languages) - Page 14
el interruptor de la puerta. 120 voltios. Cambie el tablero de control. 1. Inicie la prueba de diagnóstico. Gire la perilla del programa el motor. Si la lectura está entre 80 y 130 Ohmios, cambie el tablero de control de velocidad. Si la lectura del medidor no está entre 80 y 130 Ohmios, cambie - Frigidaire FAFW3801LW | Wiring Diagram (All Languages) - Page 15
- Frigidaire FAFW3801LW | Wiring Diagram (All Languages) - Page 16
-
 1
1 -
 2
2 -
 3
3 -
 4
4 -
 5
5 -
 6
6 -
 7
7 -
8
-
9
-
10
-
11
-
12
-
13
-
14
-
15
-
16
 |
 |

Washer Tech Data Sheet
This information is intended for Qualified Technicians Only.
CAUTION: DISCONNECT ELECTRICAL CURRENT BEFORE SERVICING
Please Return This Sheet to its Envelope in the Product for Future Reference
Contents
Page
Error code explanation
..........................................
1
Diagnostics
...........................................................
1
Error Code Chart
...................................................
2
Tests
..................................................................
3-4
Français
.............................................................
5-8
Español
............................................................
9-14
6000 Wiring Diagram
...........................................
15
7000 Wiring Diagram
...........................................
16
READING ERROR CODES:
1. Wake the washer by pressing any button.
2. Wait 5 seconds.
3. Press and
HOLD
the
Start/Pause
and
Cancel
buttons simultaneously.
As long as the buttons are held, the failure code will appear in the display as an
E
followed by two numbers, a number and a letter or two letters. The
control will beep and the
Door Lock, Wash, Rinse,
and
Final Spin
indicator lights will flash.
T
roubleshoot the problem by using chart
s on the p
ages 3-5.
Quick Check
I
f there is no error displayed and the washer momentarily starts then turns back off:
1. Listen for a relay closure inside the motor control shortly after the
Start/Pause
key is pressed. If this happens, the motor control has power.
2. Check the 5 pin connector wiring between the console control and the motor control.
NOTE:
During normal operation, the display may show:
“
cd
” - cool down (Sanitary cycle)
“
do
” or “
dr
” - door problem.
“
Err
” - an error has been detected.
“
LOC
” - control lock is activated.
“
PAU
” - cycle has been interrupted.
To clear latest stored error code:
•
Turn the
Program Knob
to the
st
art position,
Spin Only.
•
Press
Start/Pause
to start the cycle and save it.
•
Press
Cancel
to stop the cycle and turn off the LEDs.
•
Press
Cancel
again to turn on the LEDs.
•
Within 5 seconds, press and hold the
Option
and
Start/Pause
buttons until LEDs start sequentially chasing, then release buttons.
•
Turn the program knob clockwise 7 clicks from the
S
t
art Position. The control will signal the last error code.
•
Press and hold the
Options
and
Start/Pause
buttons for 3 seconds. The code will be cleared.
•
Exit Diagnostic Mode to return the washer to normal operation.
a) Unplug the power cord, wait 5-8 seconds, then reconnect the power cord
OR
b) Turn the program knob clockwise 2 or 3 clicks after the
S
t
art Position. Press
Options
and
Start/Pause
buttons together for a few seconds
until wash cycle LEDs appear.
Diagnostic Test
The diagnostic test is used to check individual component function only.
T
O ST
ART THE TEST
:
•
Turn the
Program Knob
to the
st
art position,
Spin Only.
•
Press
Start/Pause
to start the cycle and save it.
•
Press
Cancel
to stop the cycle and turn off the LEDs.
•
Press
Cancel
again to turn on the LEDs.
•
Within 5 seconds, press and hold the
Options
and
Start/Pause
buttons until LEDs start sequentially chasing, then release buttons.
1.
All the LEDs will sequentially light. Pressing a button below a light cluster will light all the LEDs in that cluster at one time to confirm functionality.
2. Turn the program knob (1) click clockwise from the start position. The hot water solenoid will activate and hot water should enter through the
detergent compartment.
3. Turn the program knob (2) clicks from the start position. The bleach water solenoid will activate and cold water should enter through the bleach
compartment.
4. Turn the program knob (3) clicks from the start position. The bleach and the wash water solenoids will activate and cold water should enter
through the softener compartment.
5.
Turn the program knob (4) clicks from the start position. The door lock solenoid will deactivate and the loading door can be opened. When the door
is opened, the drum light should turn on.
6. Turn the program knob (5) clicks from the start position. The washer will fill and tumble. Once tumbling has started, the Boost Heater (if so
equipped) will turn on.
7.
Turn the program knob (6) clicks from the start position. The drain pump & door lock solenoid will activate and the washer will operate in high spin.
SAFETY
W
ARNING:
If power is removed during this test, the door can be opened. To prevent injury,
DO NOT
put your hands inside when the tub
is rotating.
8. Turn the program knob (7) clicks from the start position. The control will signal the last error code.
Exiting Diagnostic Mode
There are two options for exiting the Diagnostic Test mode and returning the washer to normal operation:
a) Unplug the power cord, wait 5-8 seconds, then reconnect the power cord
OR
b) Turn the program knob clockwise 2 or 3 clicks after the
start position. Press
Options
and
Start/Pause
buttons together for a few seconds until
wash cycle LEDs appear.
If a situation arises where you cannot exit the Diagnostic mode as described above and the bank of 5 LED’s on the right end remain ON
regardless of Program Knob position, a combination of pushed buttons may have caused the control to enter a special factory test
mode. Disconnect power to reset the control to return washer to normal operation is this occurs.
137063900B (0911)